SmartTaskOps Support
How to Create a Customer
To start the customer creation flow correctly, the first action is to sign in to SmartTaskOps and open the POS module. This makes sure you are in the right workspace before creating the customer profile, linking an order, and continuing tickets without losing context.
Step 1
After login, click the POS tab

- Sign in using your owner account or an authorized staff account.
- In the top navigation bar, locate the POS tab.
- Click POS to open the point-of-sale workspace and customer creation area.
- Confirm you are inside the POS module before moving to the next customer setup step.
Step 2
Click the blue plus (+) to open the add-customer modal
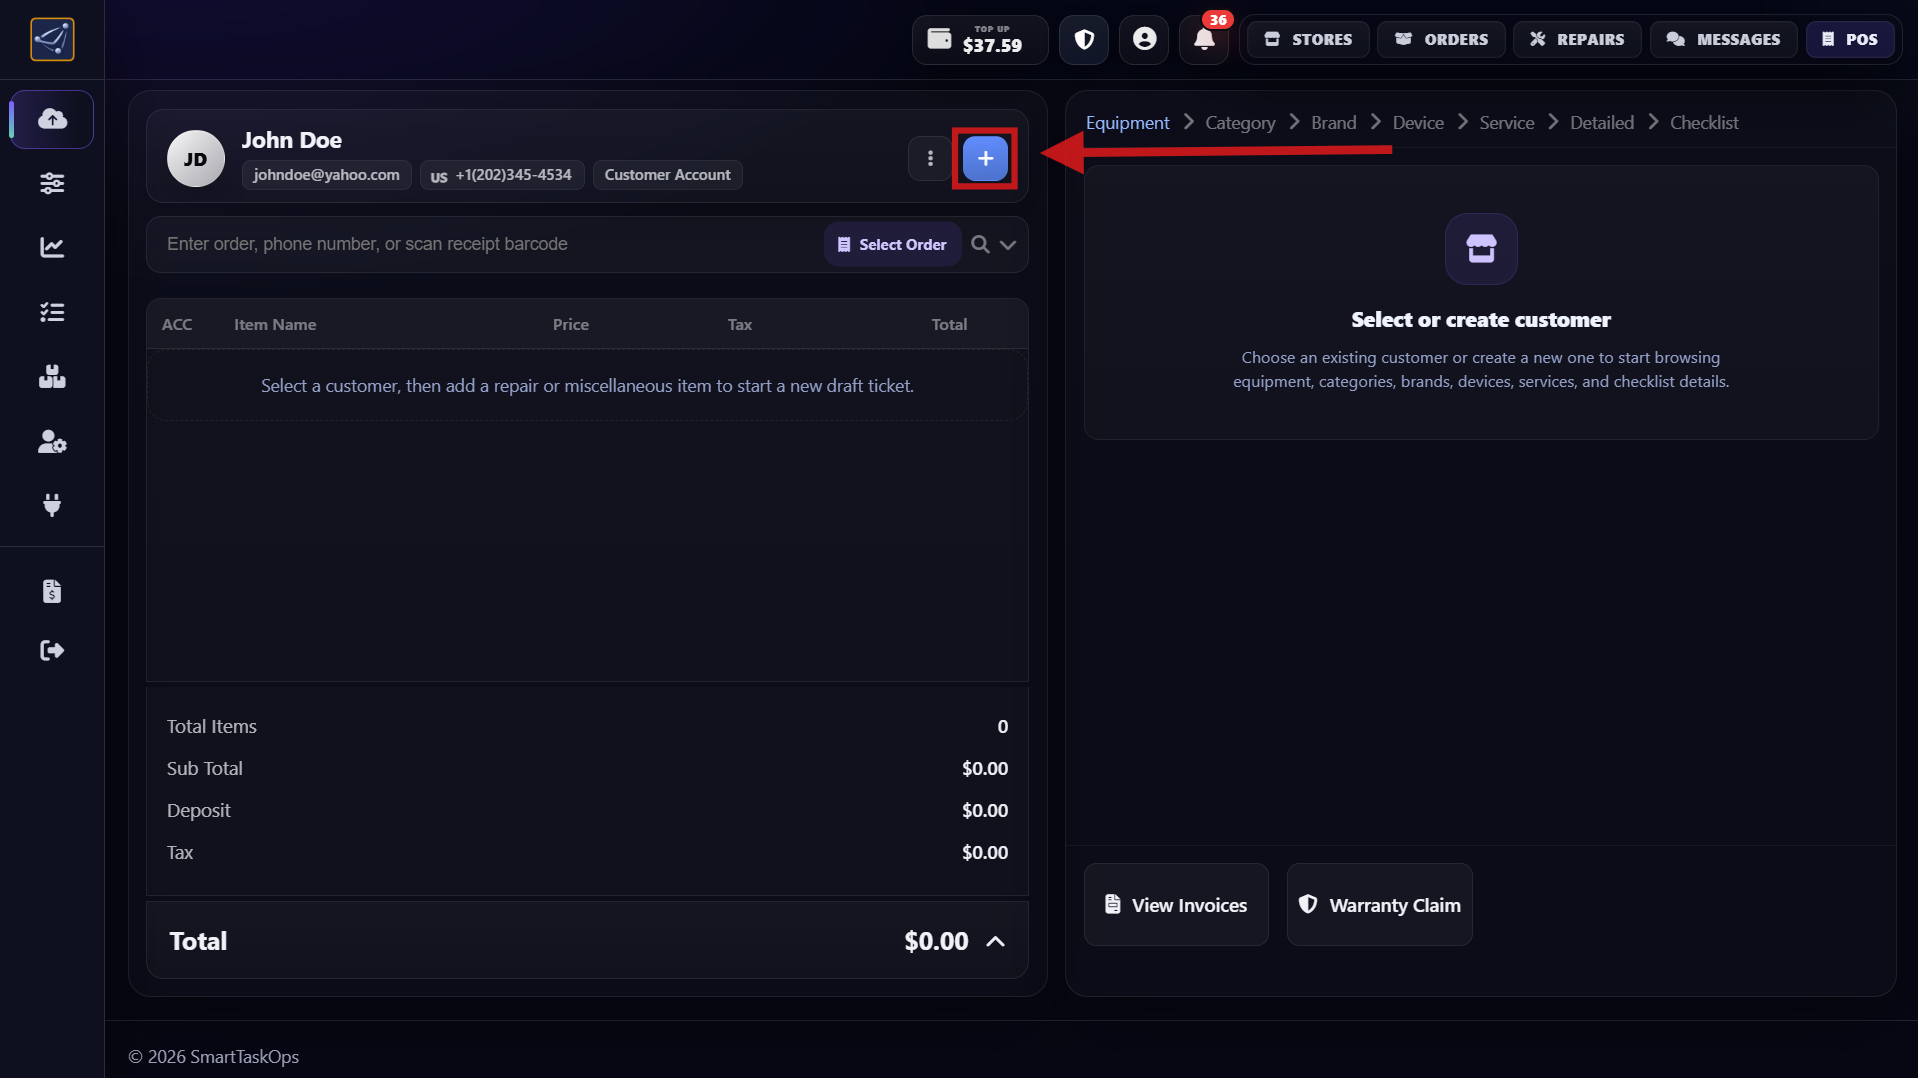
- Stay inside the POS workspace after completing Step 1.
- Locate the blue plus (+) icon used to create a new customer.
- Click the icon once to open the customer creation modal.
- Wait for the modal to fully load before entering customer details in the next step.
Step 3
Enter customer name and phone, then create the customer
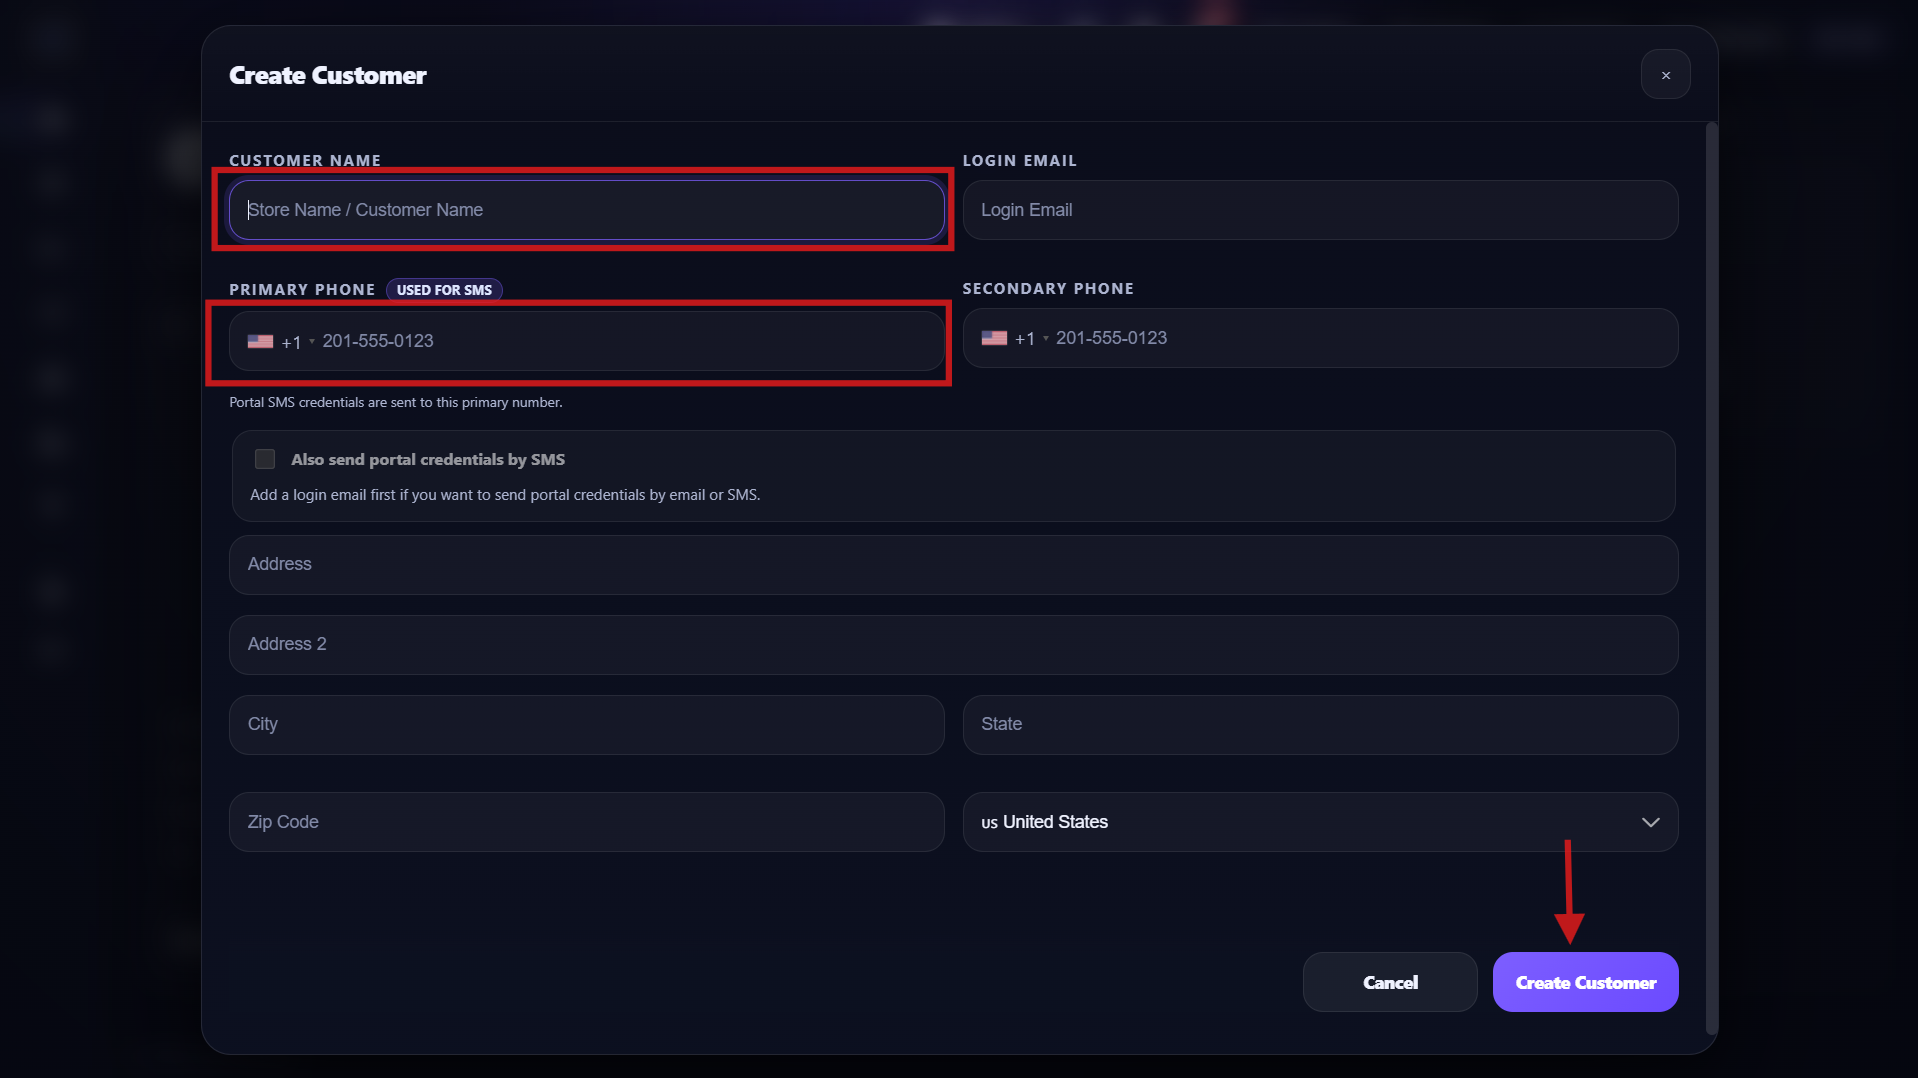
- After clicking the blue plus (+), the add-customer modal opens.
- Type the customer name and phone number.
- These two fields are enough to create a new customer profile quickly.
- Confirm and save to create the customer, then continue with the order flow.
Step 4
After Create Customer, the customer is saved and ready for repairs/products
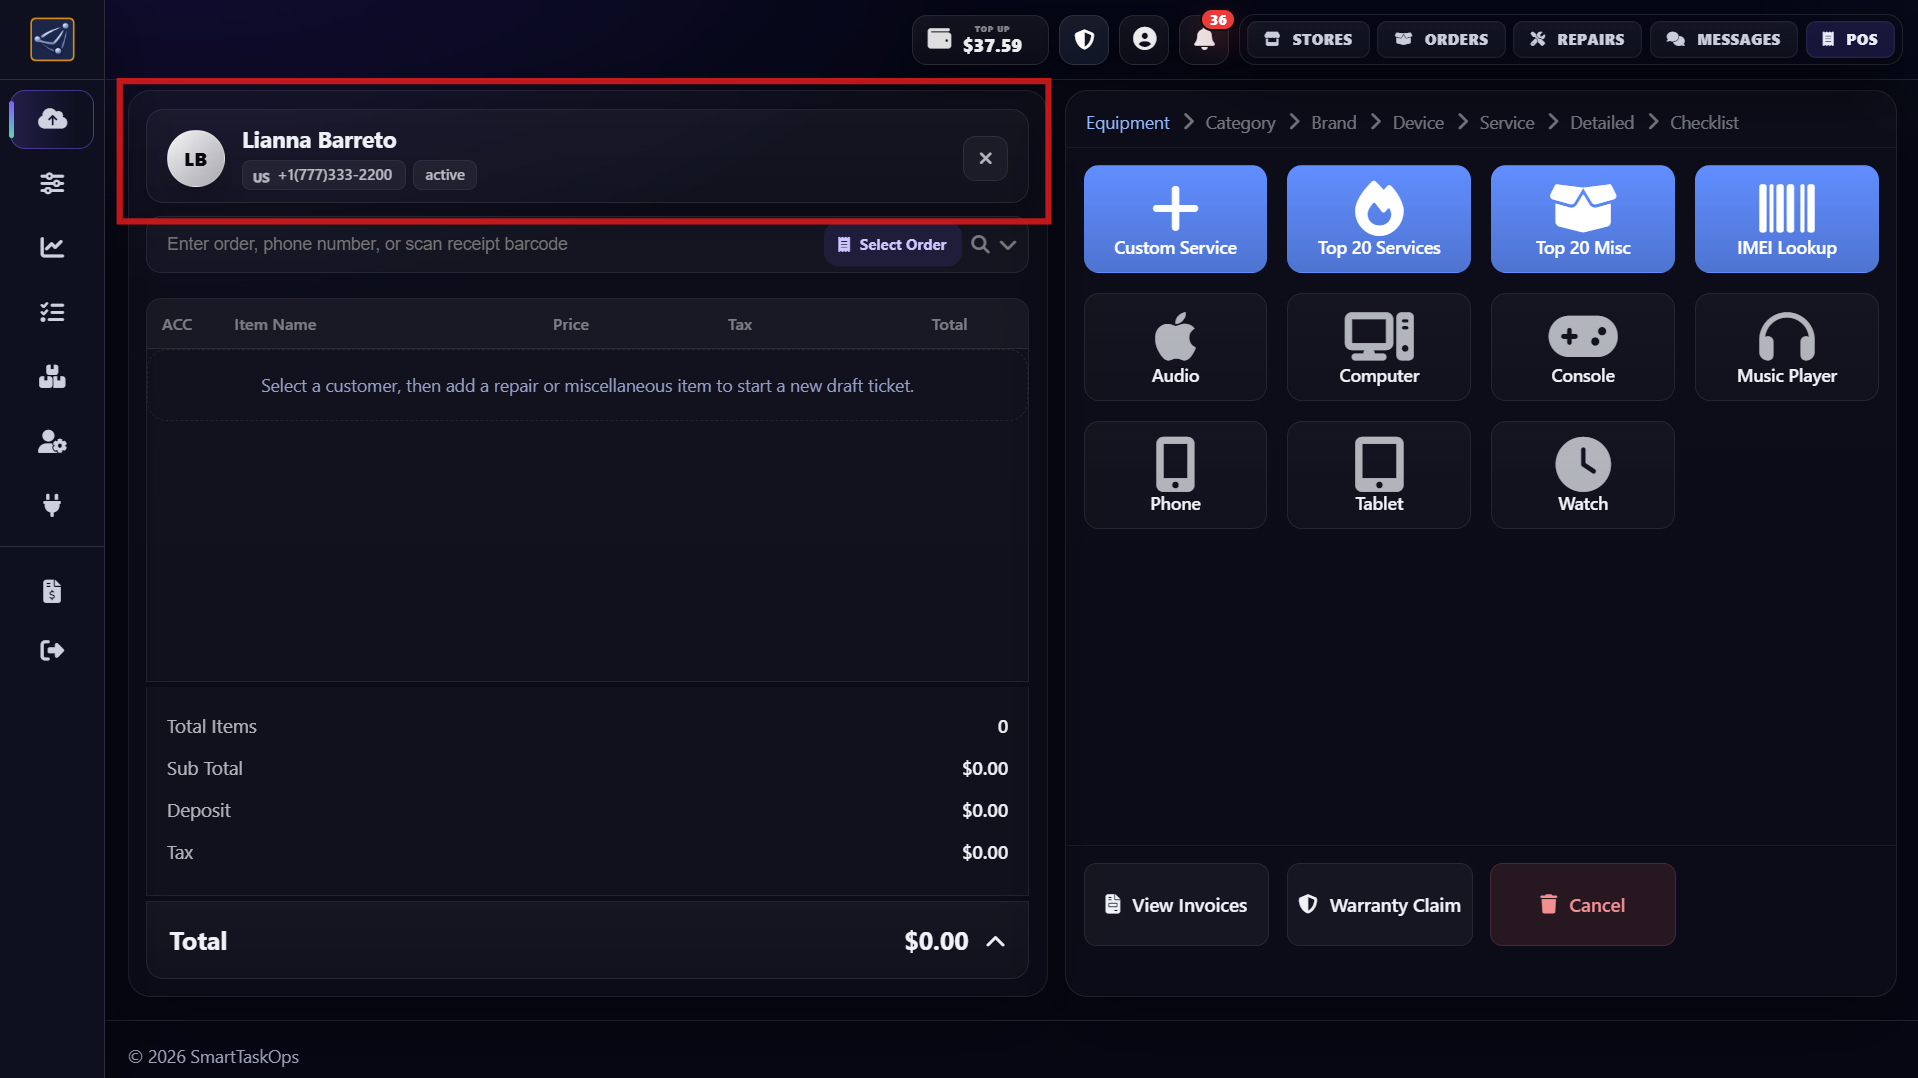
- After entering name and phone, click Create Customer.
- The customer is saved immediately in the database.
- Now the profile is ready for repairs and miscellaneous items.
- You can also add products and continue the order flow.
Step 5
Watch the full customer creation video
- Watch this Bunny.net video to see the full customer creation flow from Step 1 to Step 4.
- The video demonstrates POS access, opening the blue plus (+), and entering customer details.
- Use this walkthrough when training new staff or reviewing the complete process.
- Pause and replay any section to follow each action step by step.
How to Edit a Customer
Use this guide to start editing an existing customer profile in SmartTaskOps.
Step 1
Press the 3 dots to open the customer list
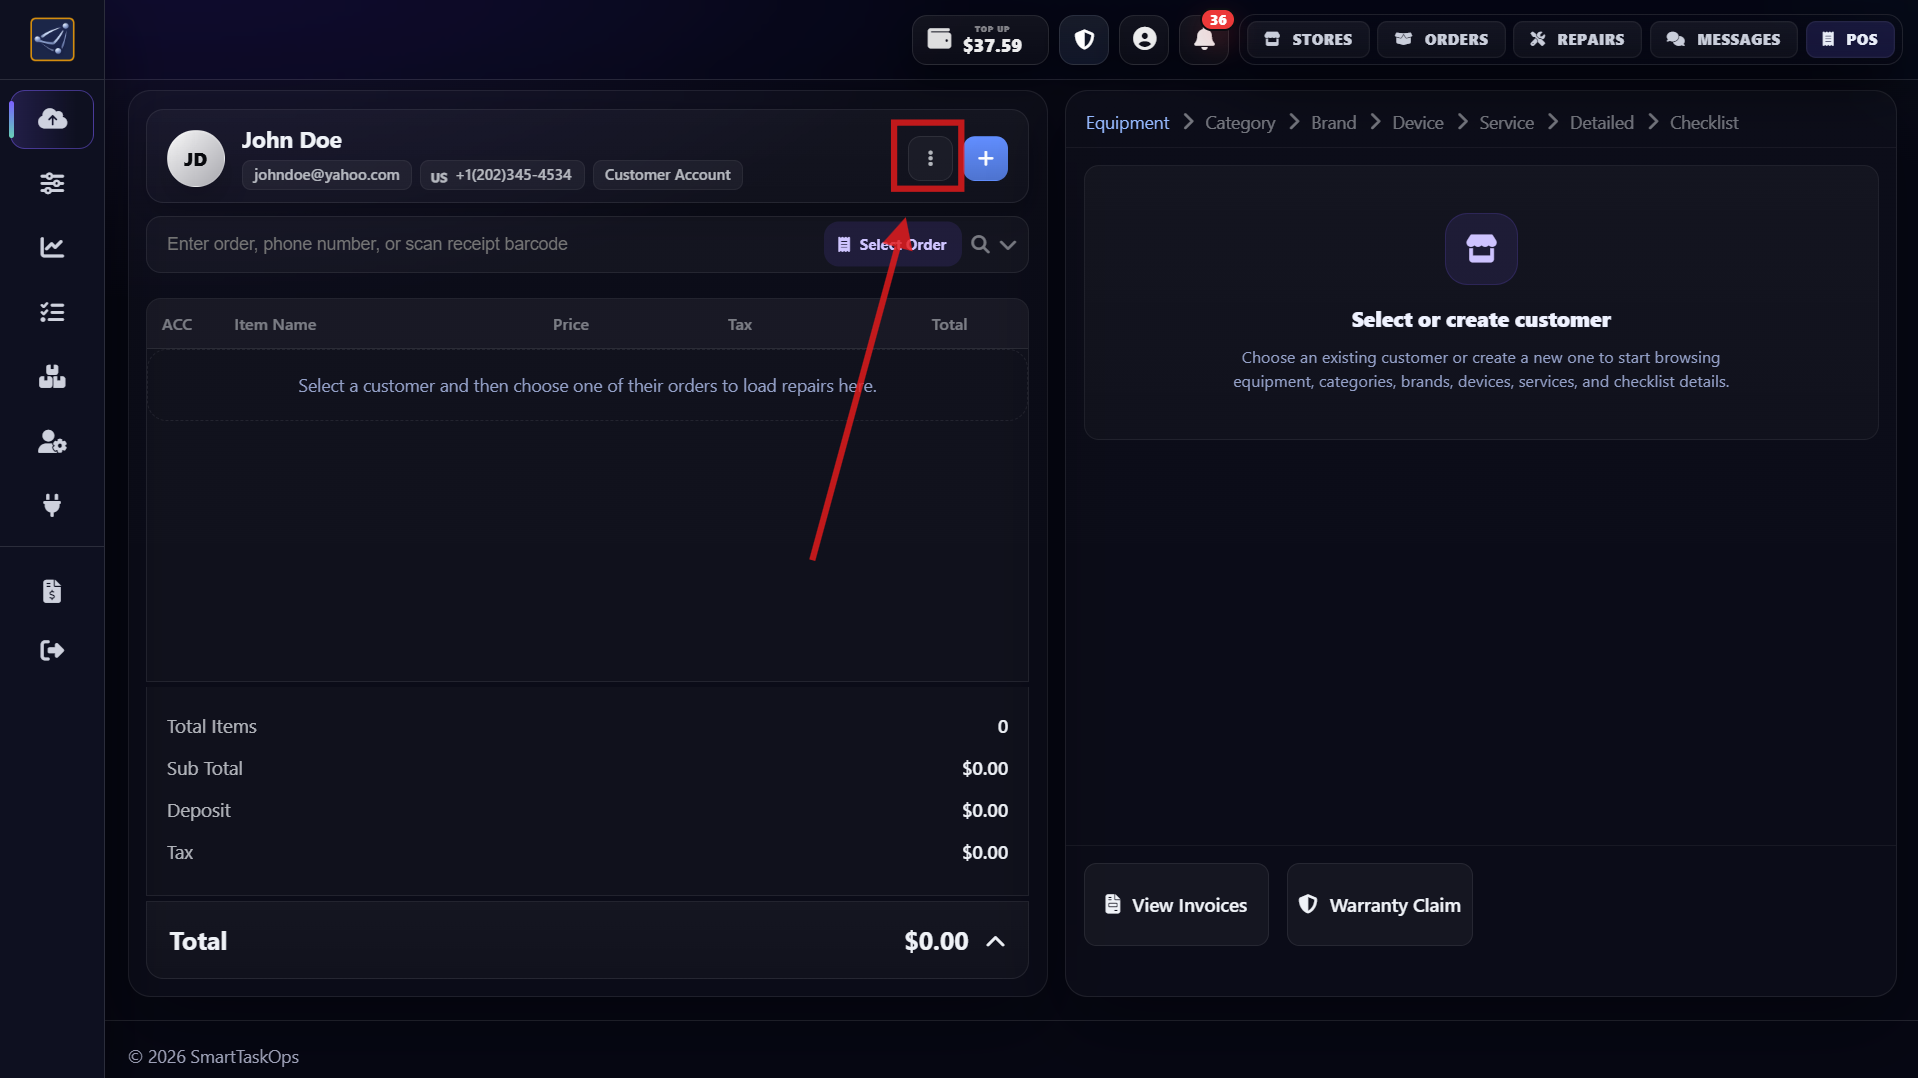
- Press the 3 dots and this opens the section where all customers are listed.
Step 2
Press the pencil icon to edit the customer
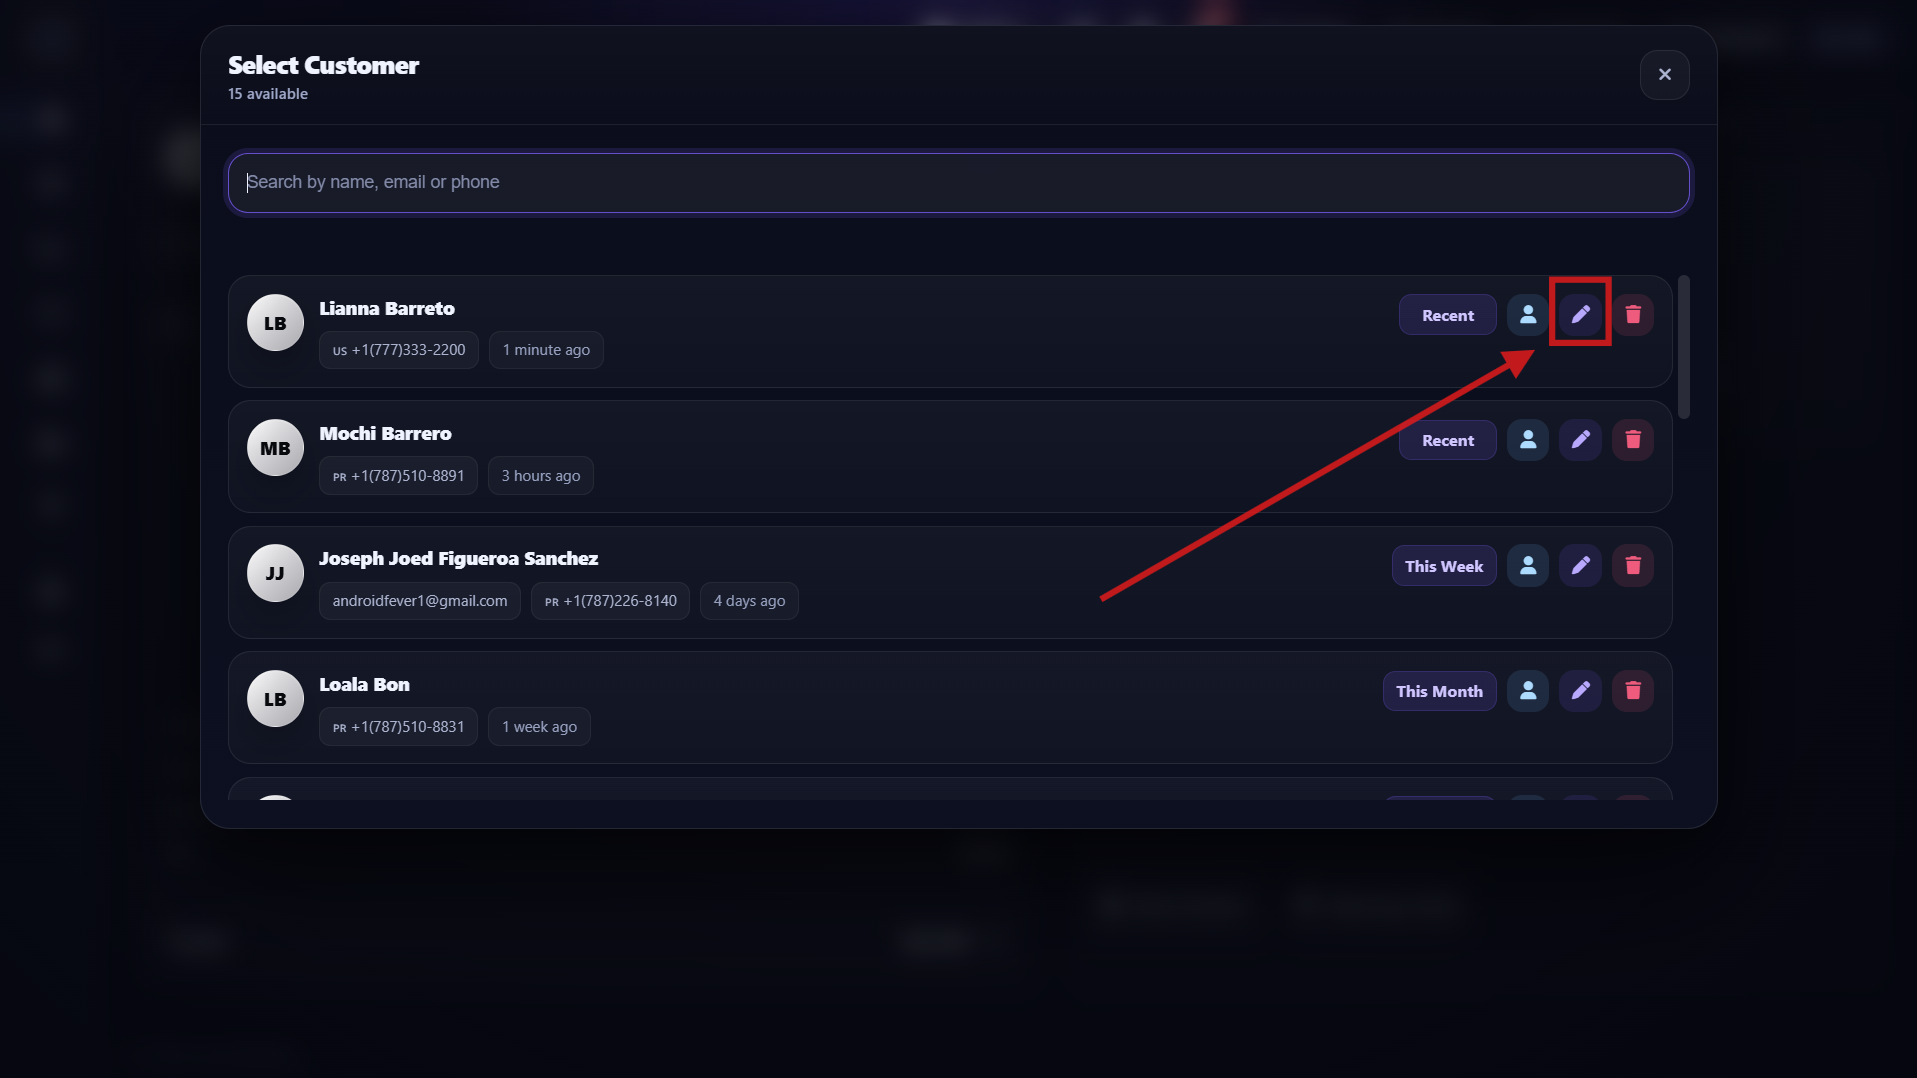
- Once the modal is open and you can see all customers, press the pencil icon to edit customer information. This will open the edit customer panel.
Step 3
Edit the customer and confirm the success message
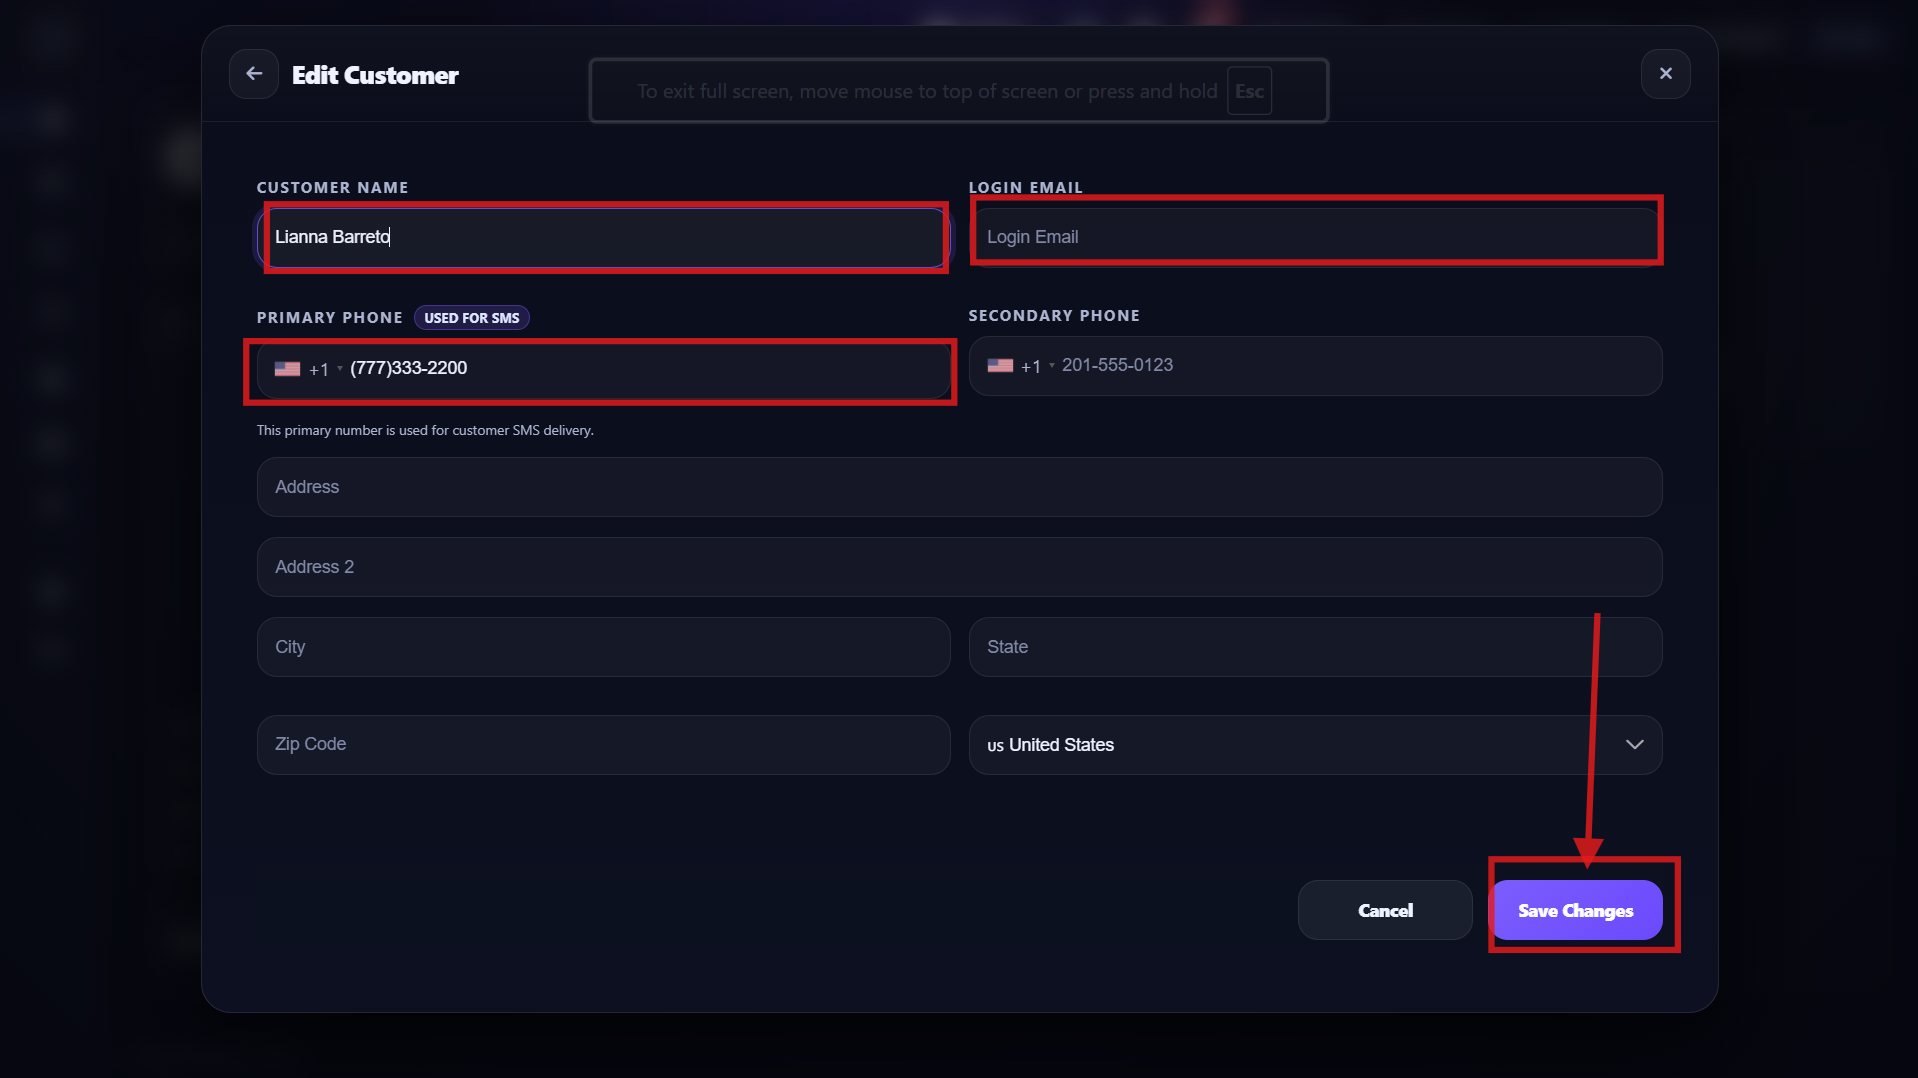
- After pressing the pencil icon, you will see the customer edit area. Once you finish editing and save, a message appears confirming the customer was edited successfully.
Step 4
Press back and confirm the updated customer
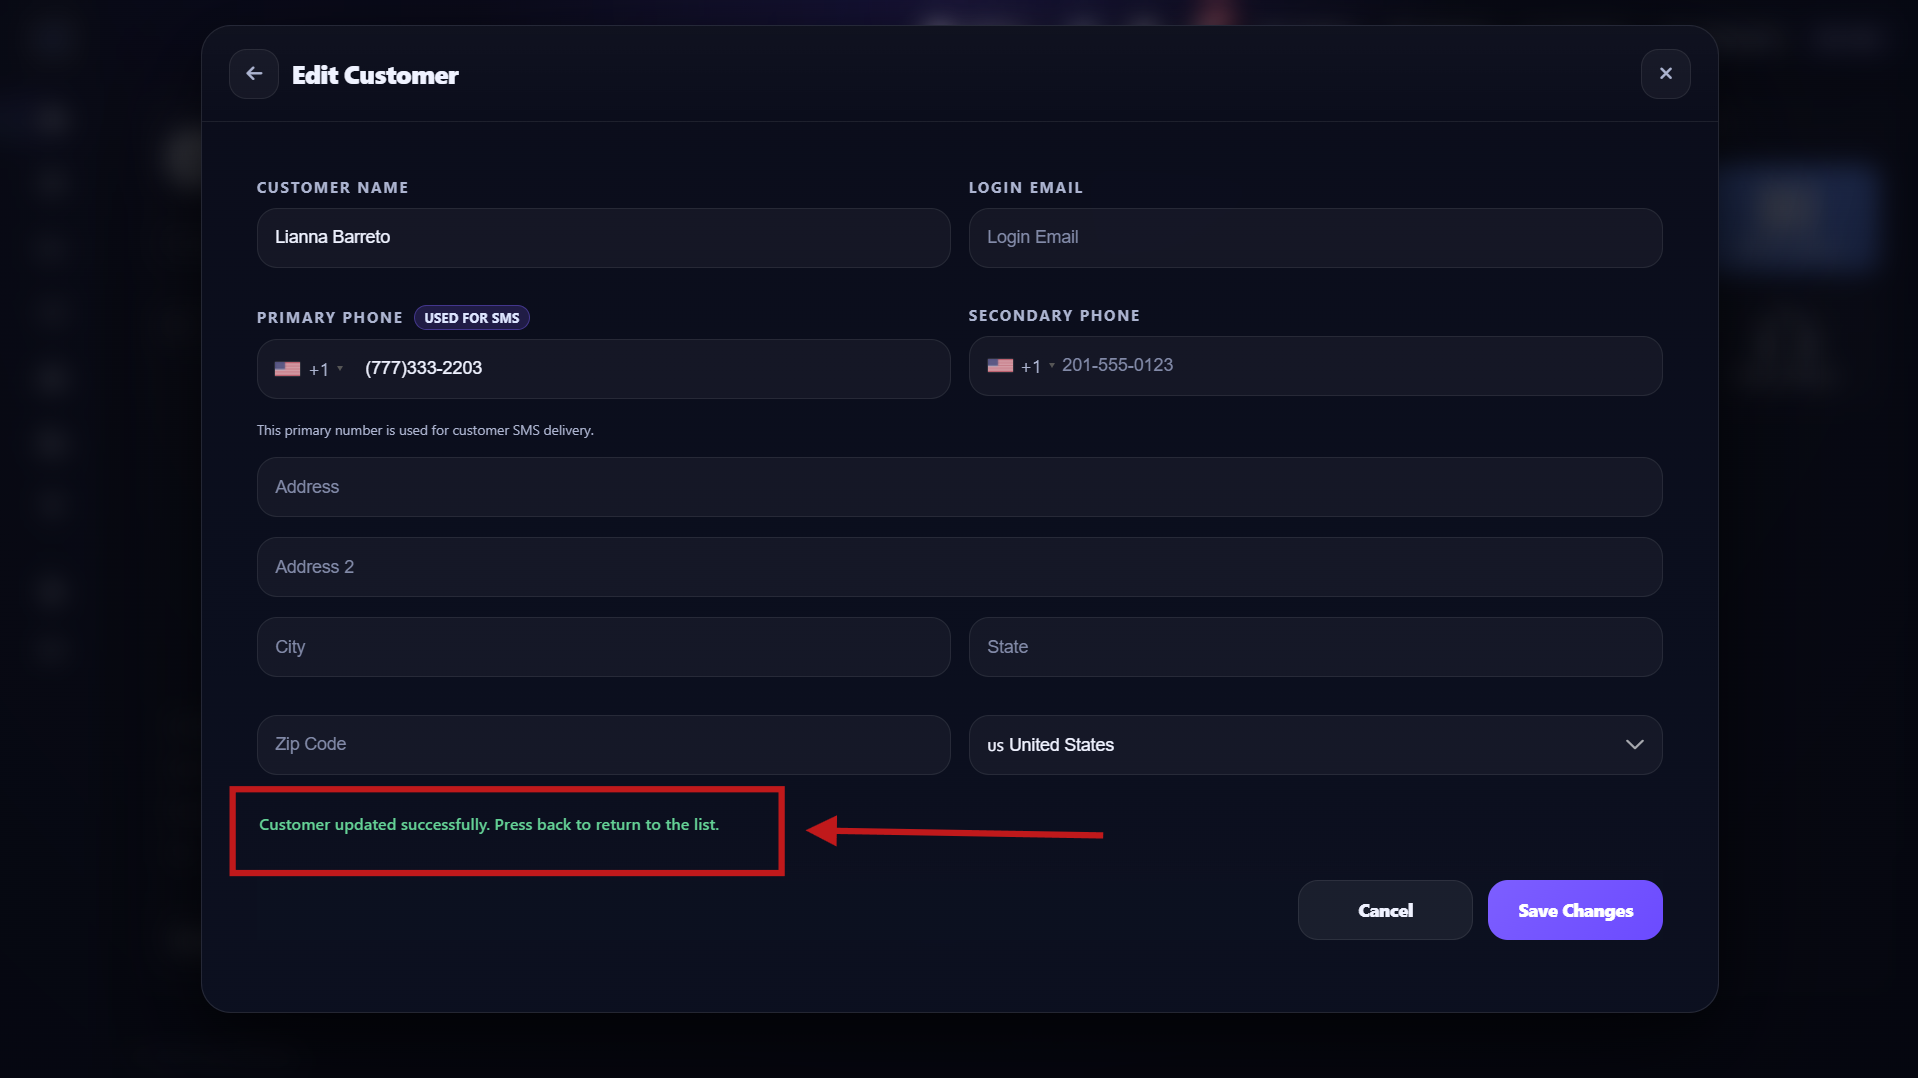
- After editing and pressing back, you can see the customer updated and this message: Customer updated successfully. Press back to return to the list.
Step 5
Press the back button after successful save
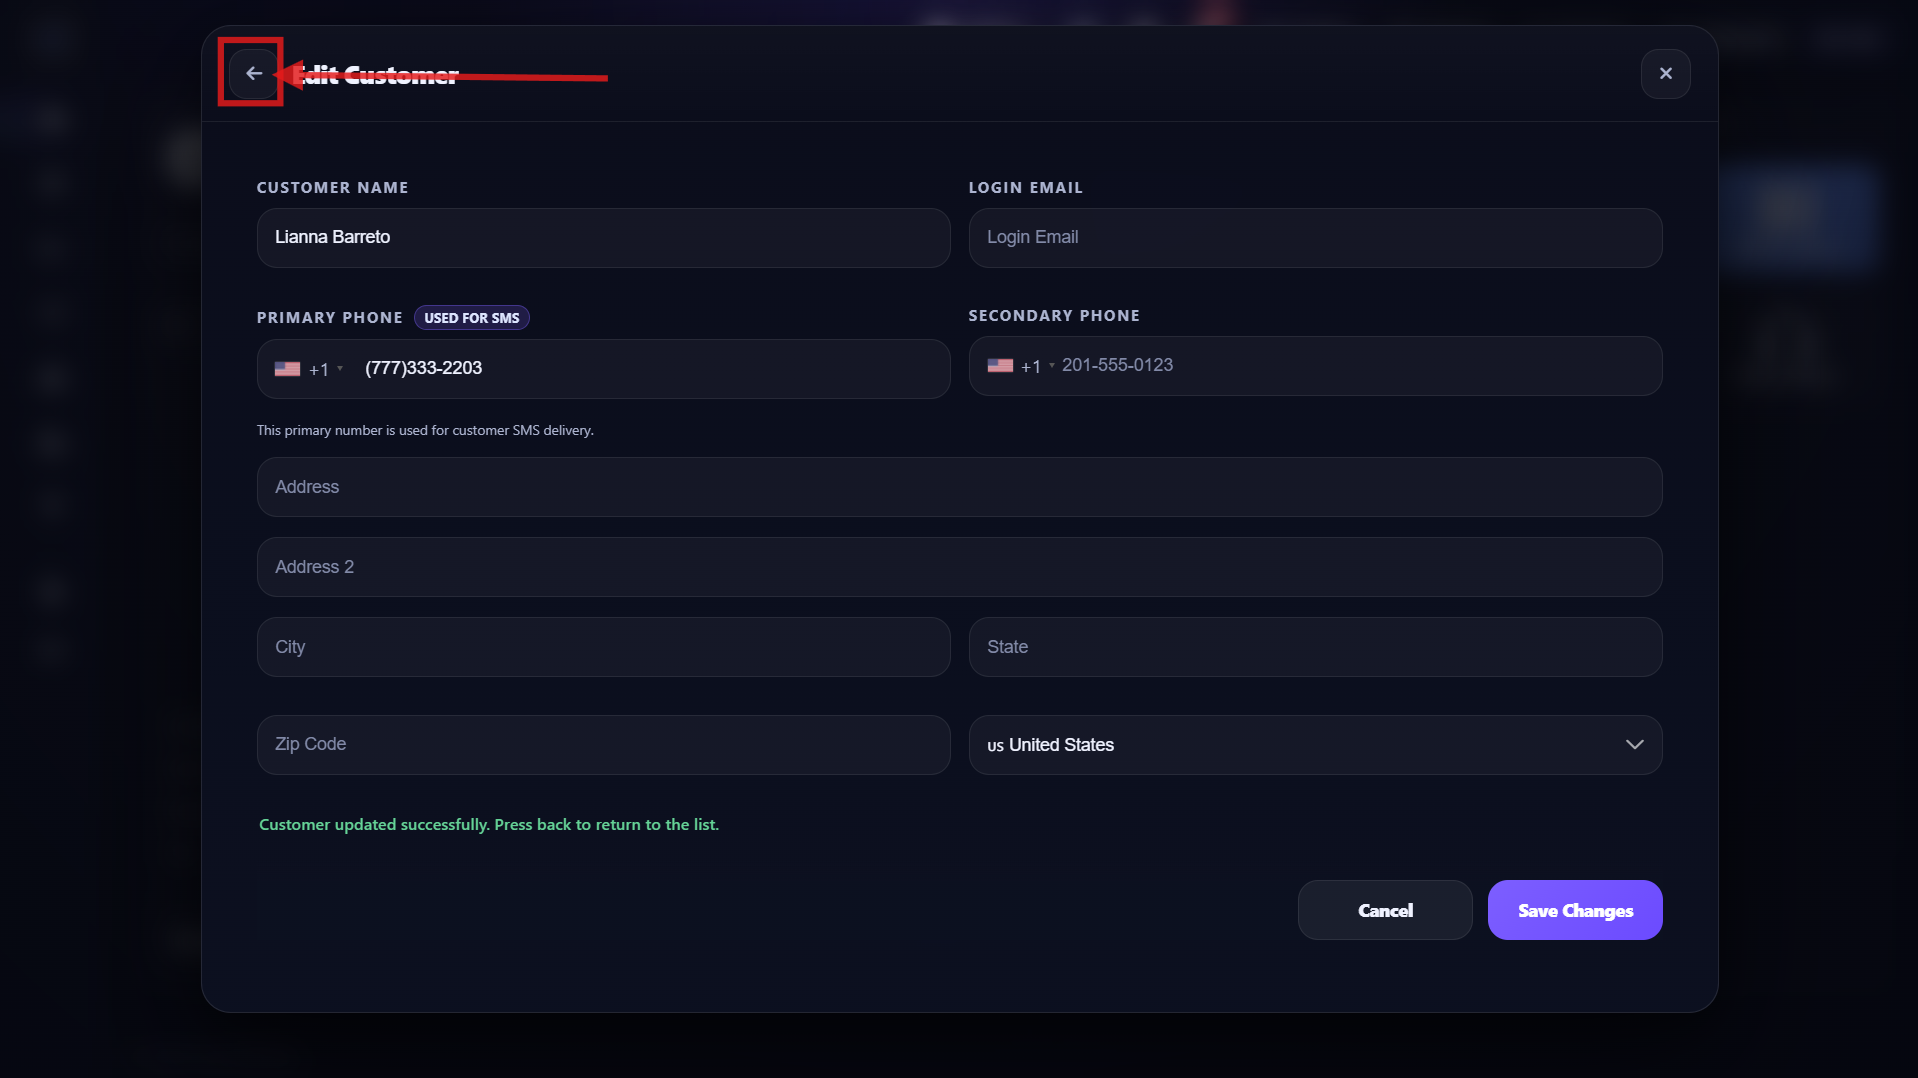
- After editing the customer and confirming it was saved successfully, you can press the back button.
Step 6
Confirm the updated customer is ready to select
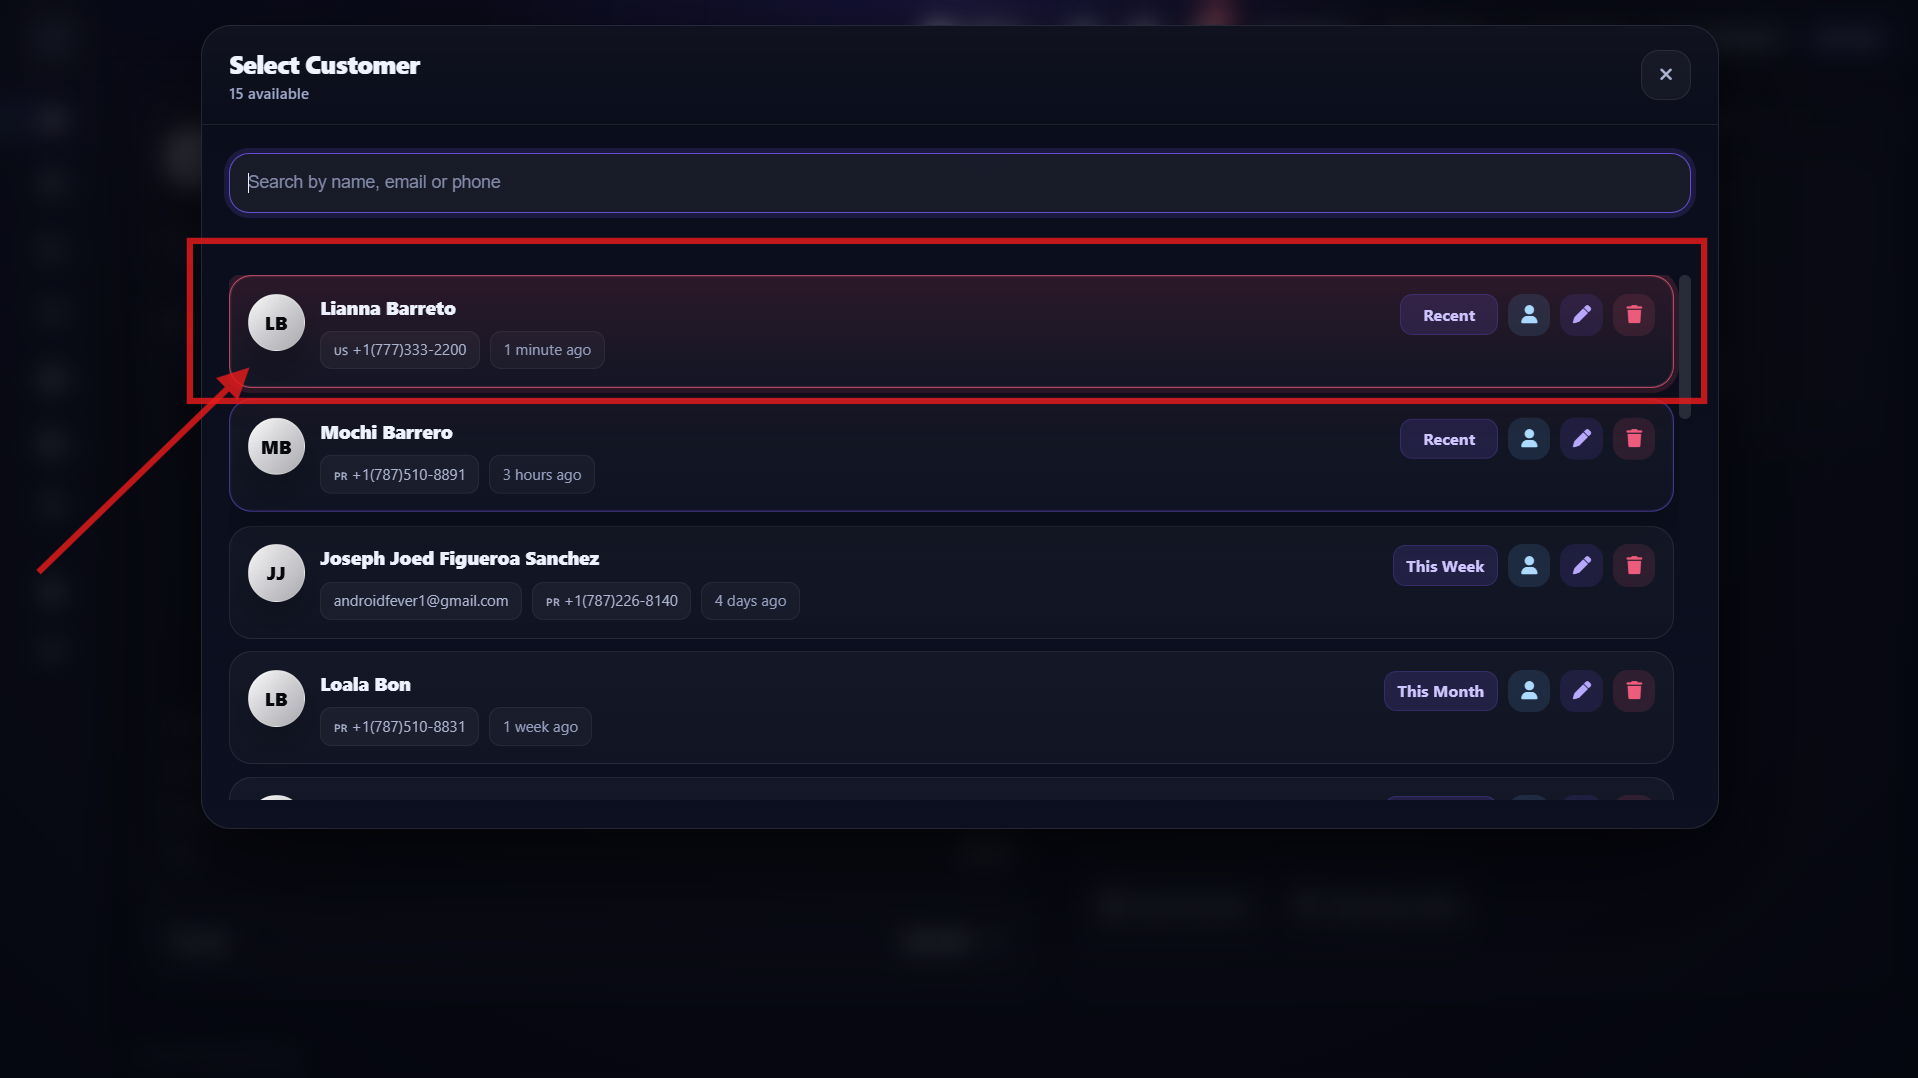
- After pressing back, you can see the customer updated and ready to select. You will see it with red borders, showing the customer was edited and is ready to select.
Step 7
Select the customer and continue with repairs/orders
- After editing the customer information, you can select the customer and continue adding repairs, miscellaneous items, or orders.
How to Select a Customer
Use this guide to select an existing customer before adding repairs, miscellaneous items, or orders.
Step 1
Press the 3 dots to open the customer list panel
- Before creating an order, press the 3 dots to open the panel where all customers are listed.
Step 2
Tap the customer you need and continue with repairs or orders

- Tap the customer you are looking for, and the system will automatically select that customer so you can continue adding repairs or orders. You can search by phone number, first name, or last name.
Step 3
Customer selected and ready to add repairs, orders, or miscellaneous items
- After selecting the customer, everything is ready to continue and add repairs, orders, or miscellaneous items.
How to Create an Order
After selecting or creating a customer, use the right-side panel to add services, miscellaneous items, or parts to the repair.
Step 1
Use the right-side panel to add services, miscellaneous items, or parts
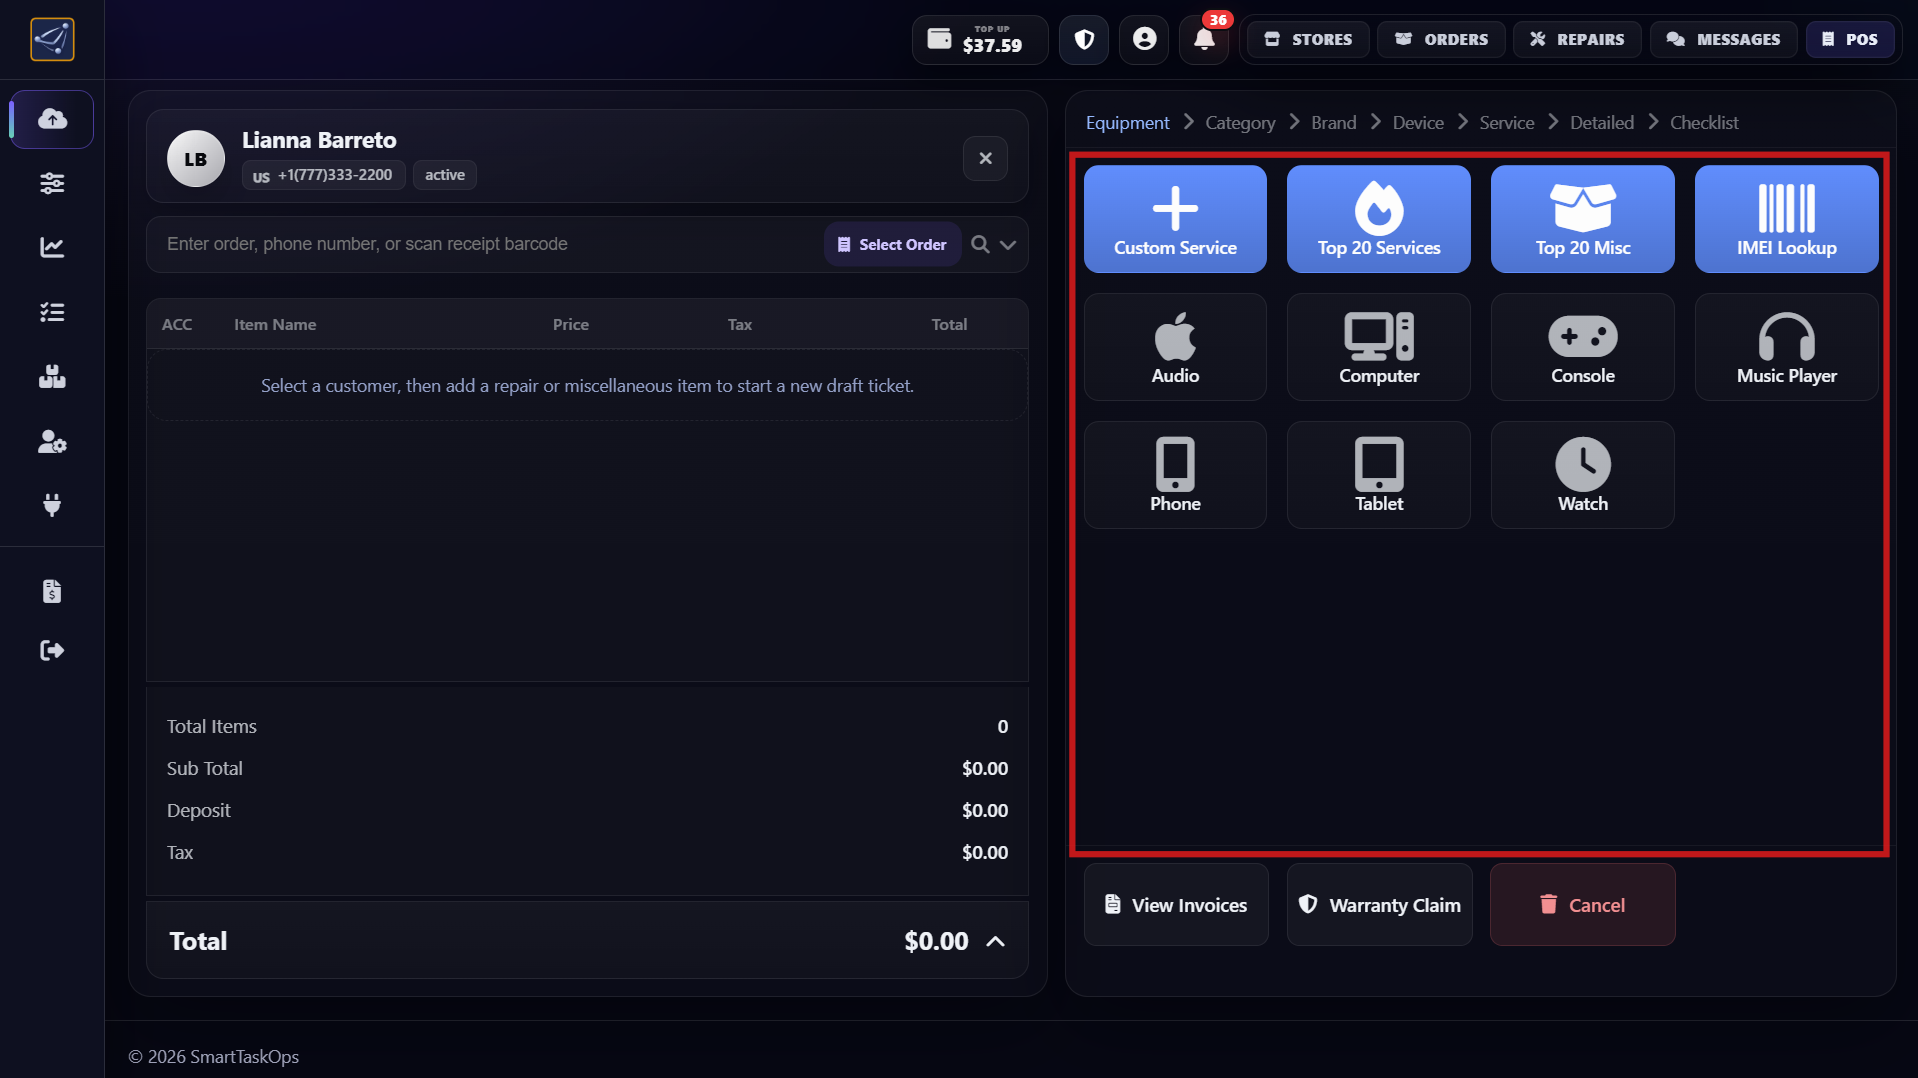
- After selecting or creating the customer, go to the panel on the right side.
- In this panel you can add services, miscellaneous items, or parts to the selected repair.
- This panel is fully customizable from Service Management, where you can create custom services or use pre-built ones.
Step 2
Select Apple, then choose Service instead of Miscellaneous
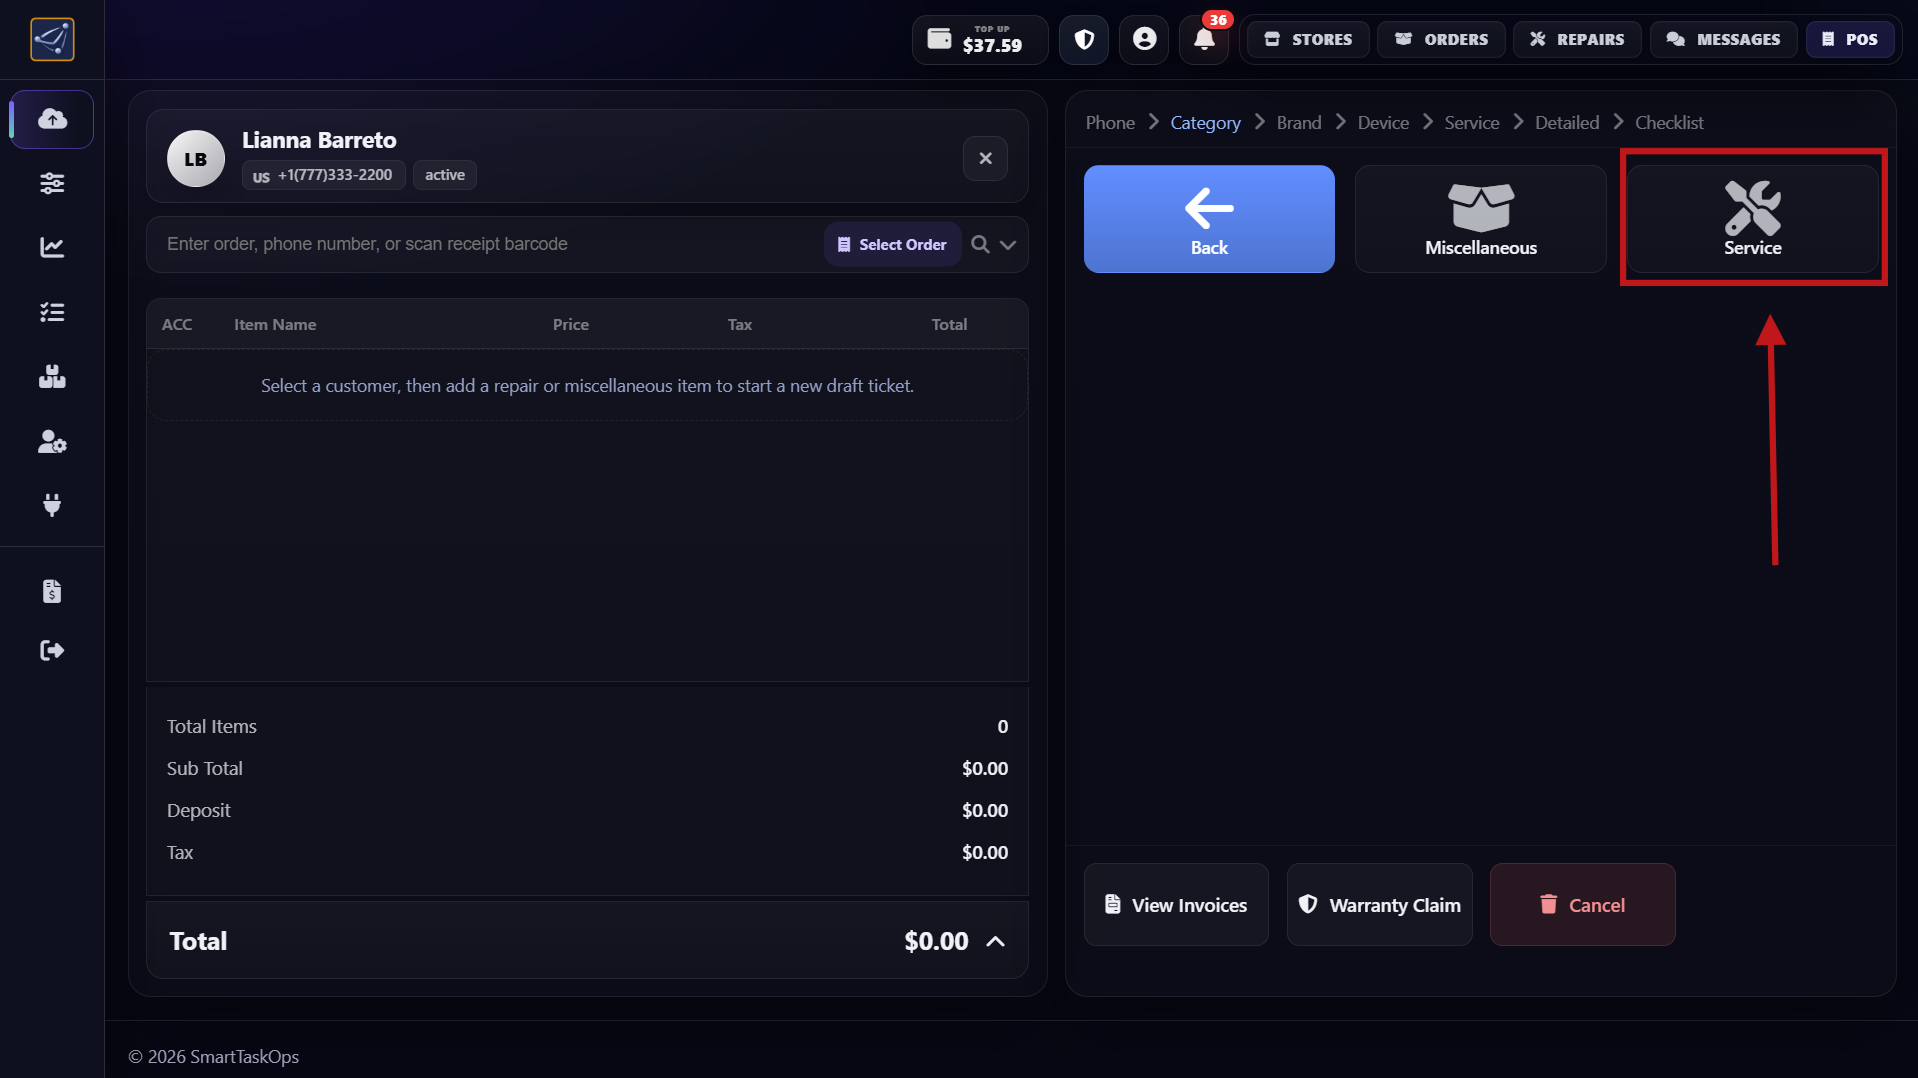
- In this section, first select an Apple device.
- After selecting the brand, choose between Miscellaneous or Service.
- For this flow, select Service to continue creating the order.
Step 3
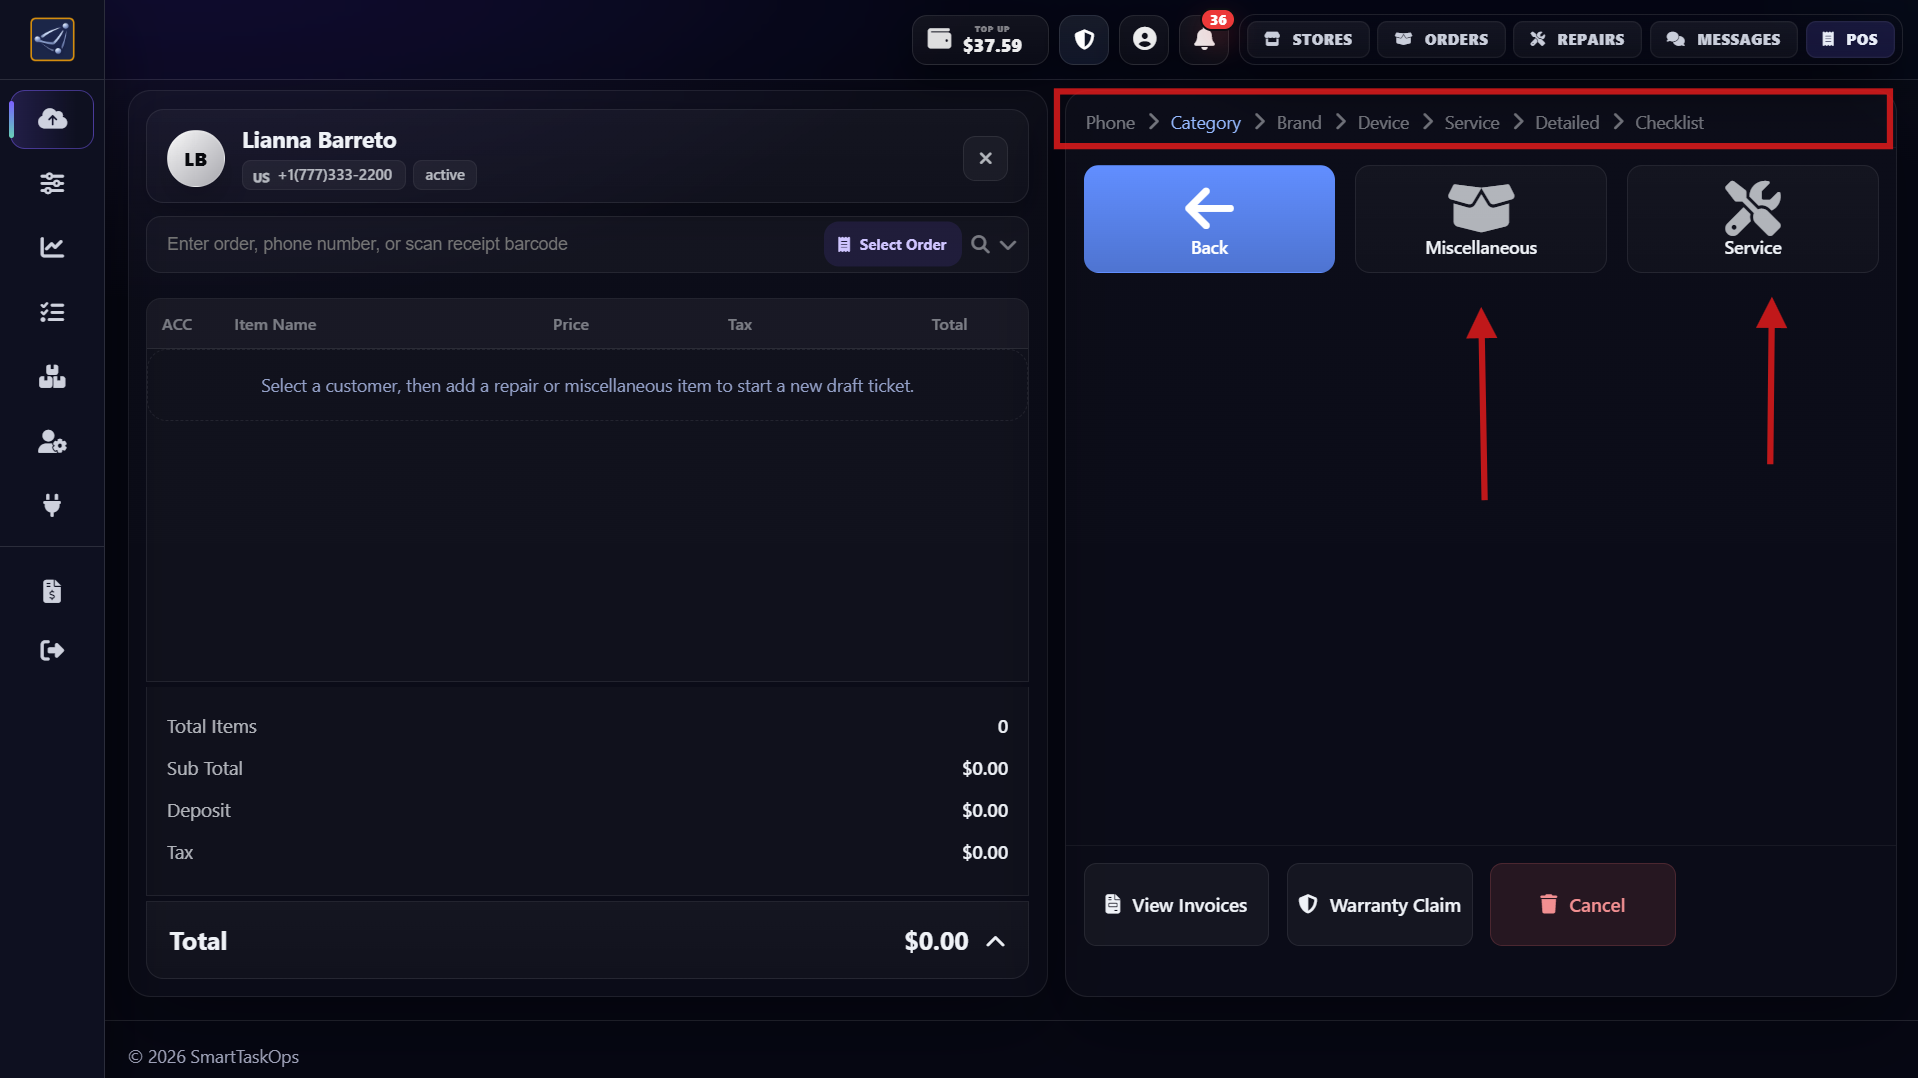
Choose Service from the mobile device options
- After this step, you can choose Services or Miscellaneous for mobile devices.
- For this guide, we continue by selecting Service now.
- This keeps the order flow focused on service-based repairs.
Step 4
Press Service and select the brand (Apple)
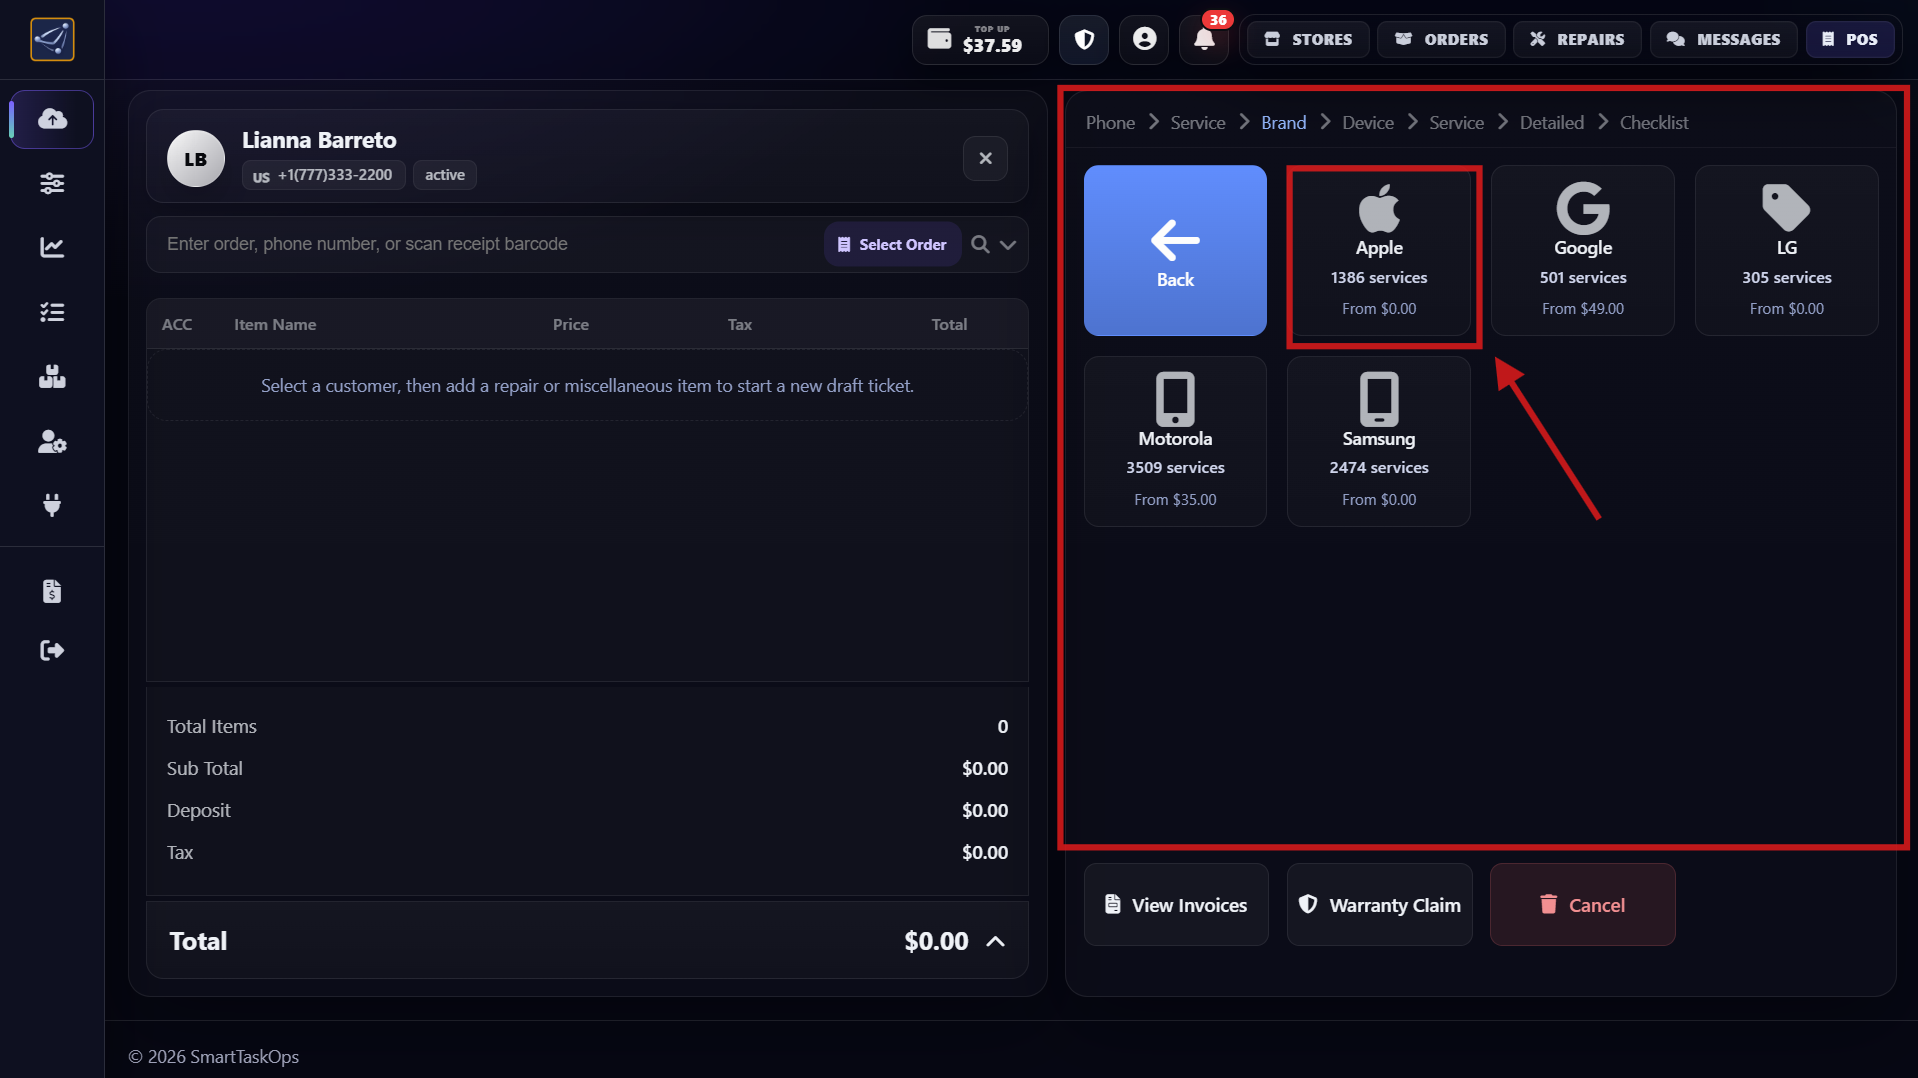
- After pressing Service, you will see phone brands like Samsung, Google, LG, Apple, and more.
- We keep adding new services constantly, and we already have more than 11,000 pre-built services.
- In this step, select the brand Apple.
Step 5
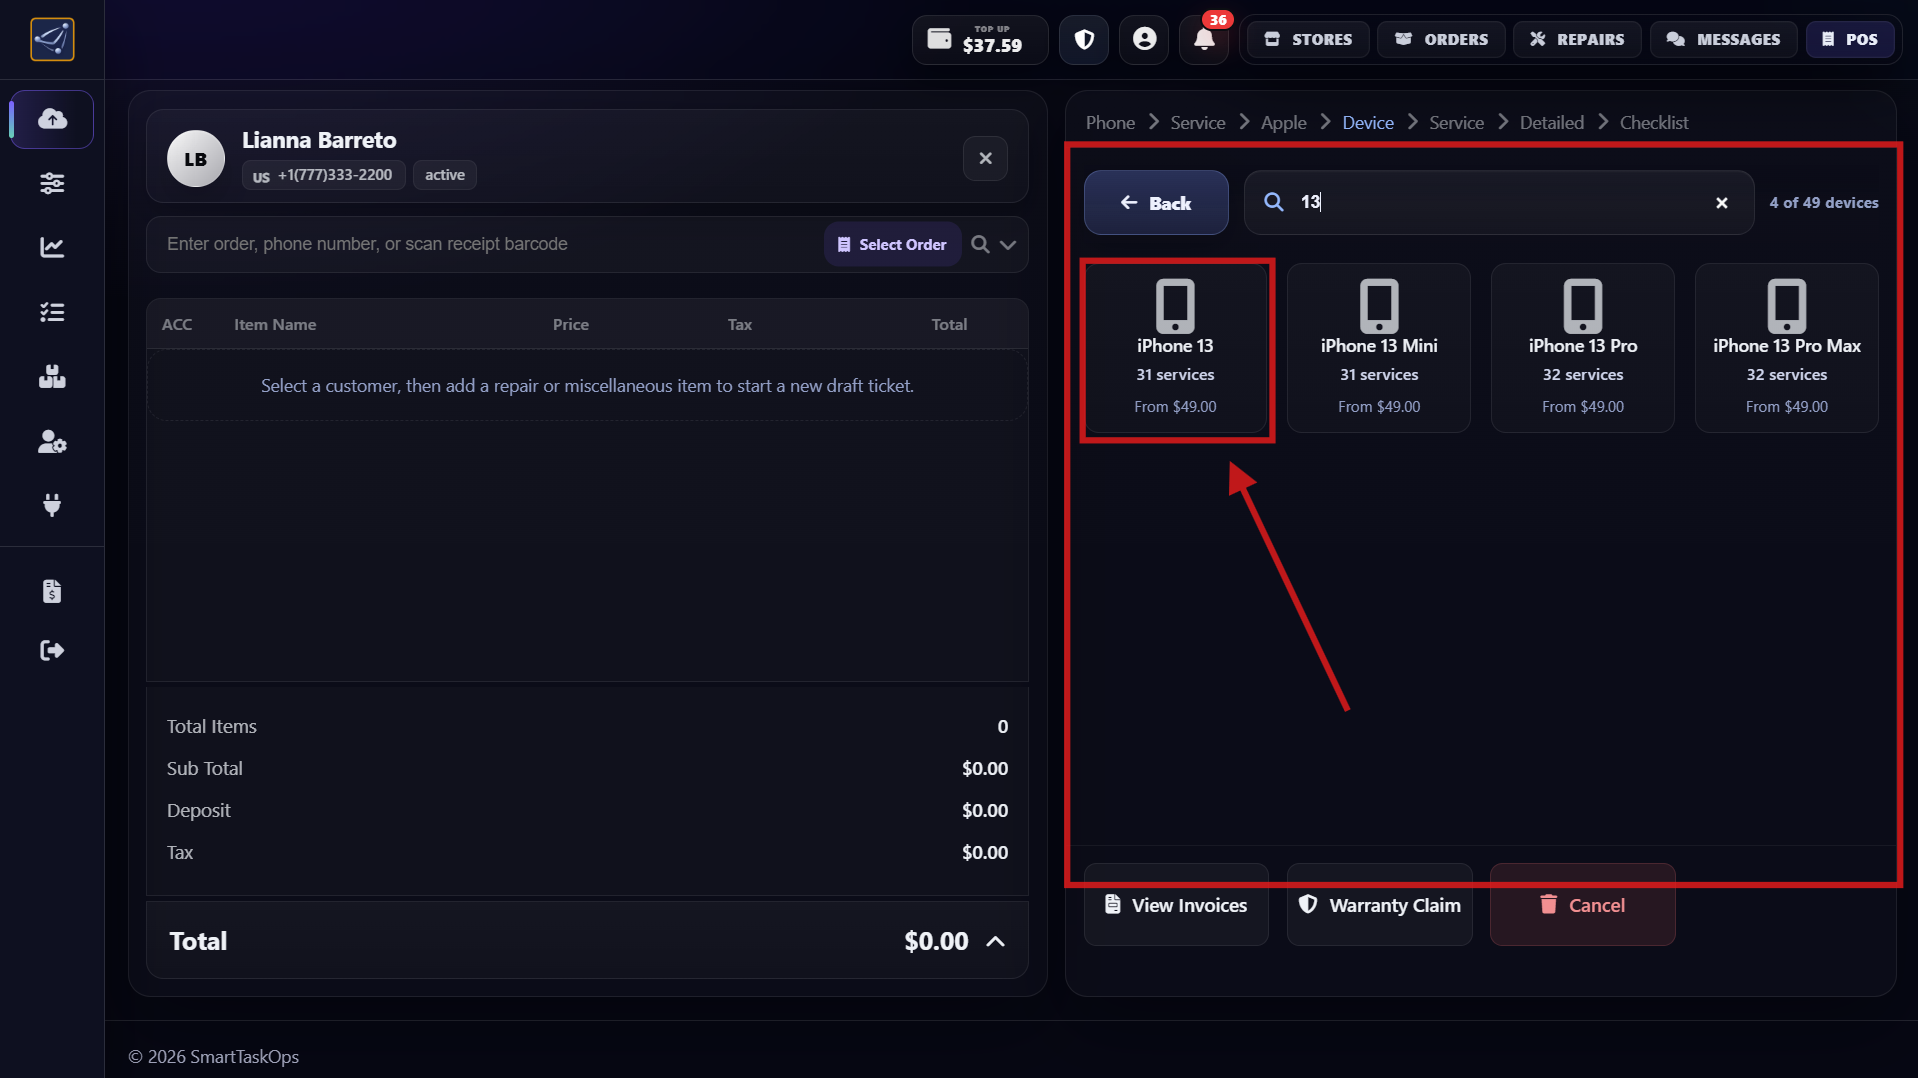
View iPhone models and find the exact model faster
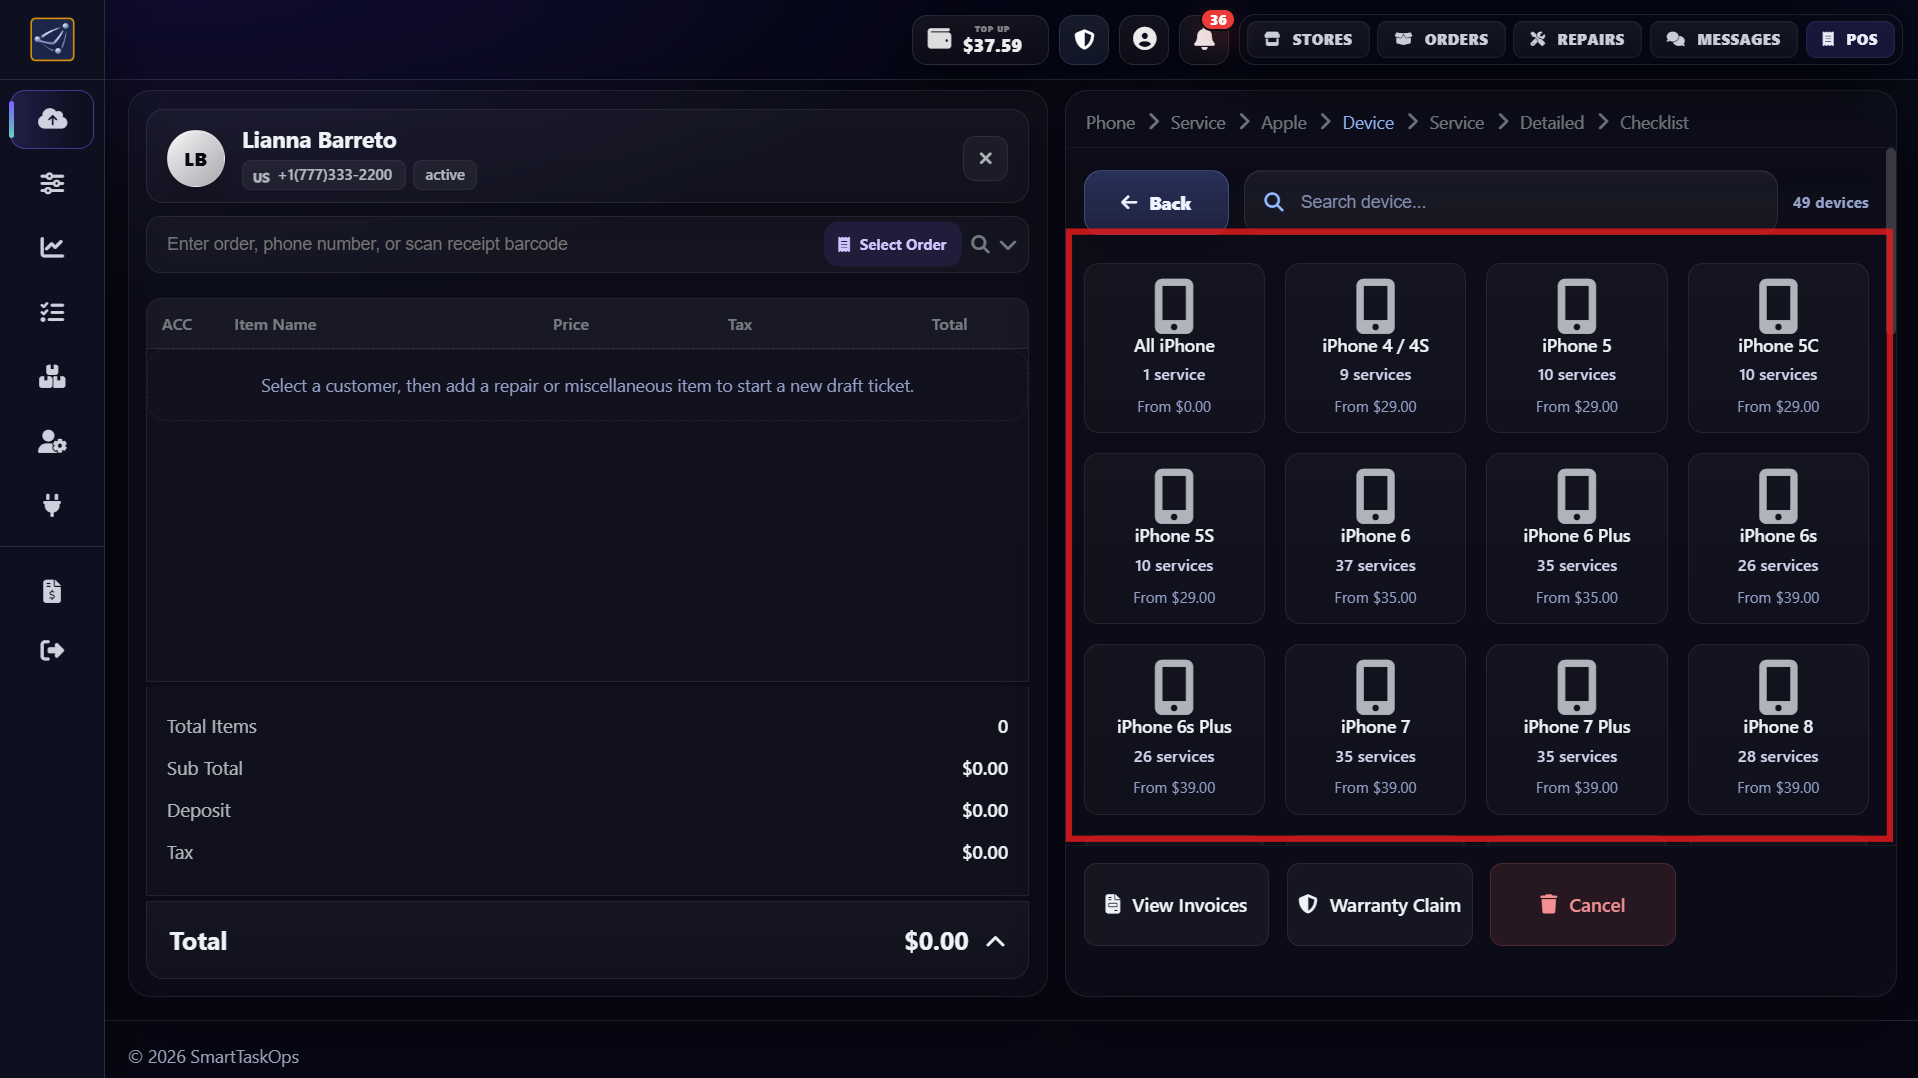
- After pressing the Apple brand, you can see all available iPhone models.
- You can select any iPhone model from the list.
- To find the exact model faster, use the device filter and then select the matching iPhone model.
Step 6
Filter by problem and select Screen Repair service
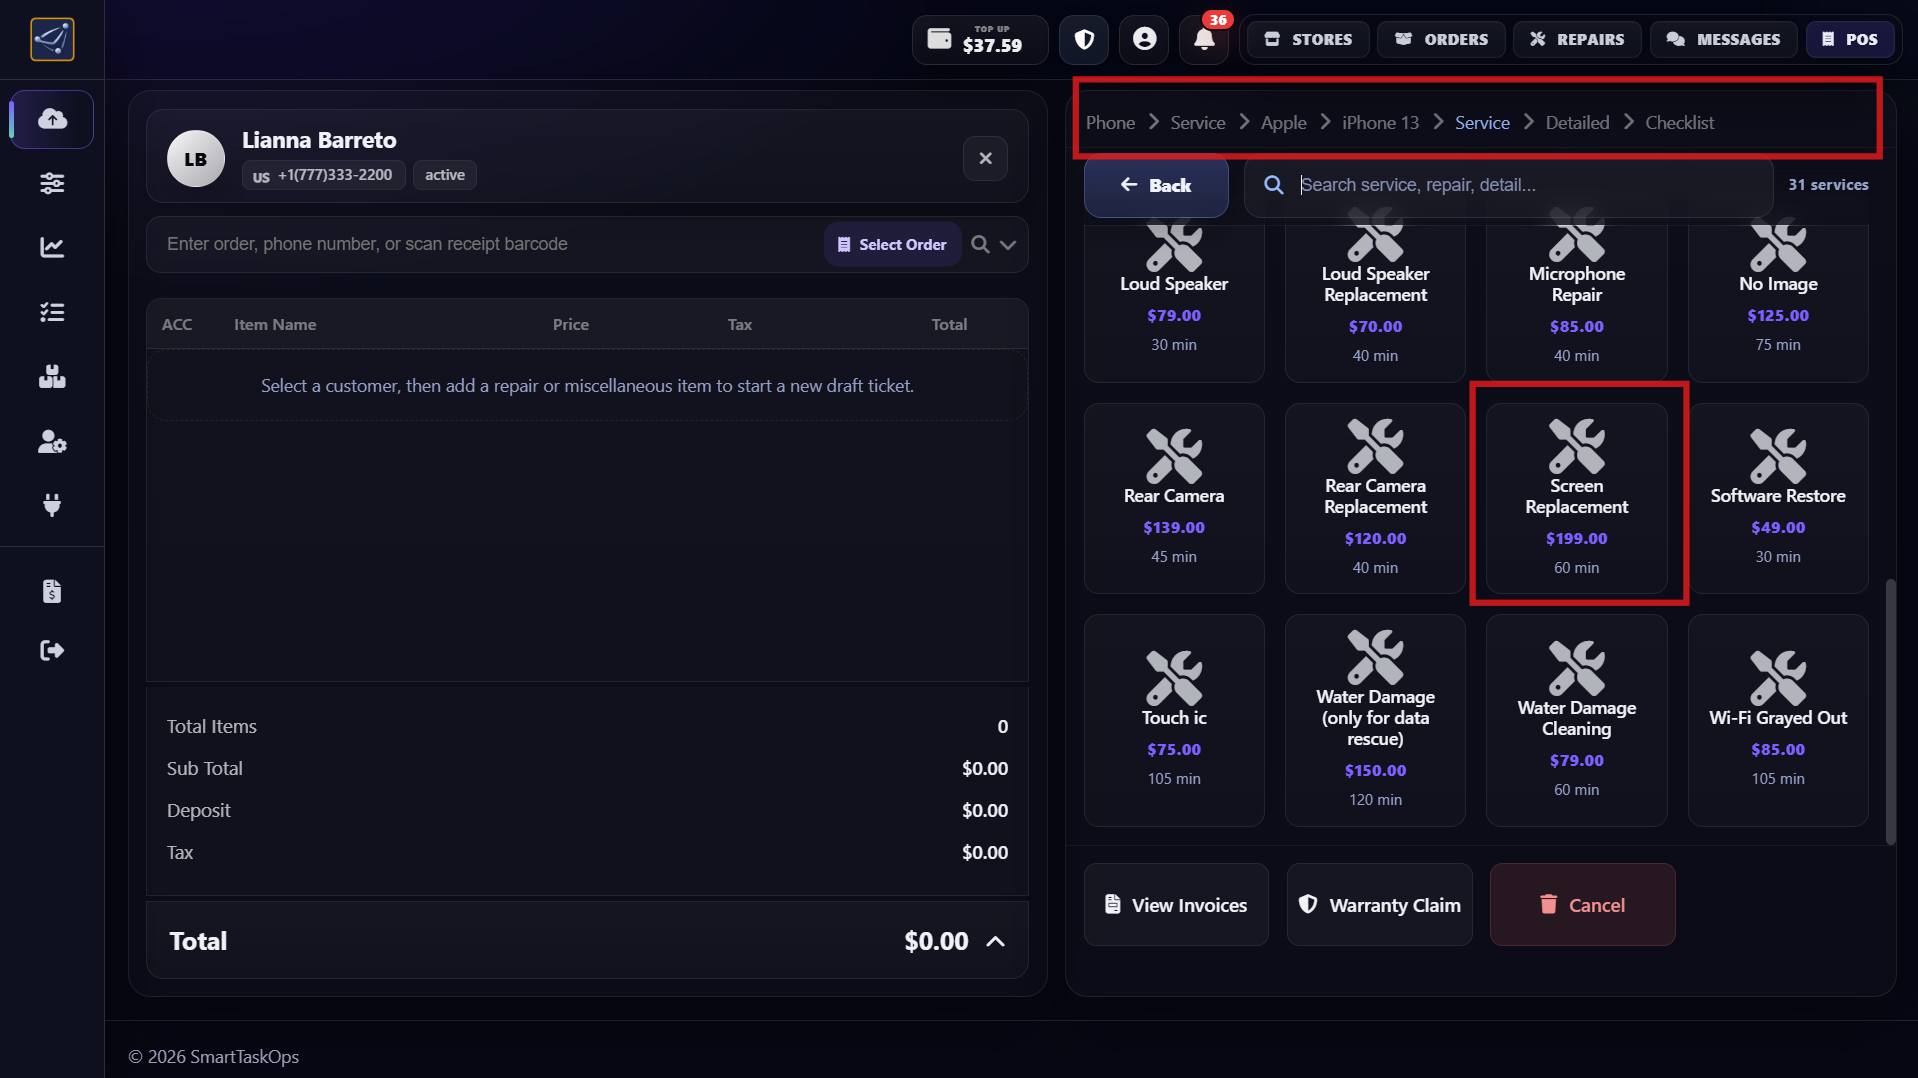
- After choosing the exact model, continue by filtering services by the device problem.
- One of the most popular options is Screen Repair.
- In this example, we selected iPhone 13 and then selected a Screen Repair service.
Step 7
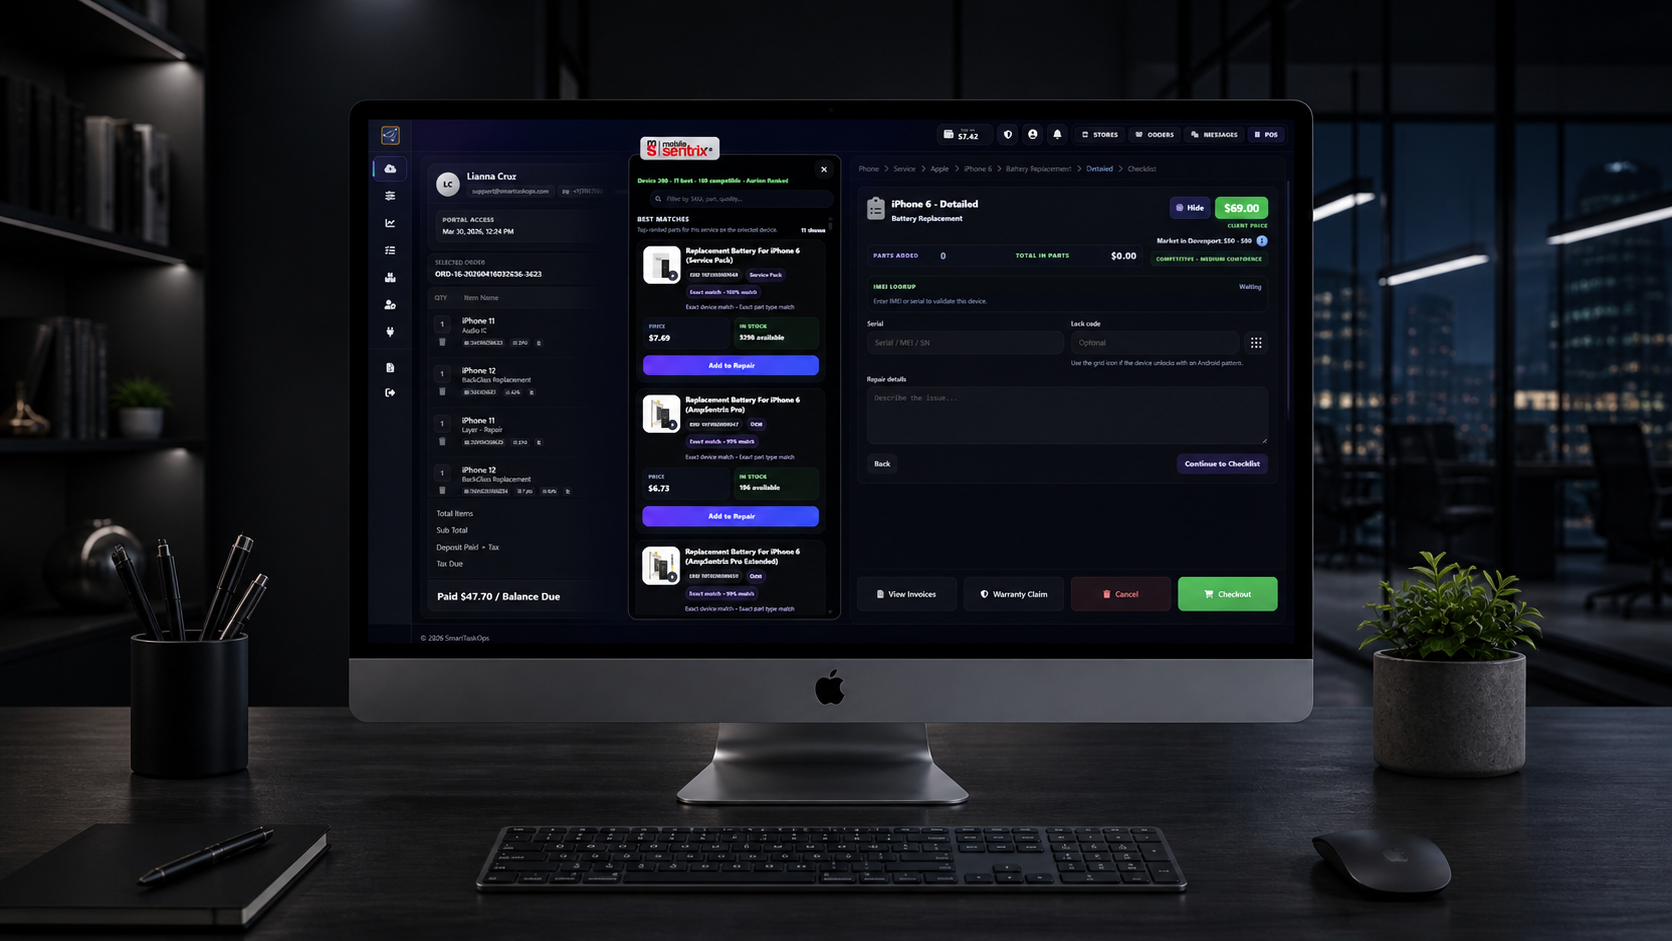
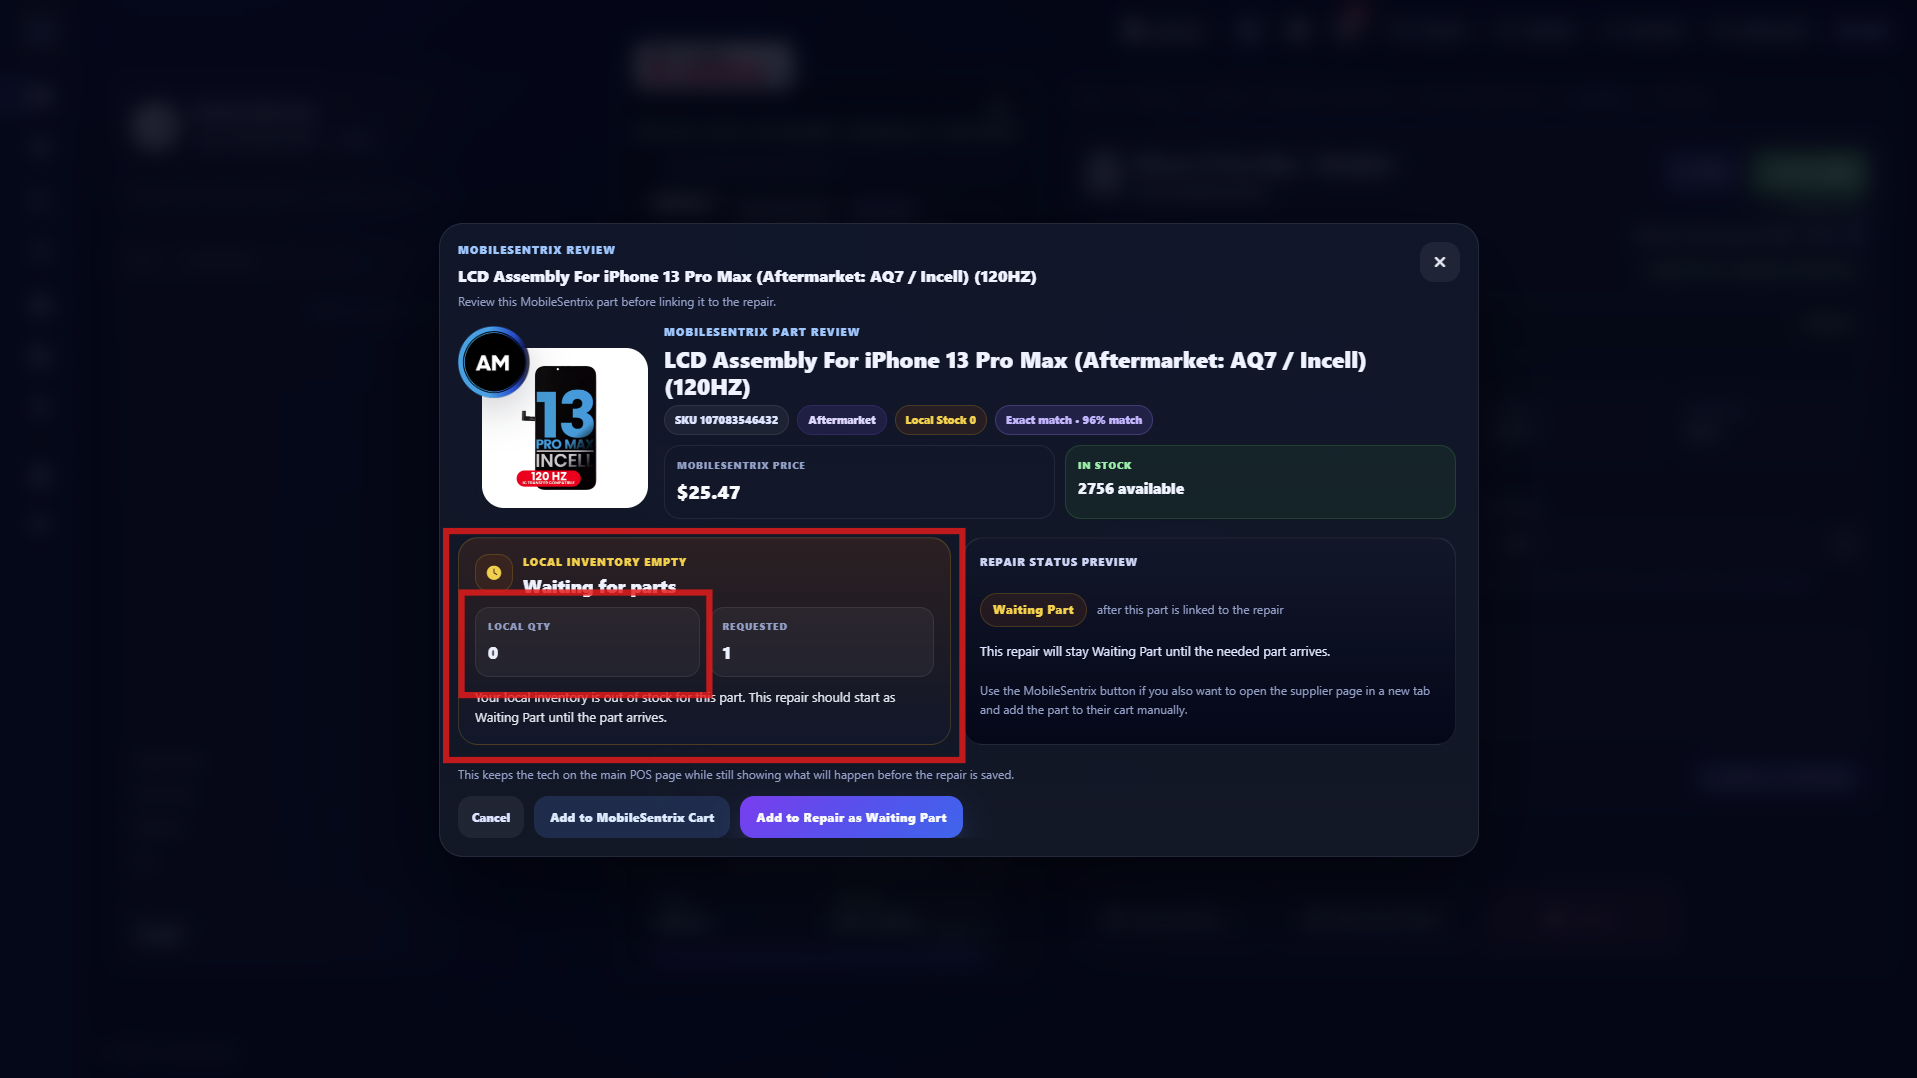
MobileSentrix pricing, IMEI check, and special-order part flow

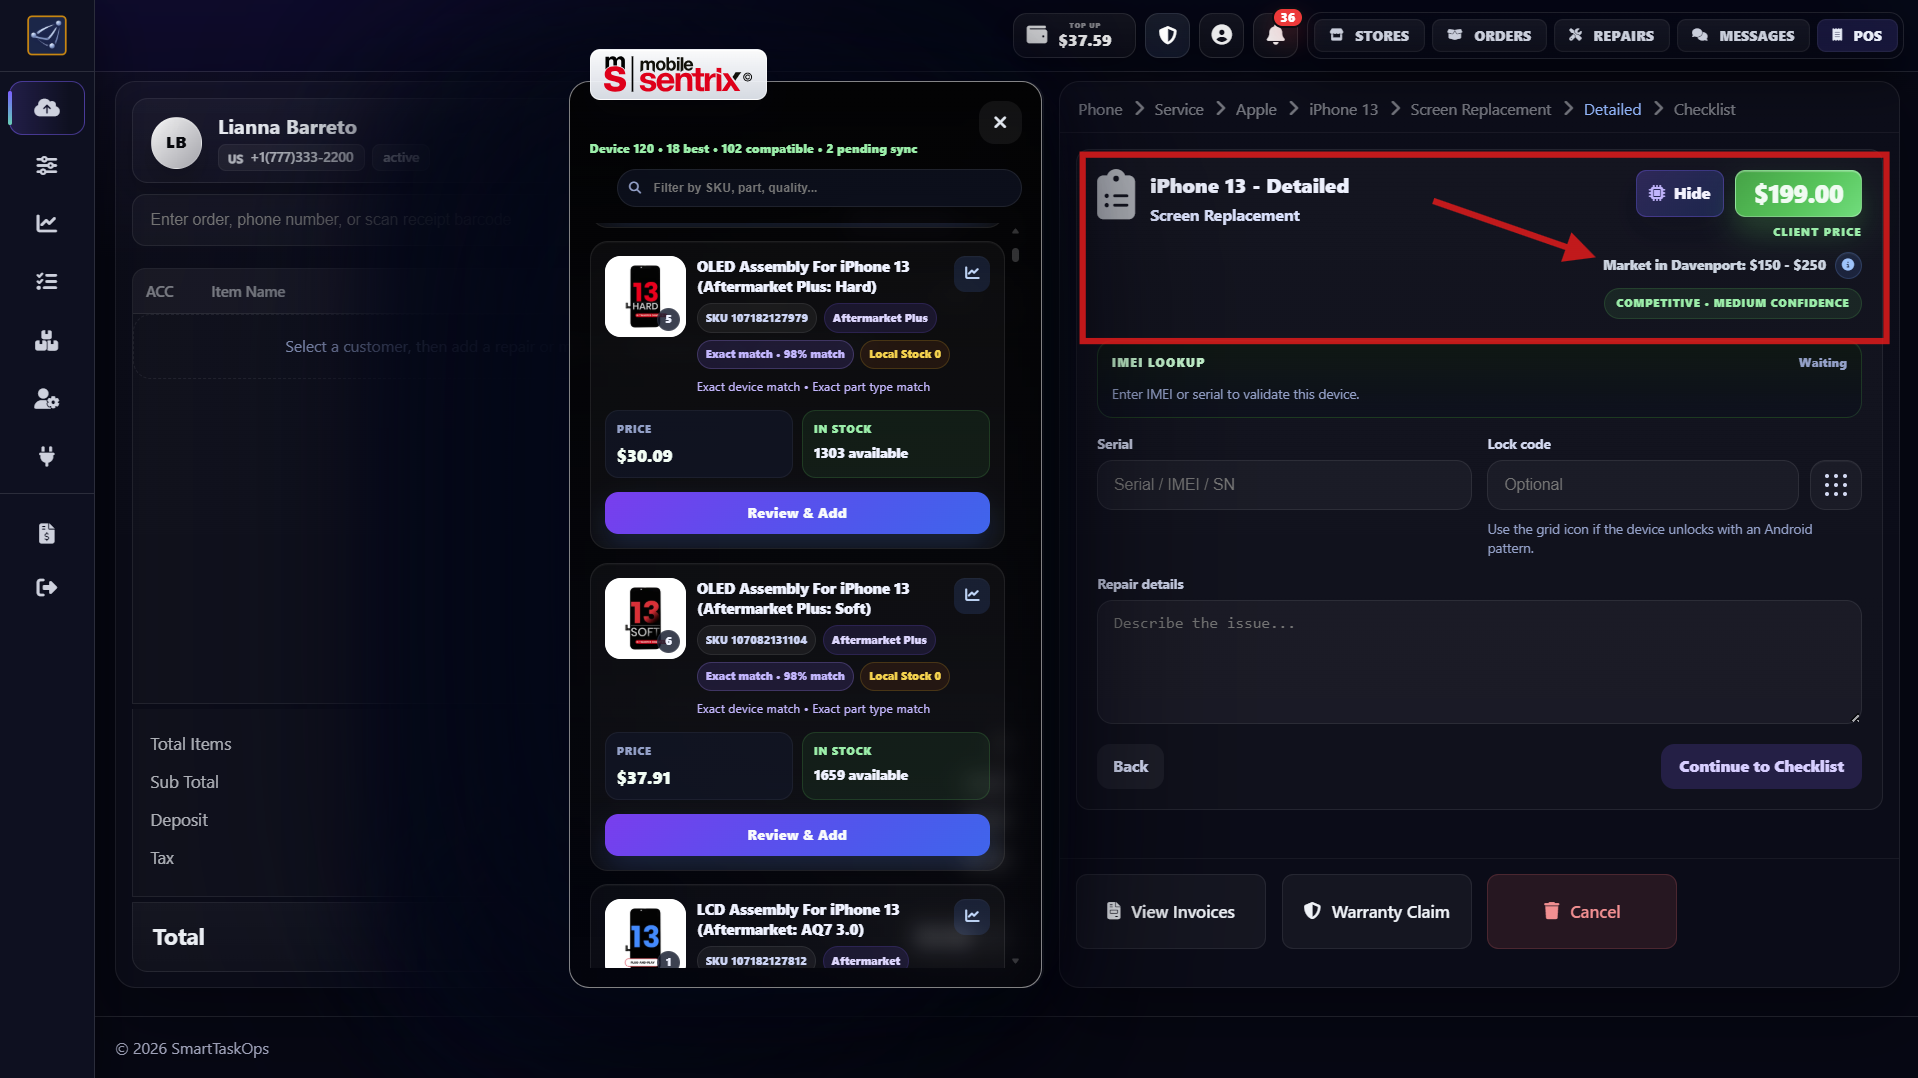
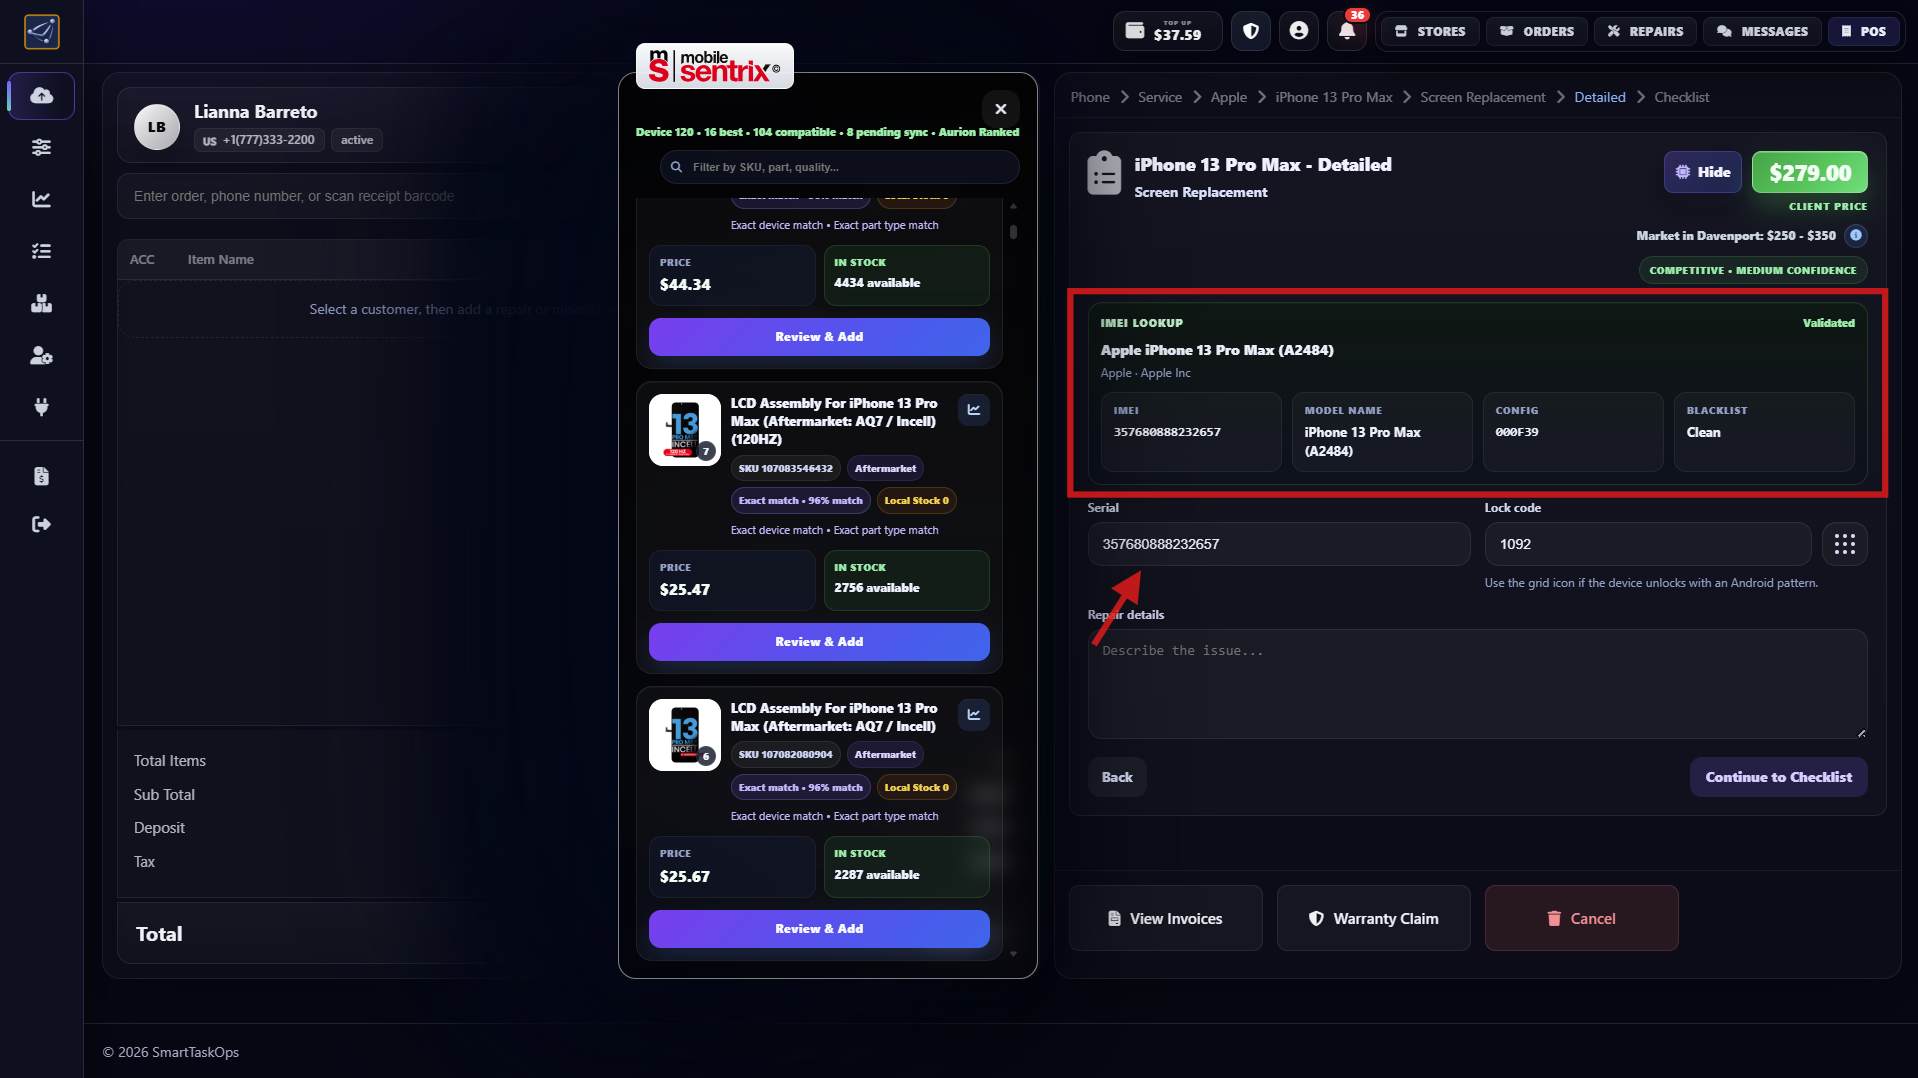
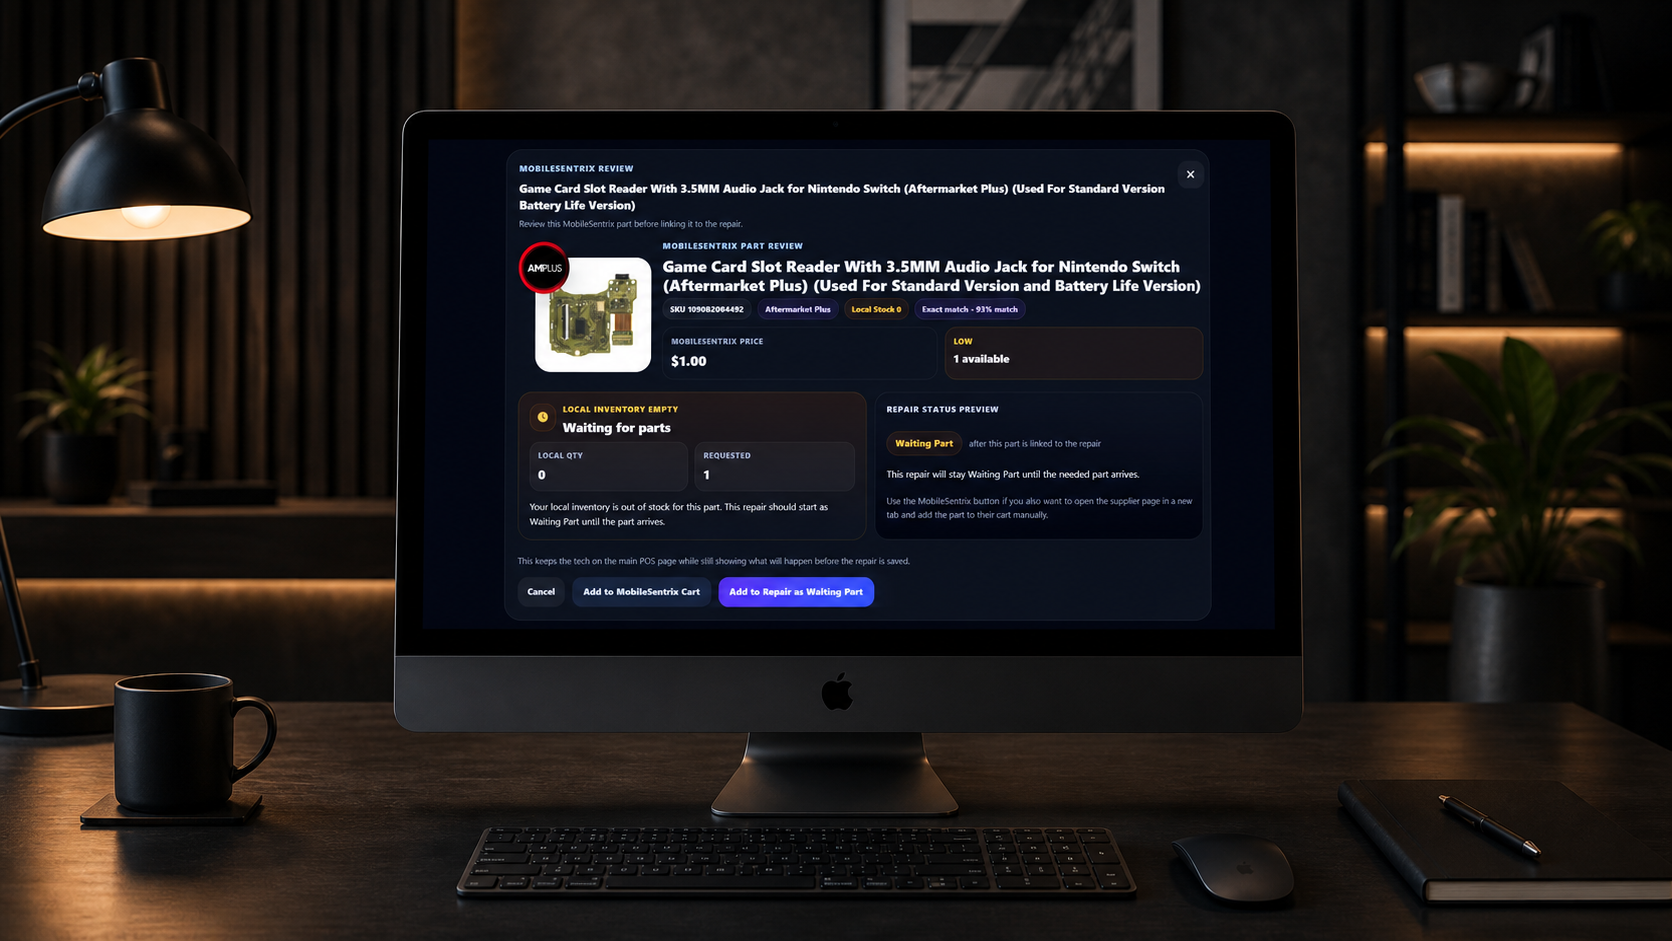
- After selecting Screen Repair, the authorized vendor dialog from MobileSentrix opens with part options for this phone model.
- Review current MobileSentrix prices and local repair prices based on your location, then choose the option that works best for you.
- You can verify IMEI to confirm the exact iPhone model and check if it is blacklisted with any carrier.
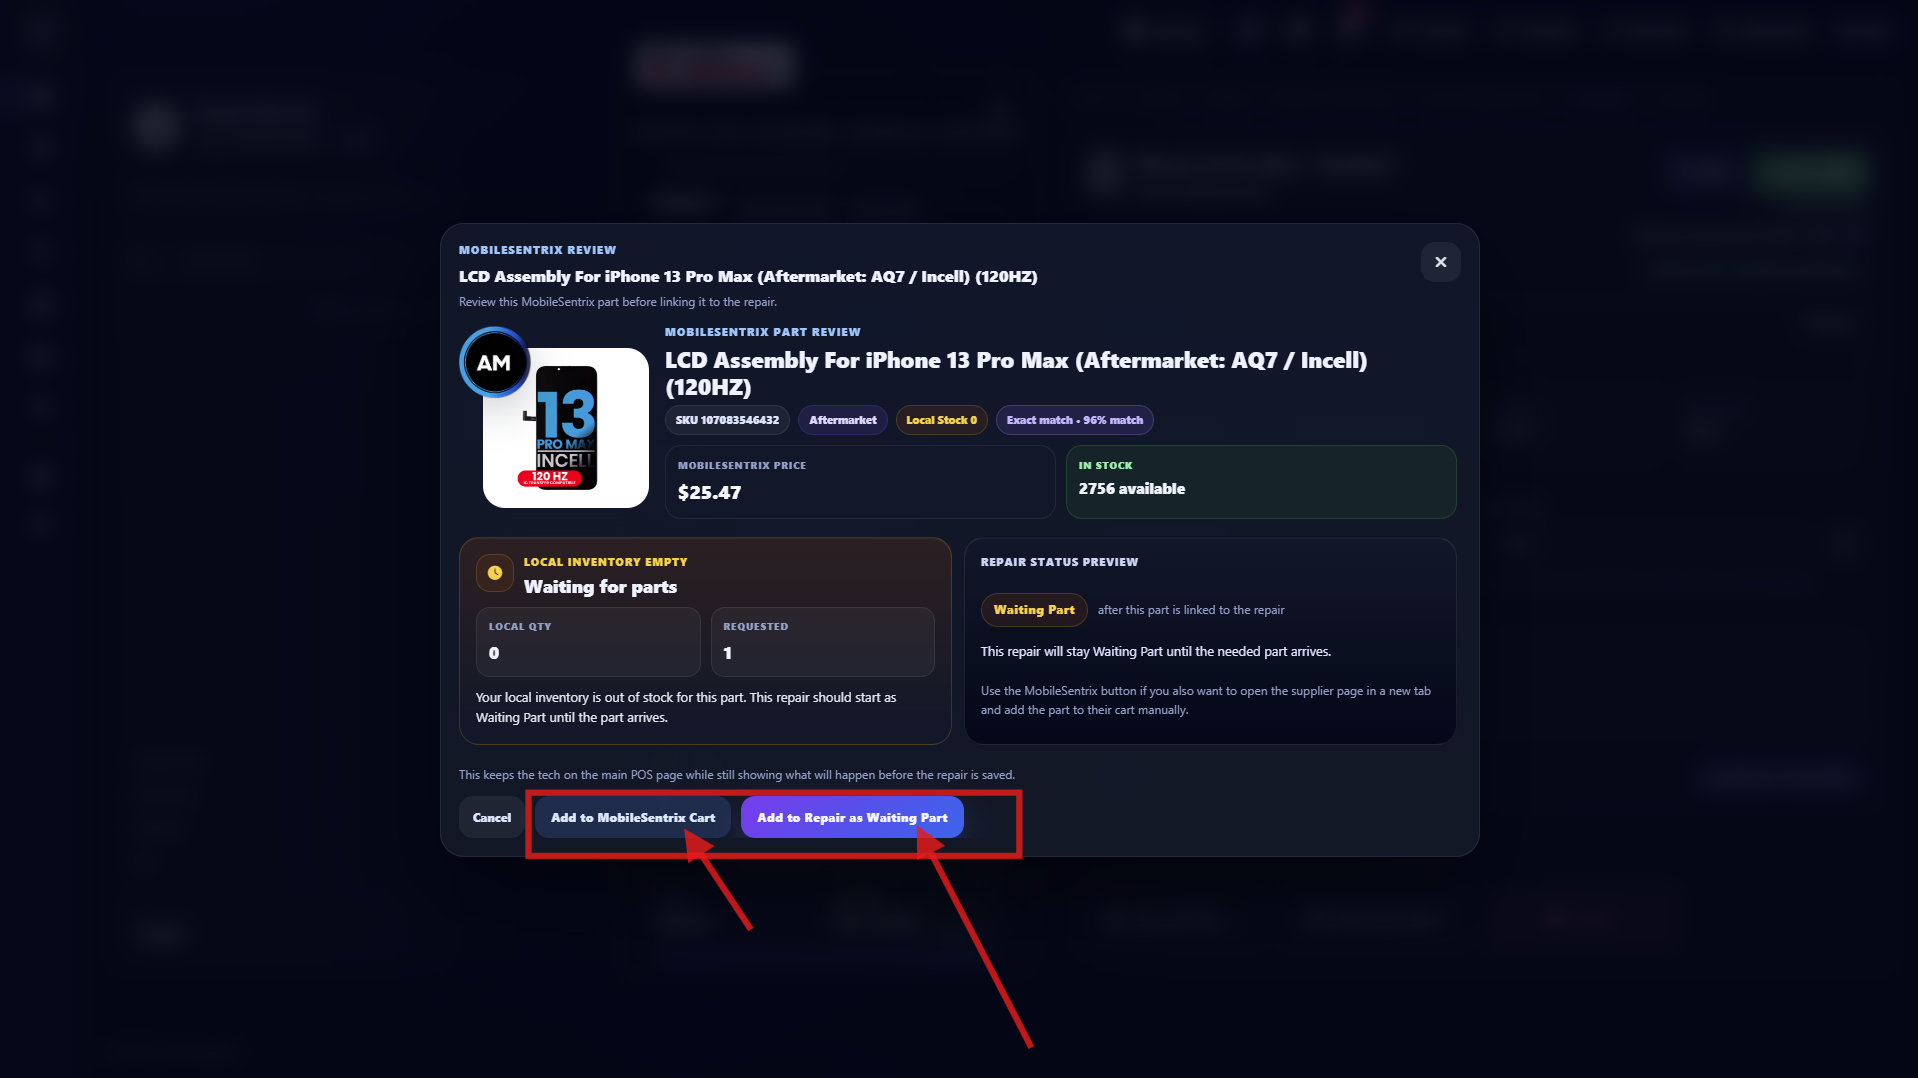
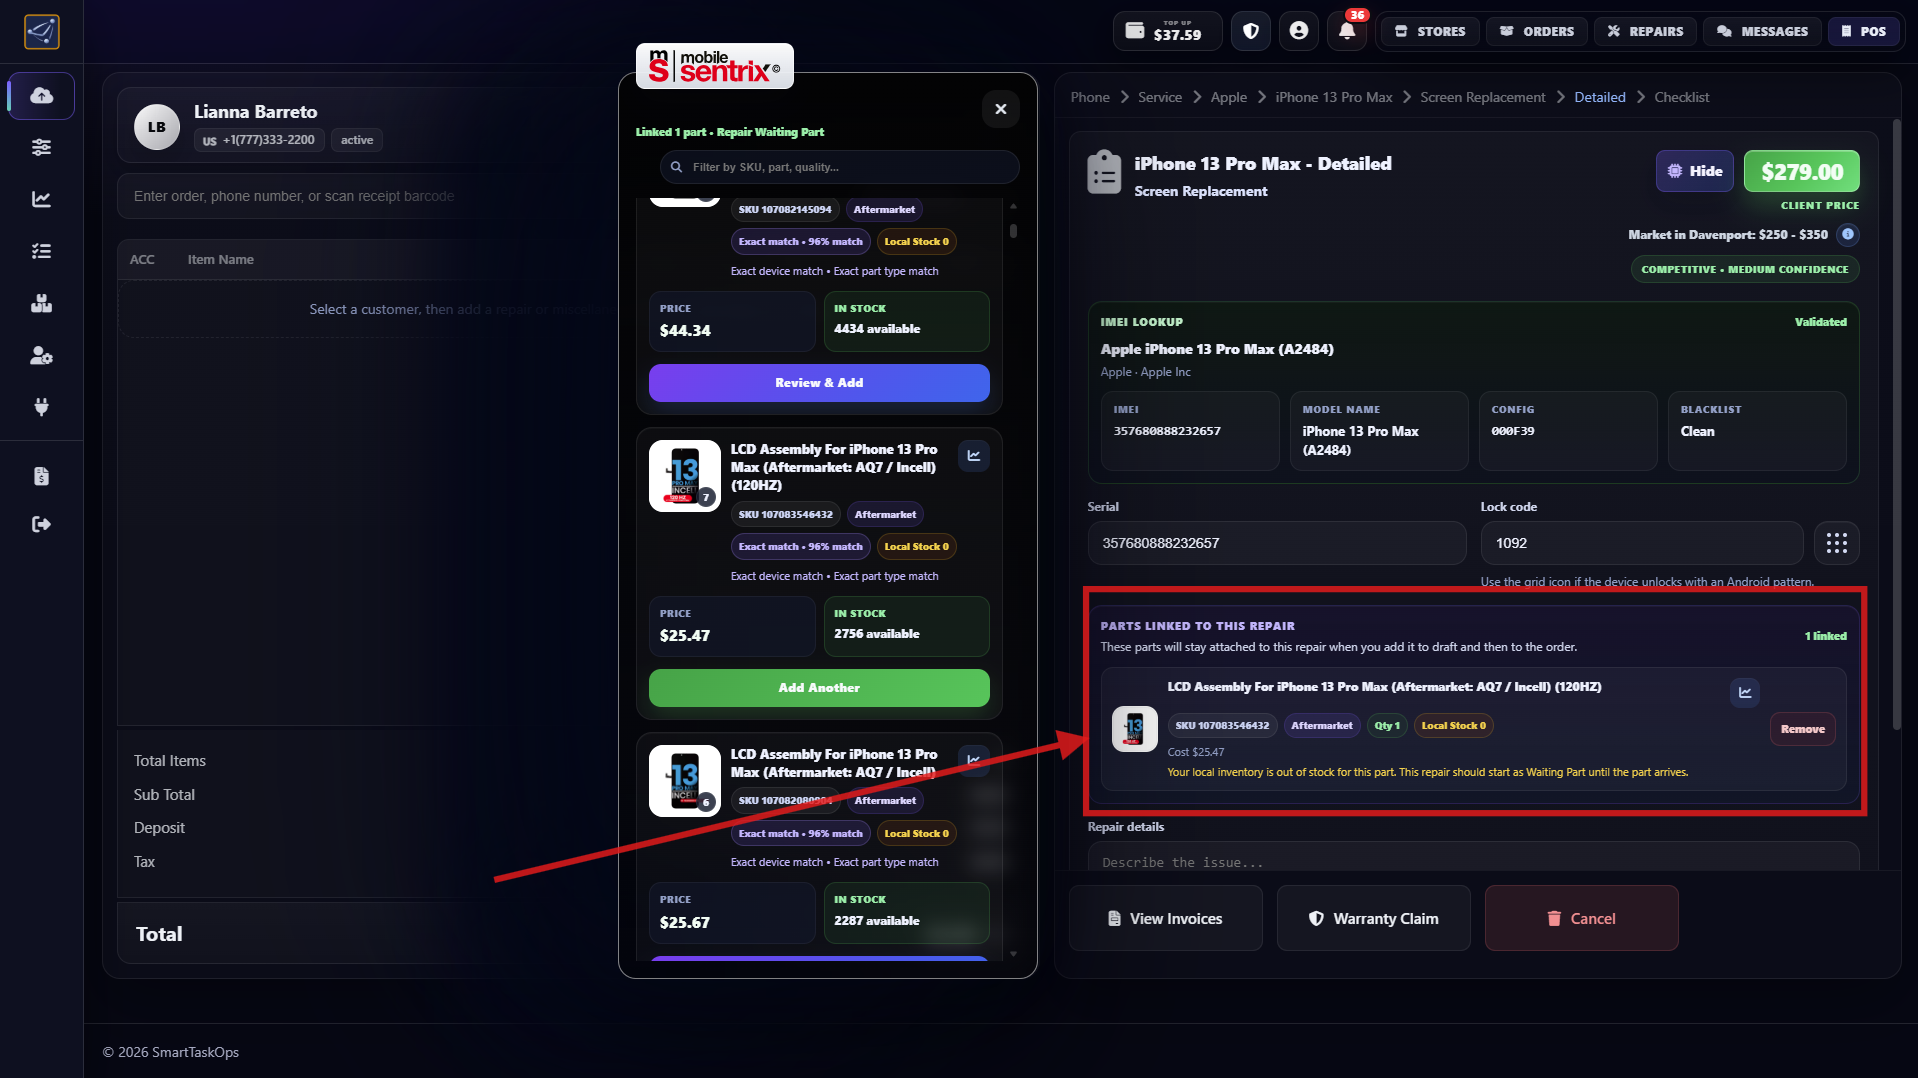
- If a part is out of local stock, add it from MobileSentrix inventory as a special order and it will stay pending automatically.
Step 8
Complete the checklist before continuing
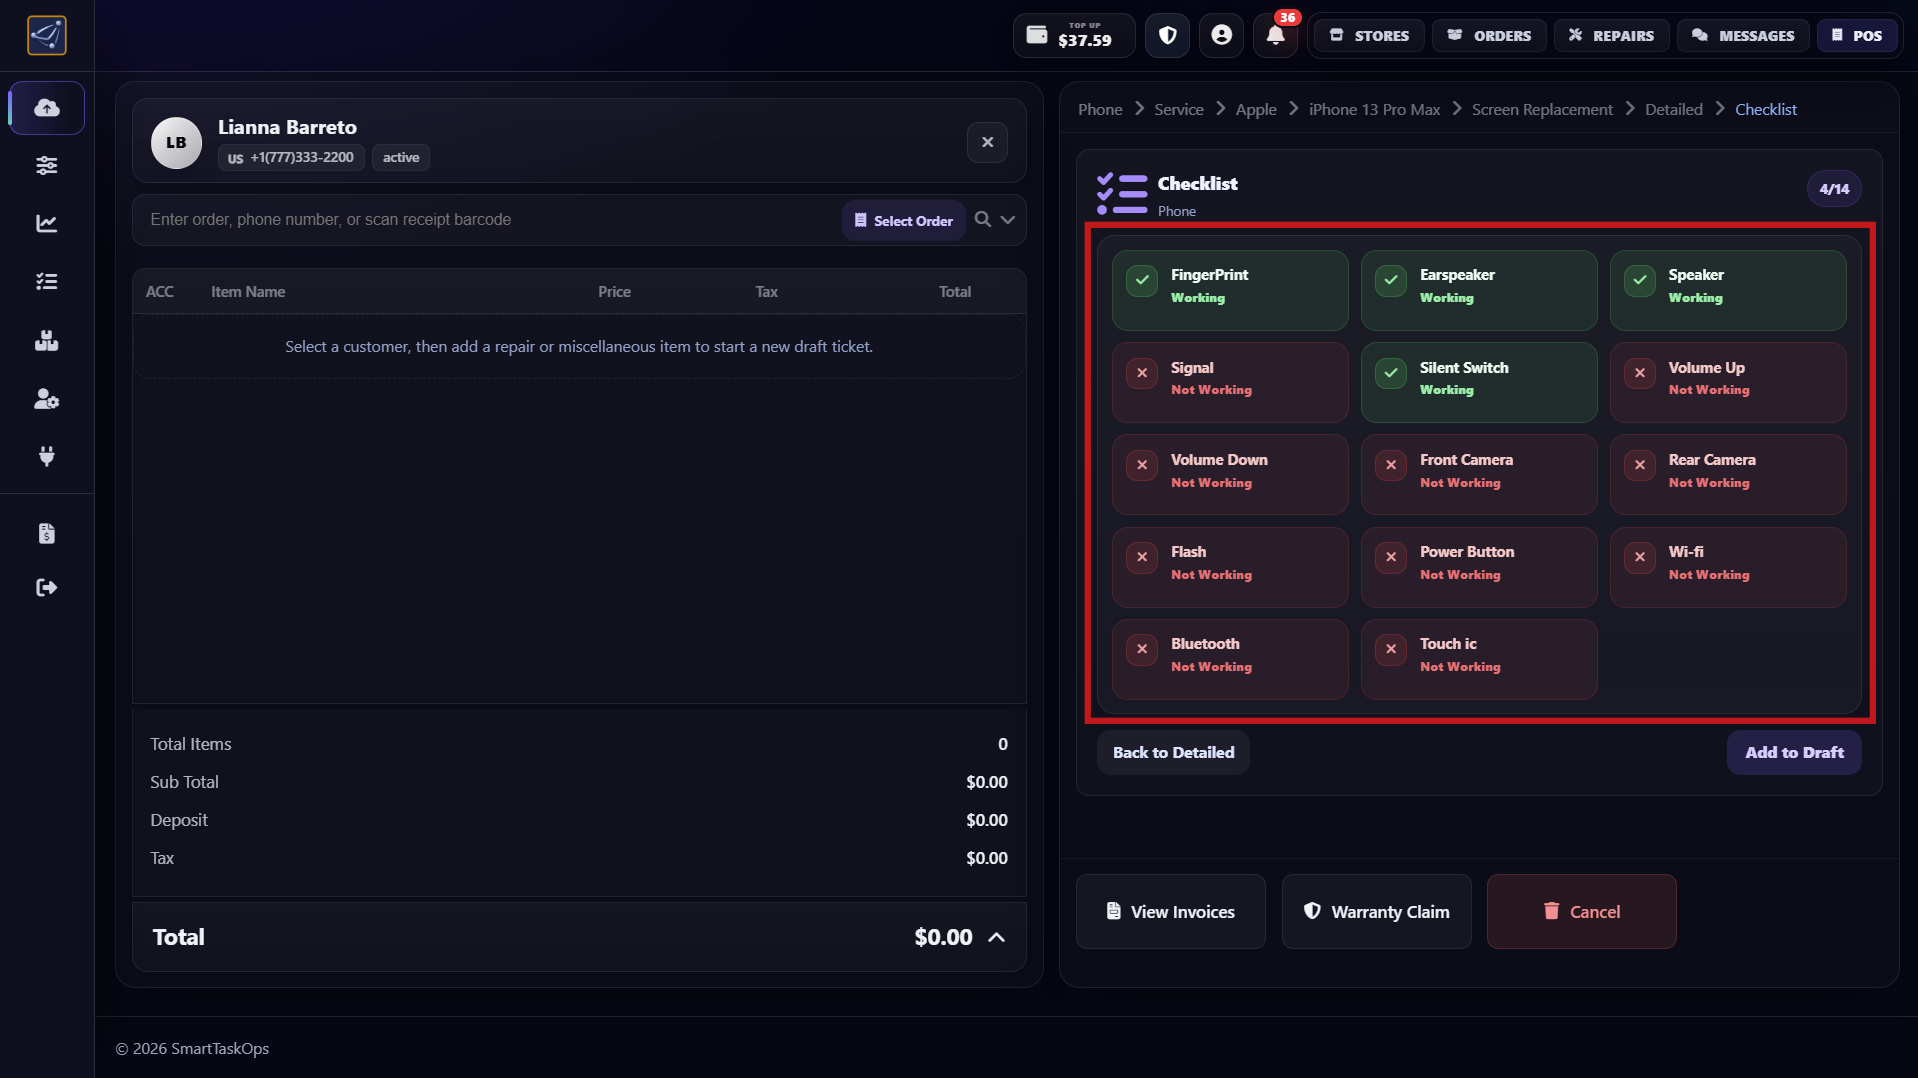
- Fill the checklist to mark what device functions are working and not working.
- This checklist is fully customizable from Checklist Manager.
Step 9
Keep repair in Draft and adjust details
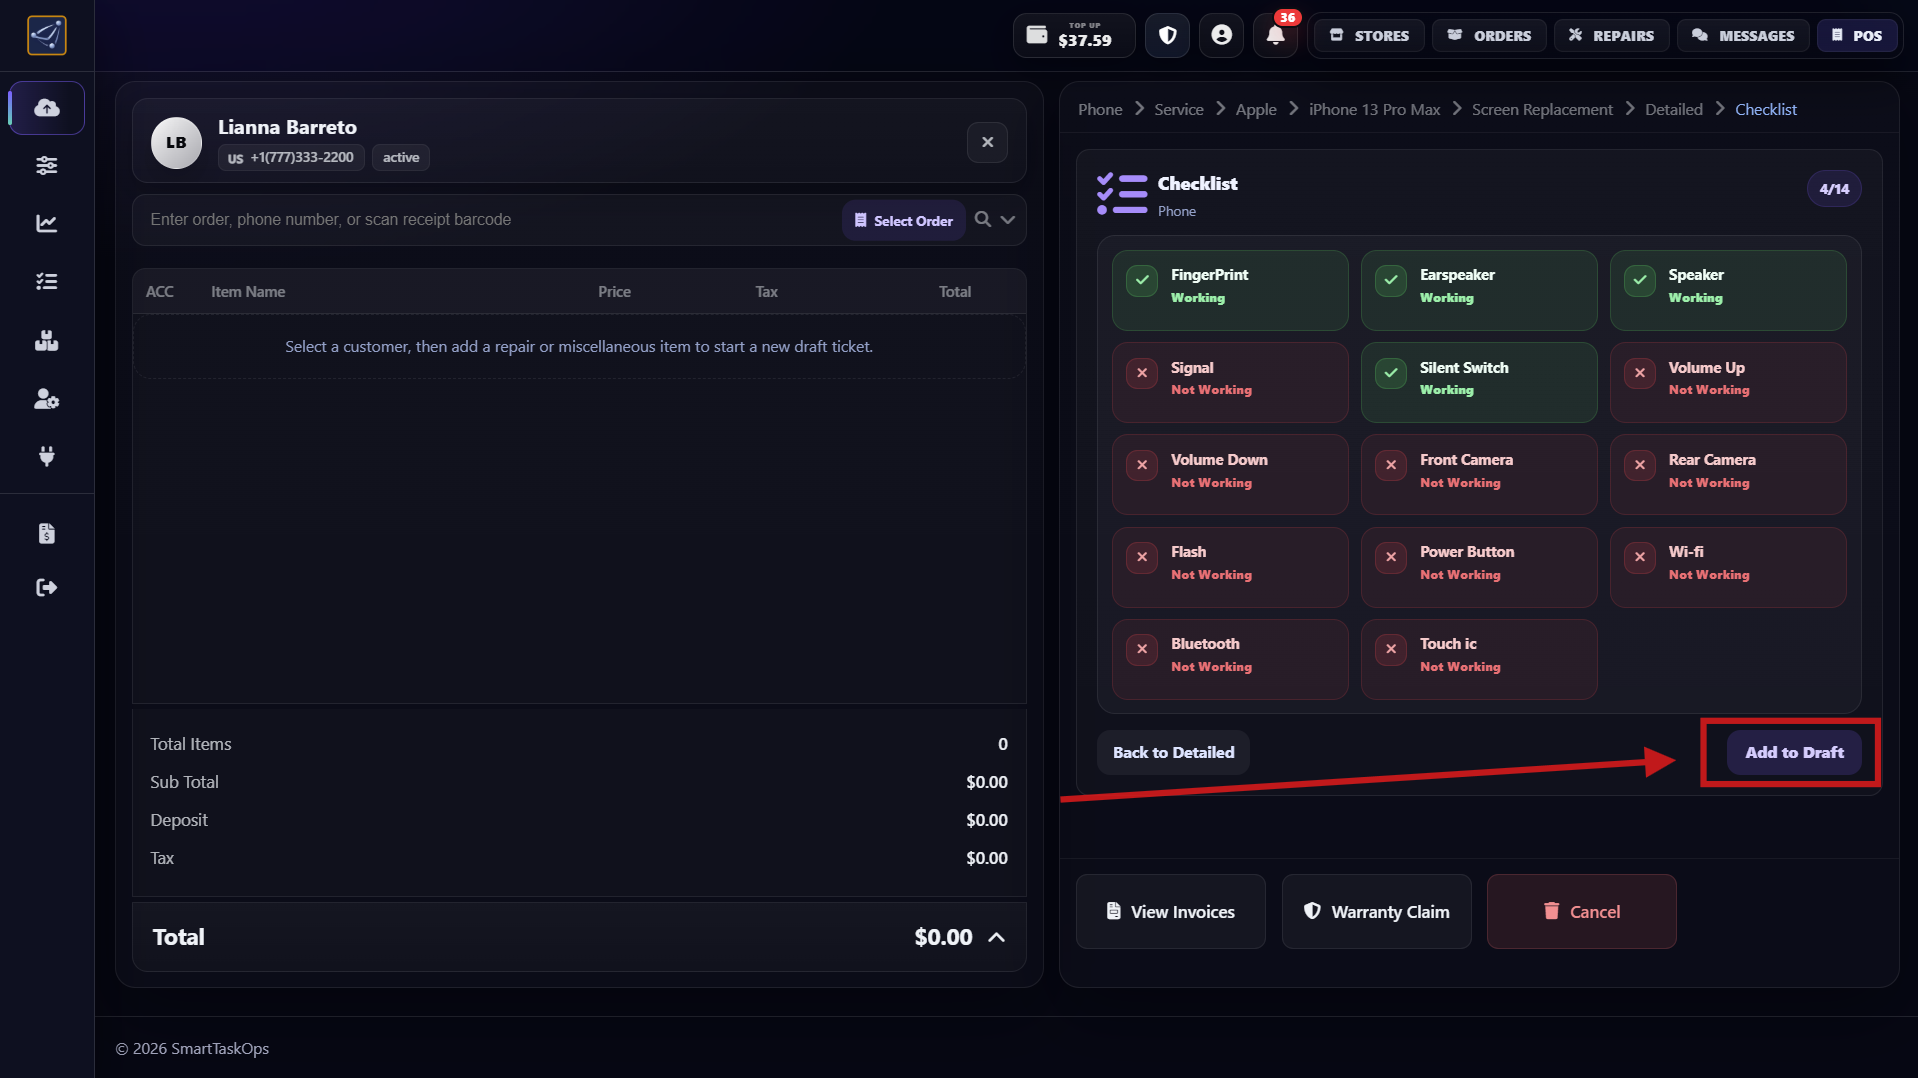
- In draft mode, you can still add more details before final order creation.
- You can also adjust pricing and deposits before confirming everything.
Step 10
Add miscellaneous stock items and create order
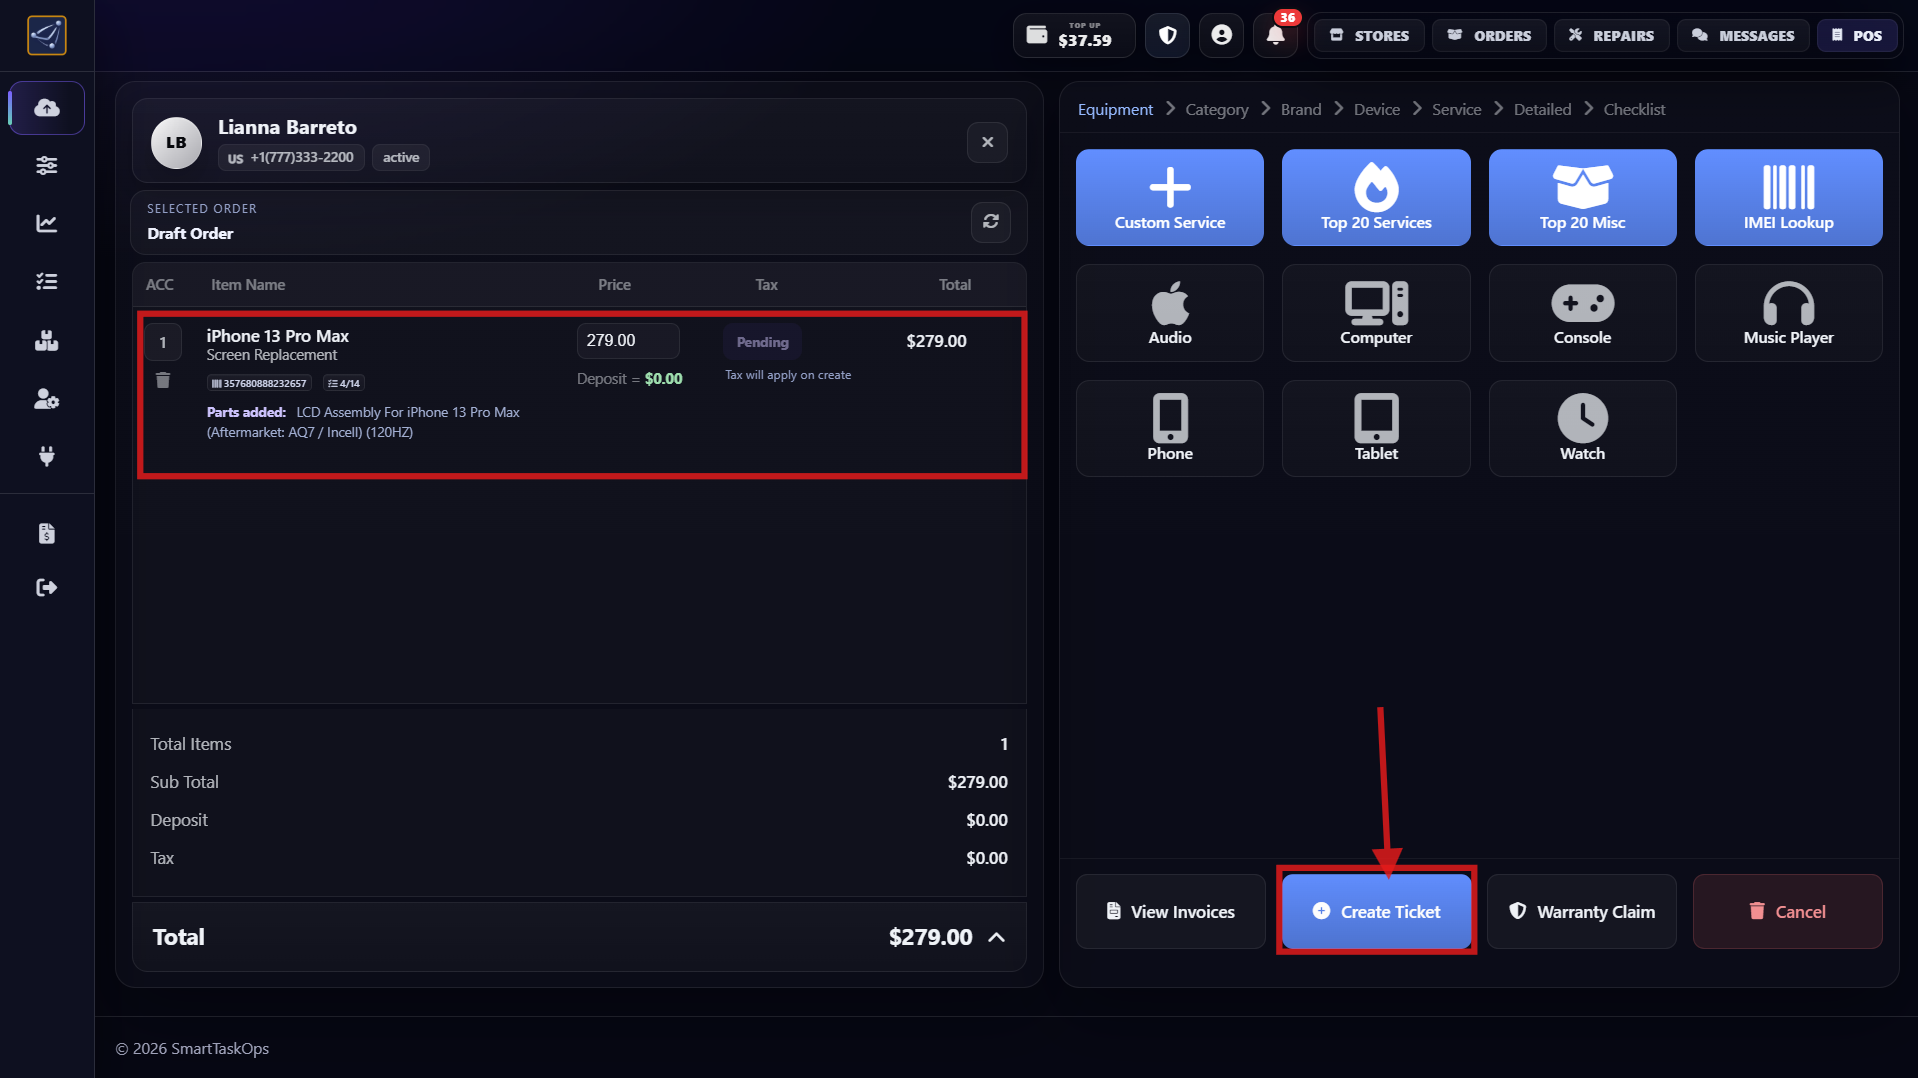
- Add miscellaneous items like tempered glass or cover from your stock.
- If no more draft changes are needed, press the blue Create Order button.
Step 11
Edit price after creation and use ticket tracking
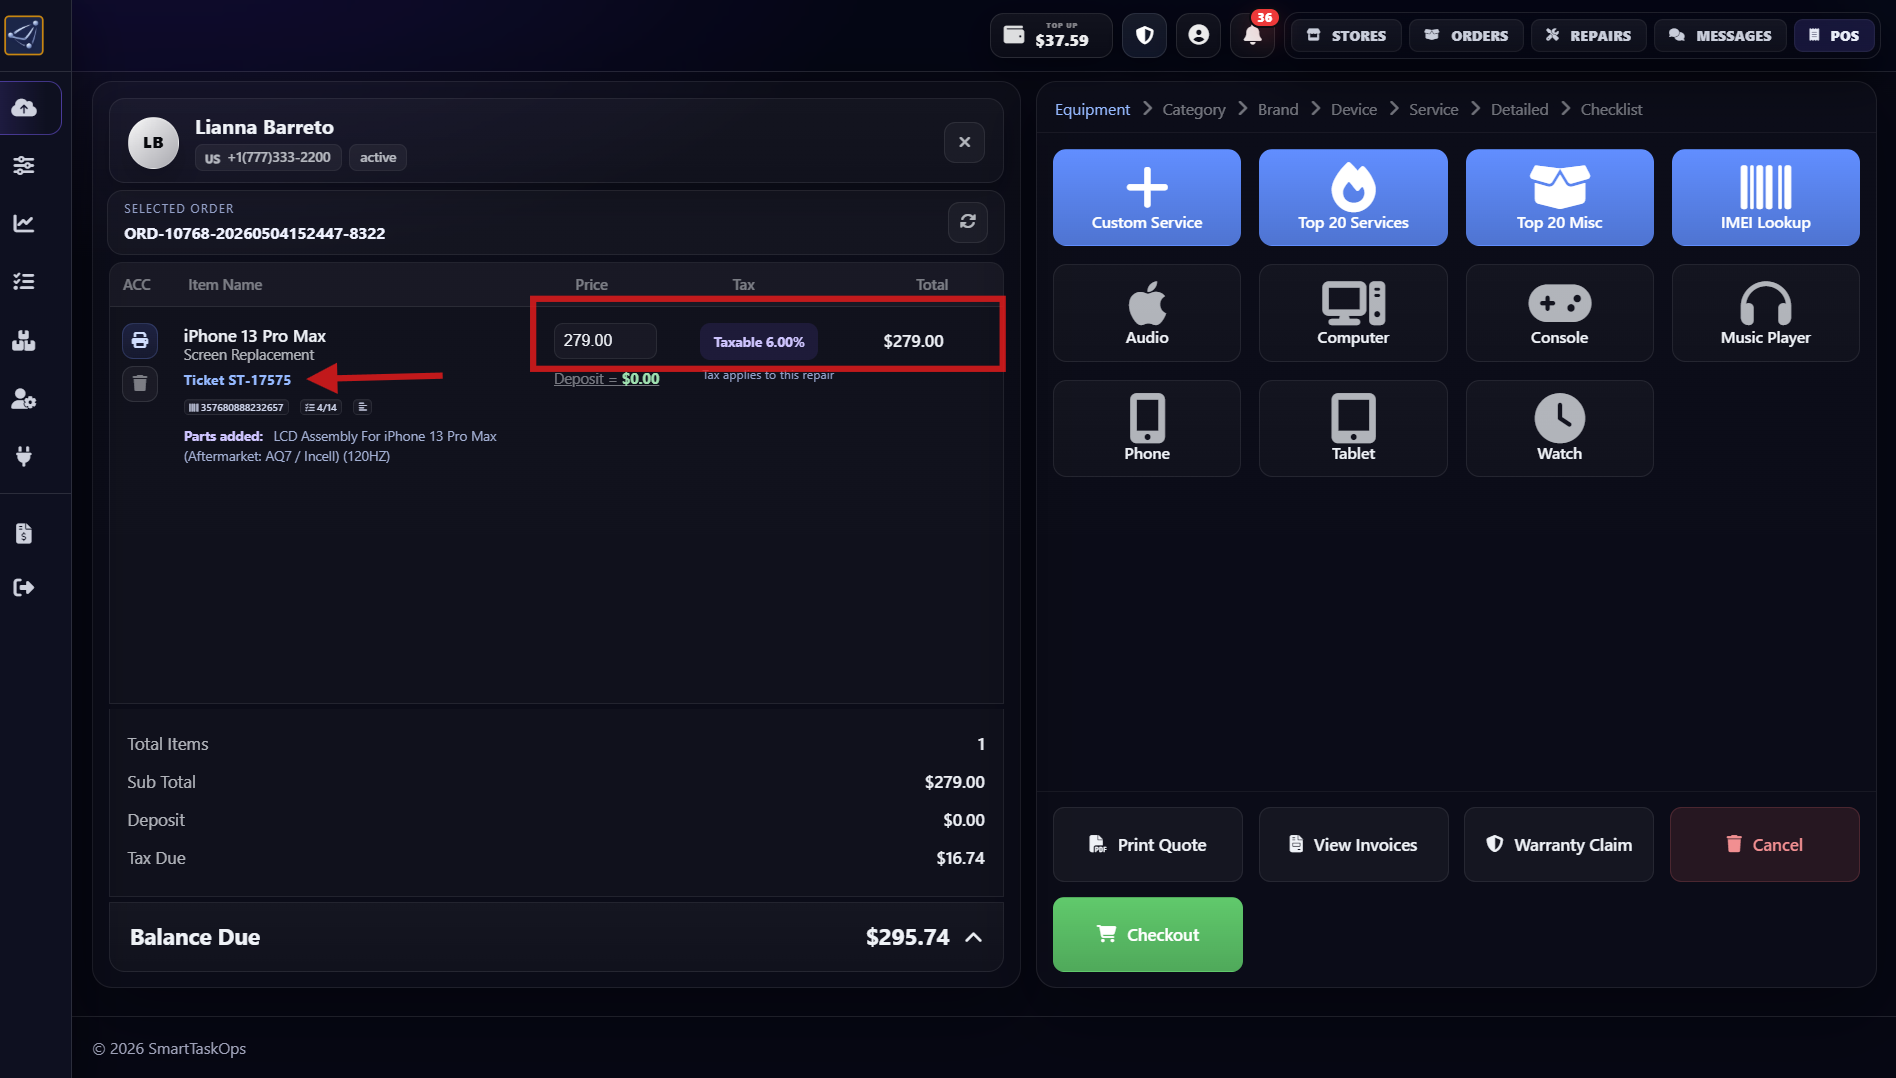
- After order creation, you can still edit prices. For diagnostic-only work, you can leave price at 0 like a quote.
- Once created, the system generates a ticket number to monitor repair status with the customer.
Step 12
Print device label for repair tracking
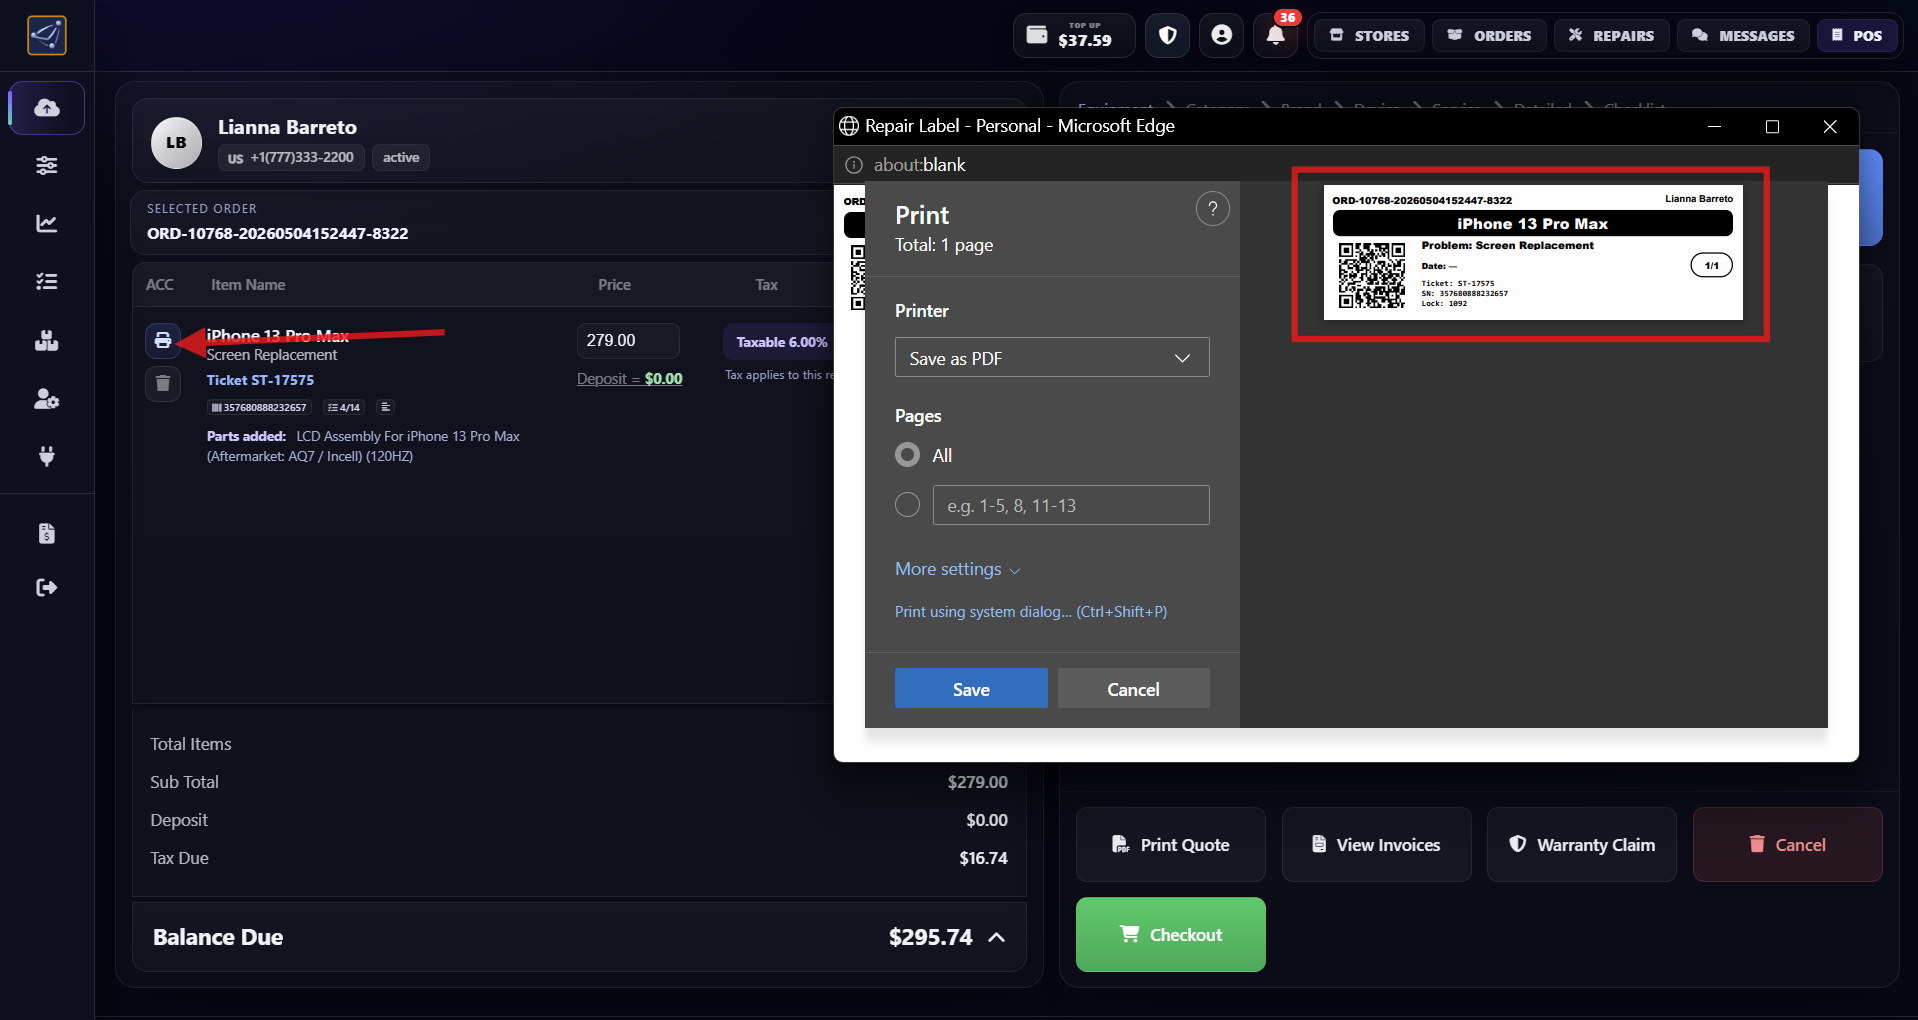
- Print the label for the device so it stays identified and always linked to the correct customer record.
- Place the printed label on the device immediately to avoid mix-ups while multiple repairs are in progress.
Step 13
Open customer receipt from Quote or Invoice

- If customer has not paid yet, use the Quote button to print the receipt.
- If the customer paid a deposit, open receipt from the Invoice button.
Step 14
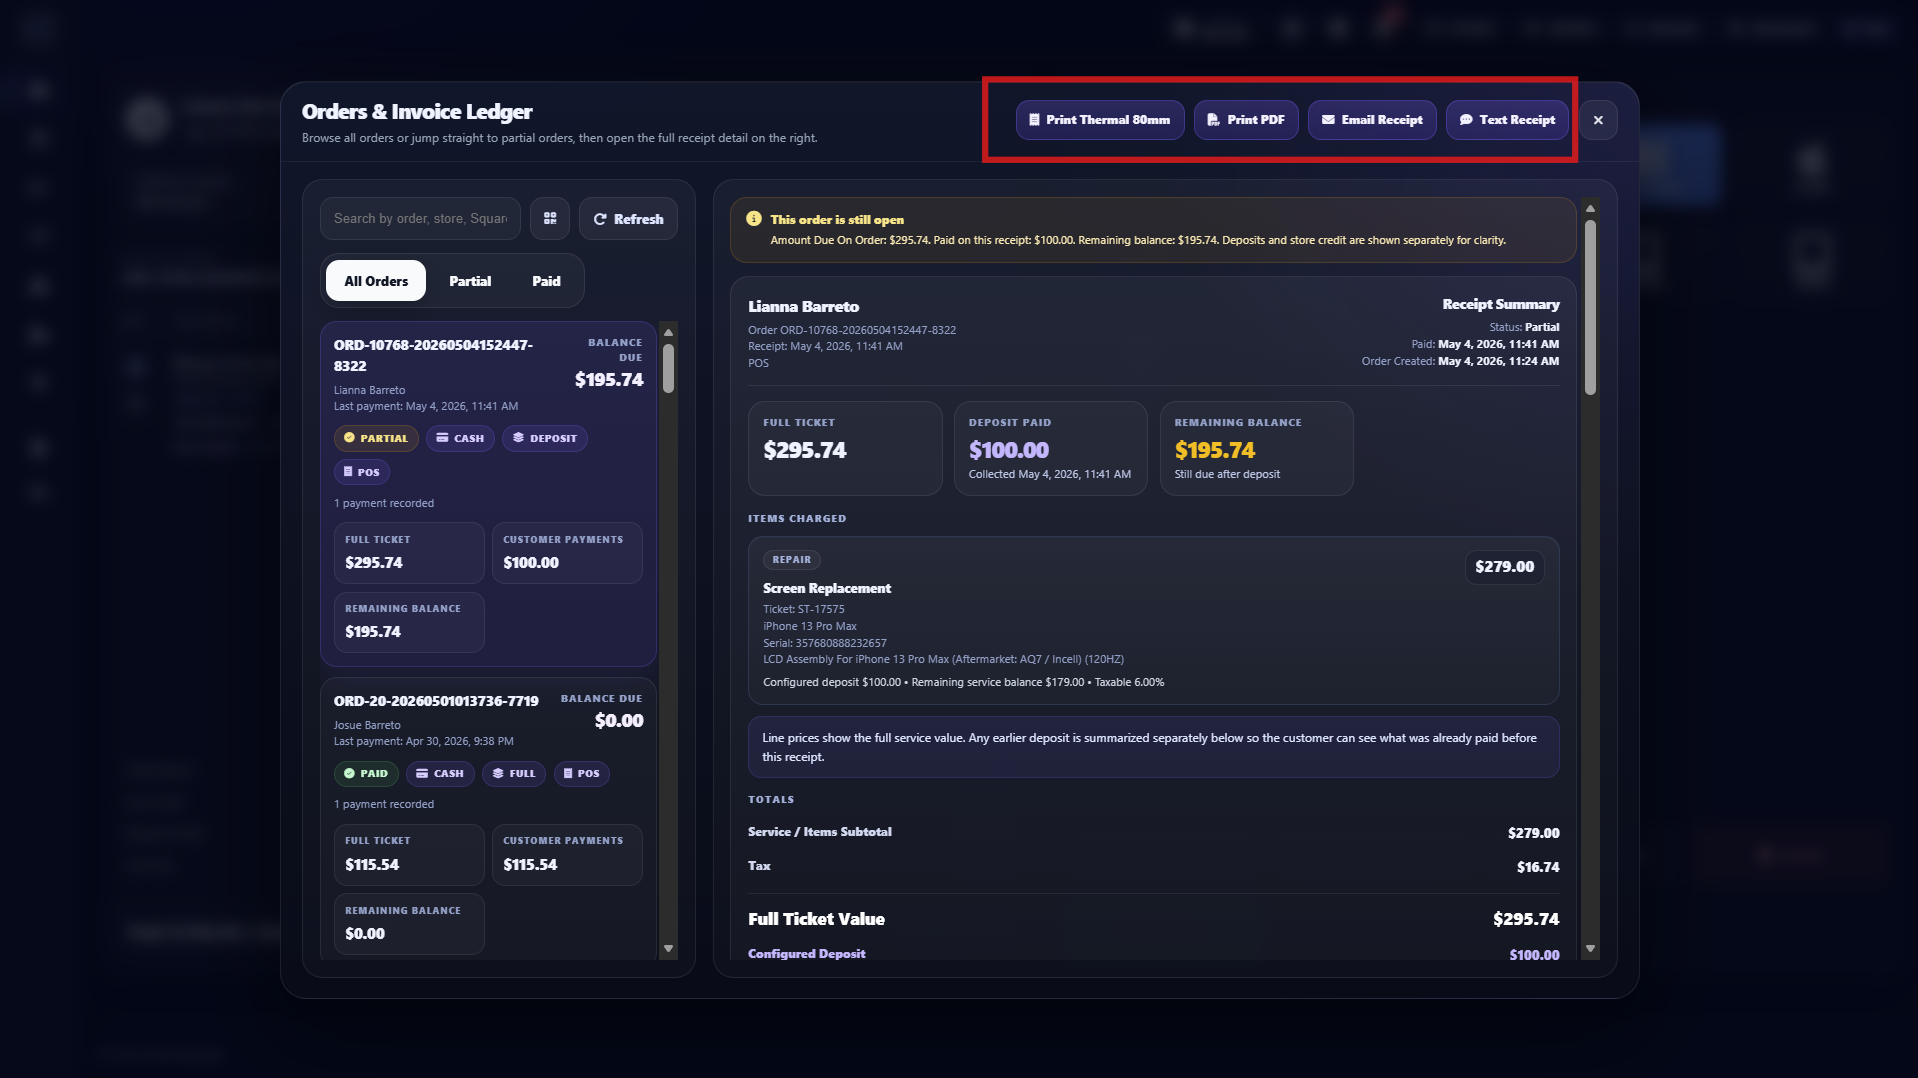
Preview receipt and choose delivery method
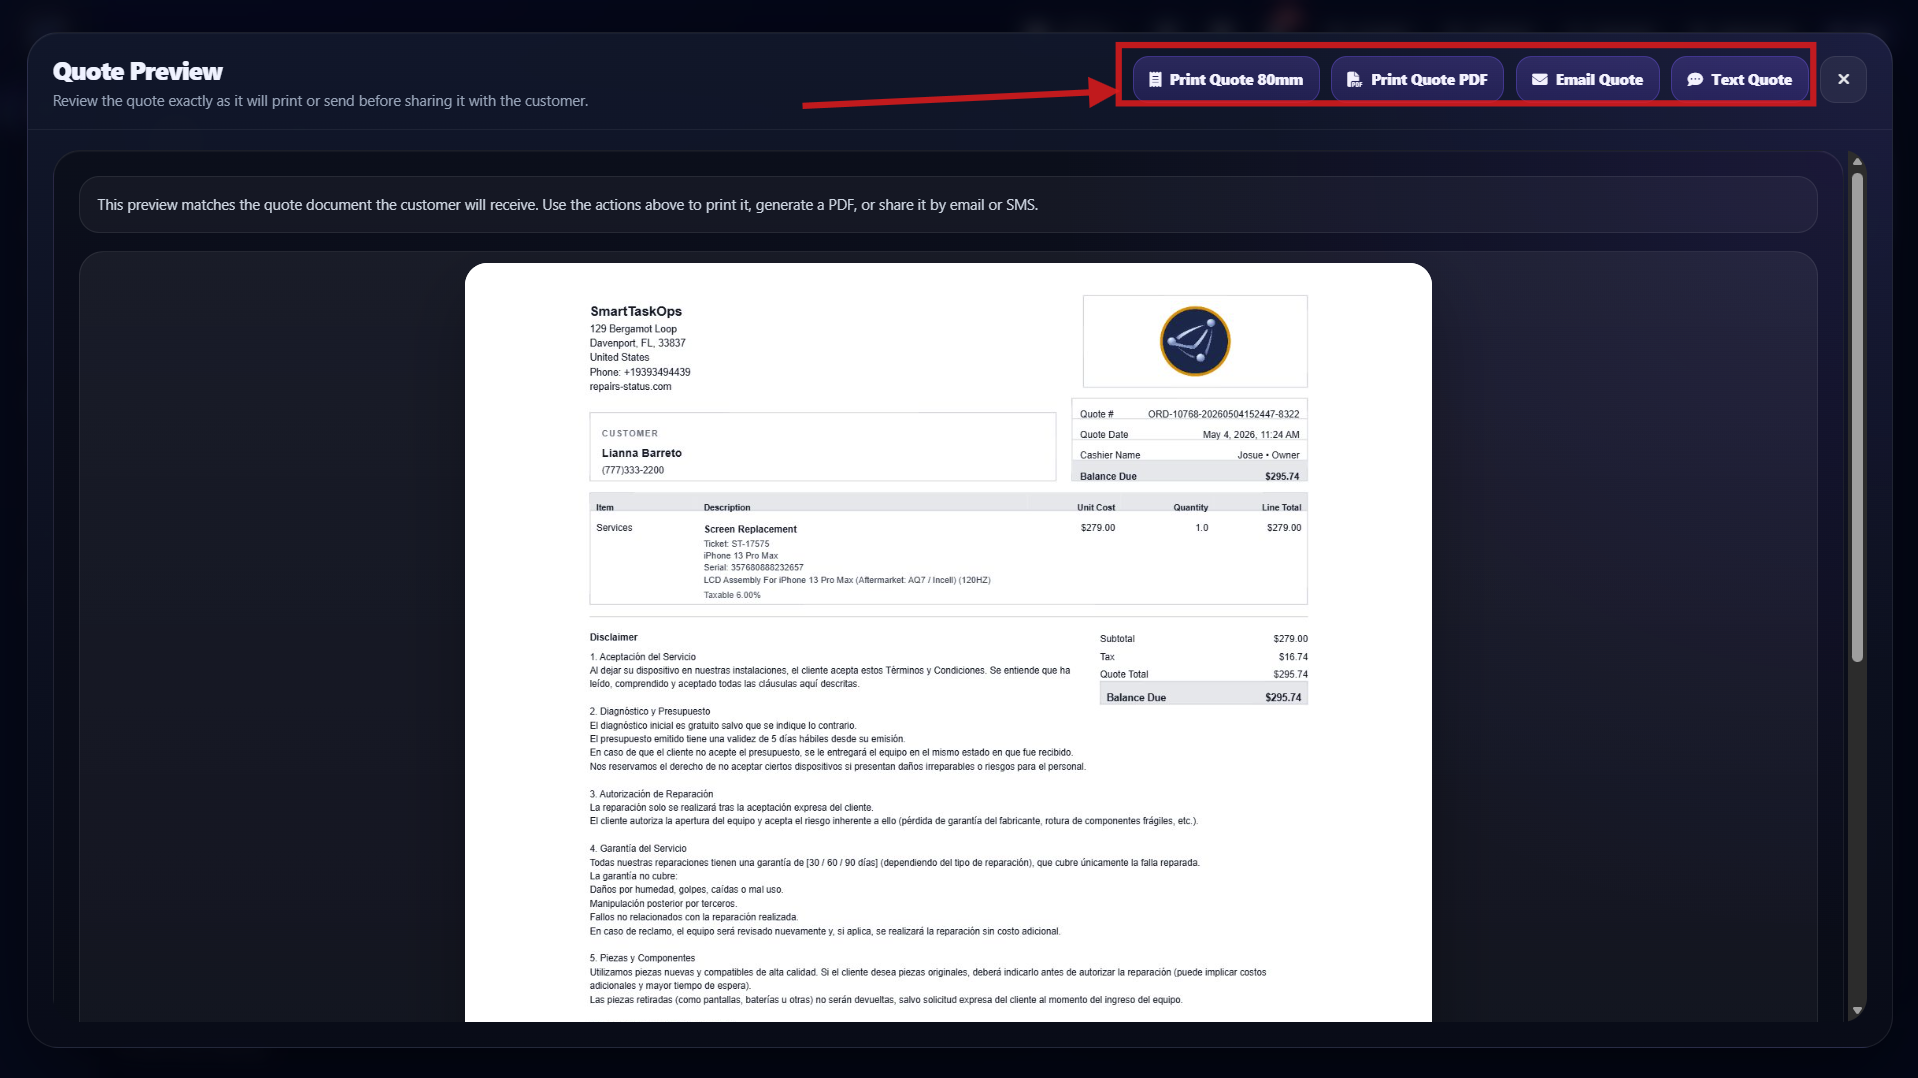
- Preview receipt and send it by 80mm printer, SMS, Email, or PDF.
- Choose the method the customer prefers so they leave with a clear proof of the quote or payment details.
Step 15
Add deposit and review checkout summary

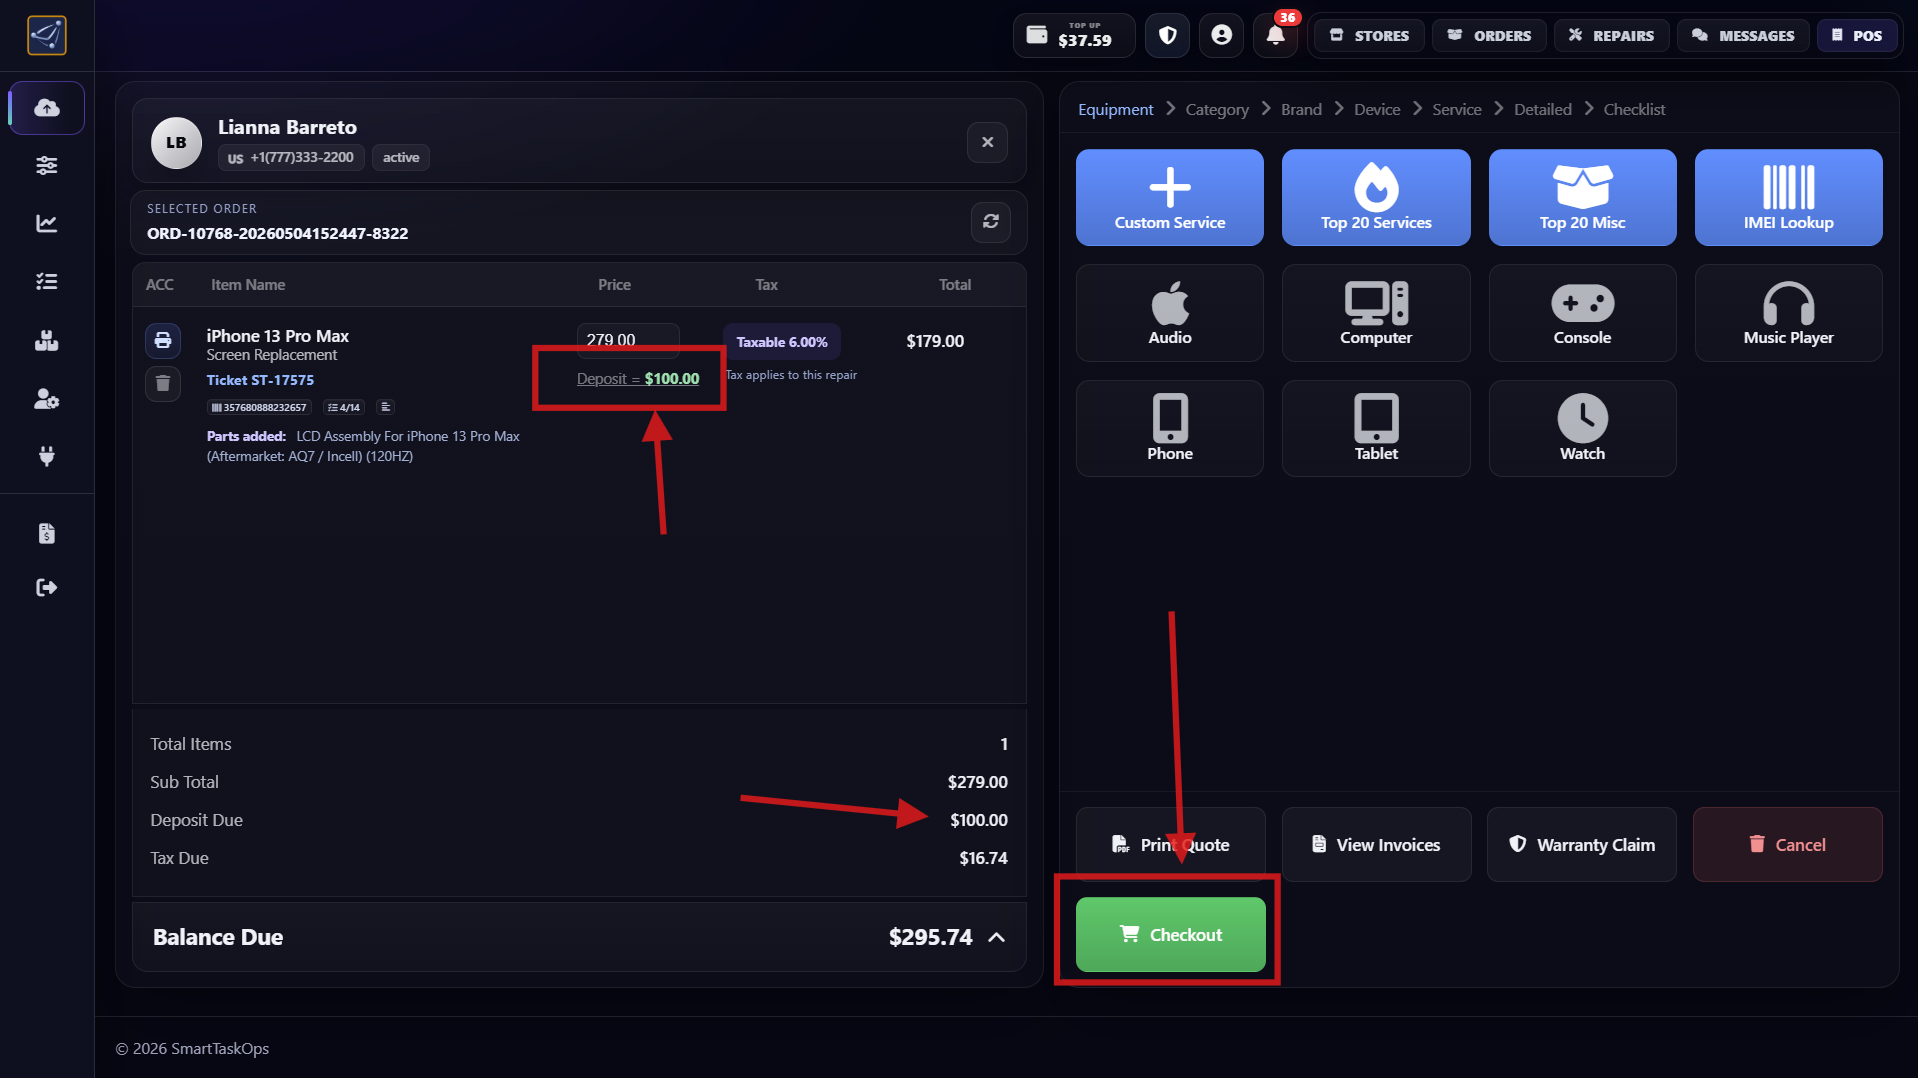
- Press Deposit and enter the amount, for example $100.00.
- After adding the deposit, review updated checkout details for this repair.
Step 16
Collect deposit from checkout modal
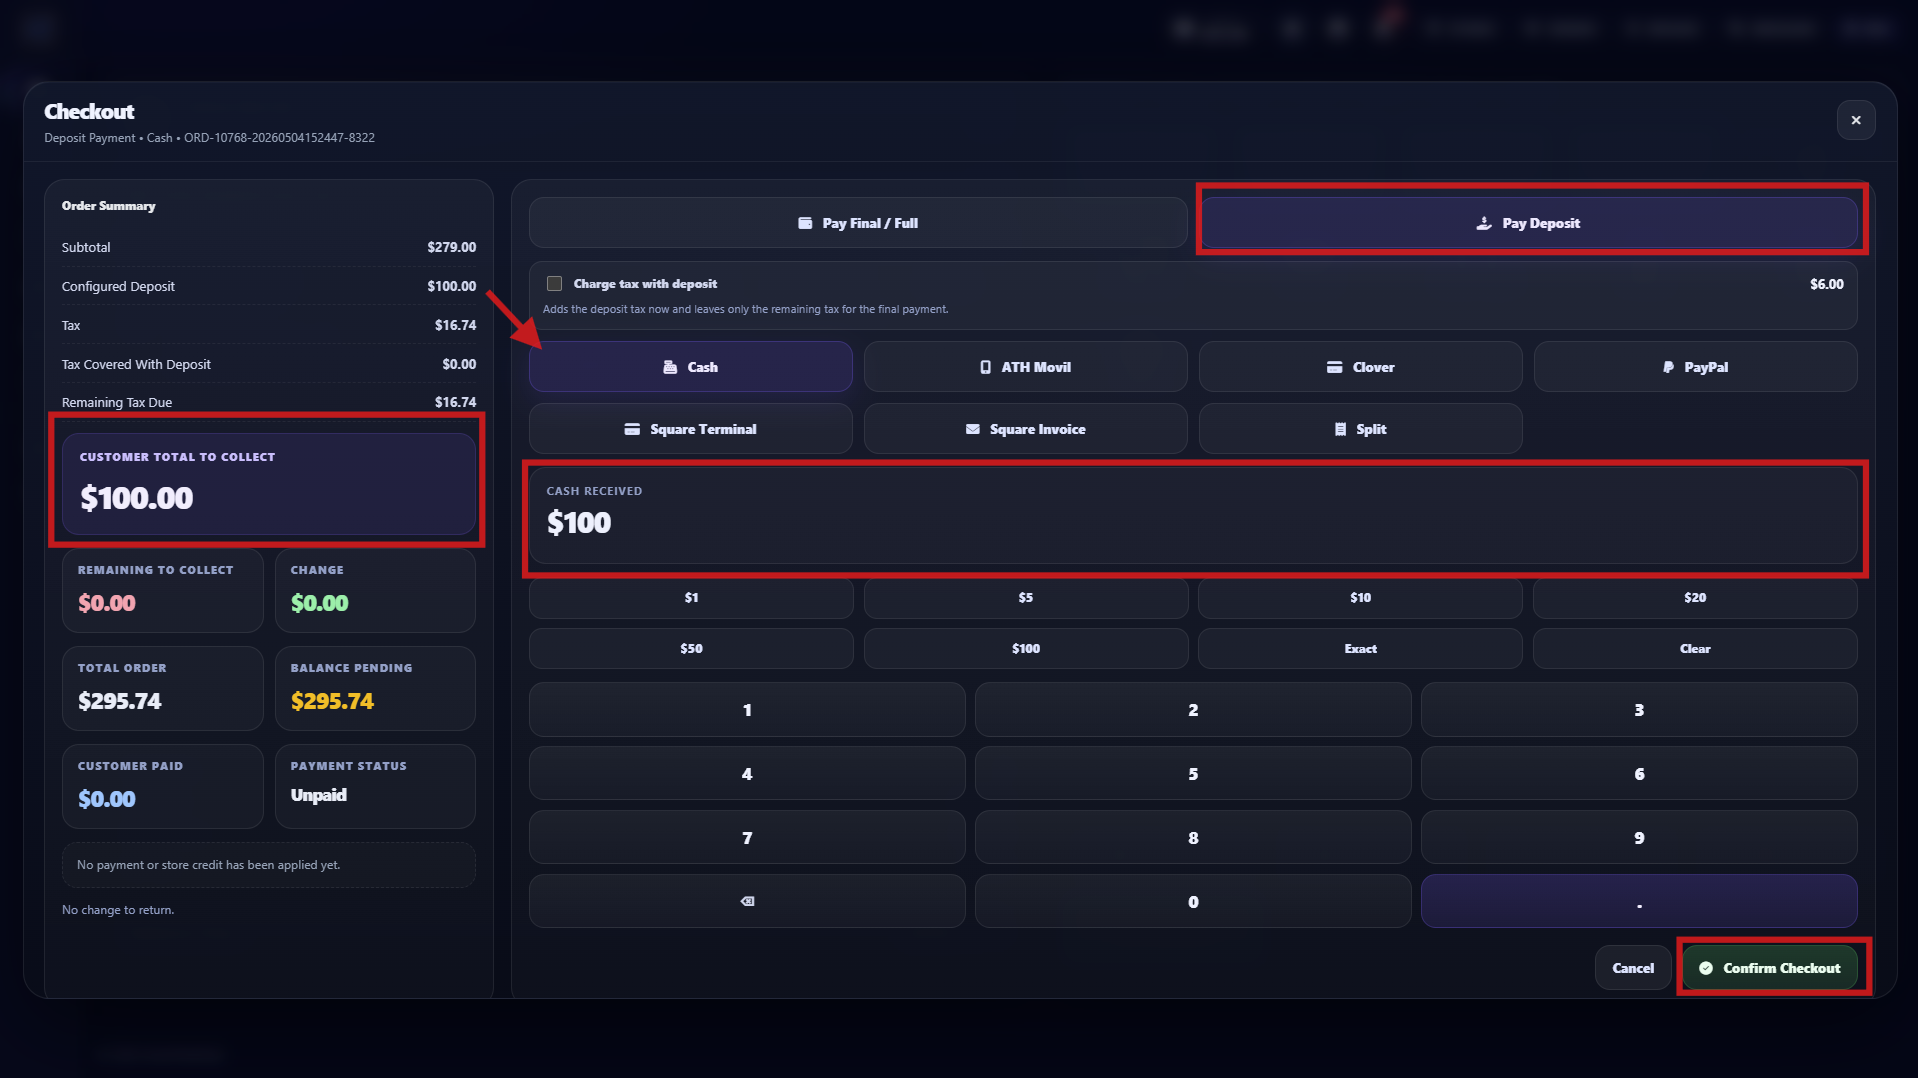
- Open checkout modal, choose Collect Deposit, then select payment method.
- In this example, customer pays cash $100 and you confirm checkout.
Step 17
Confirm checkout and issue payment receipt
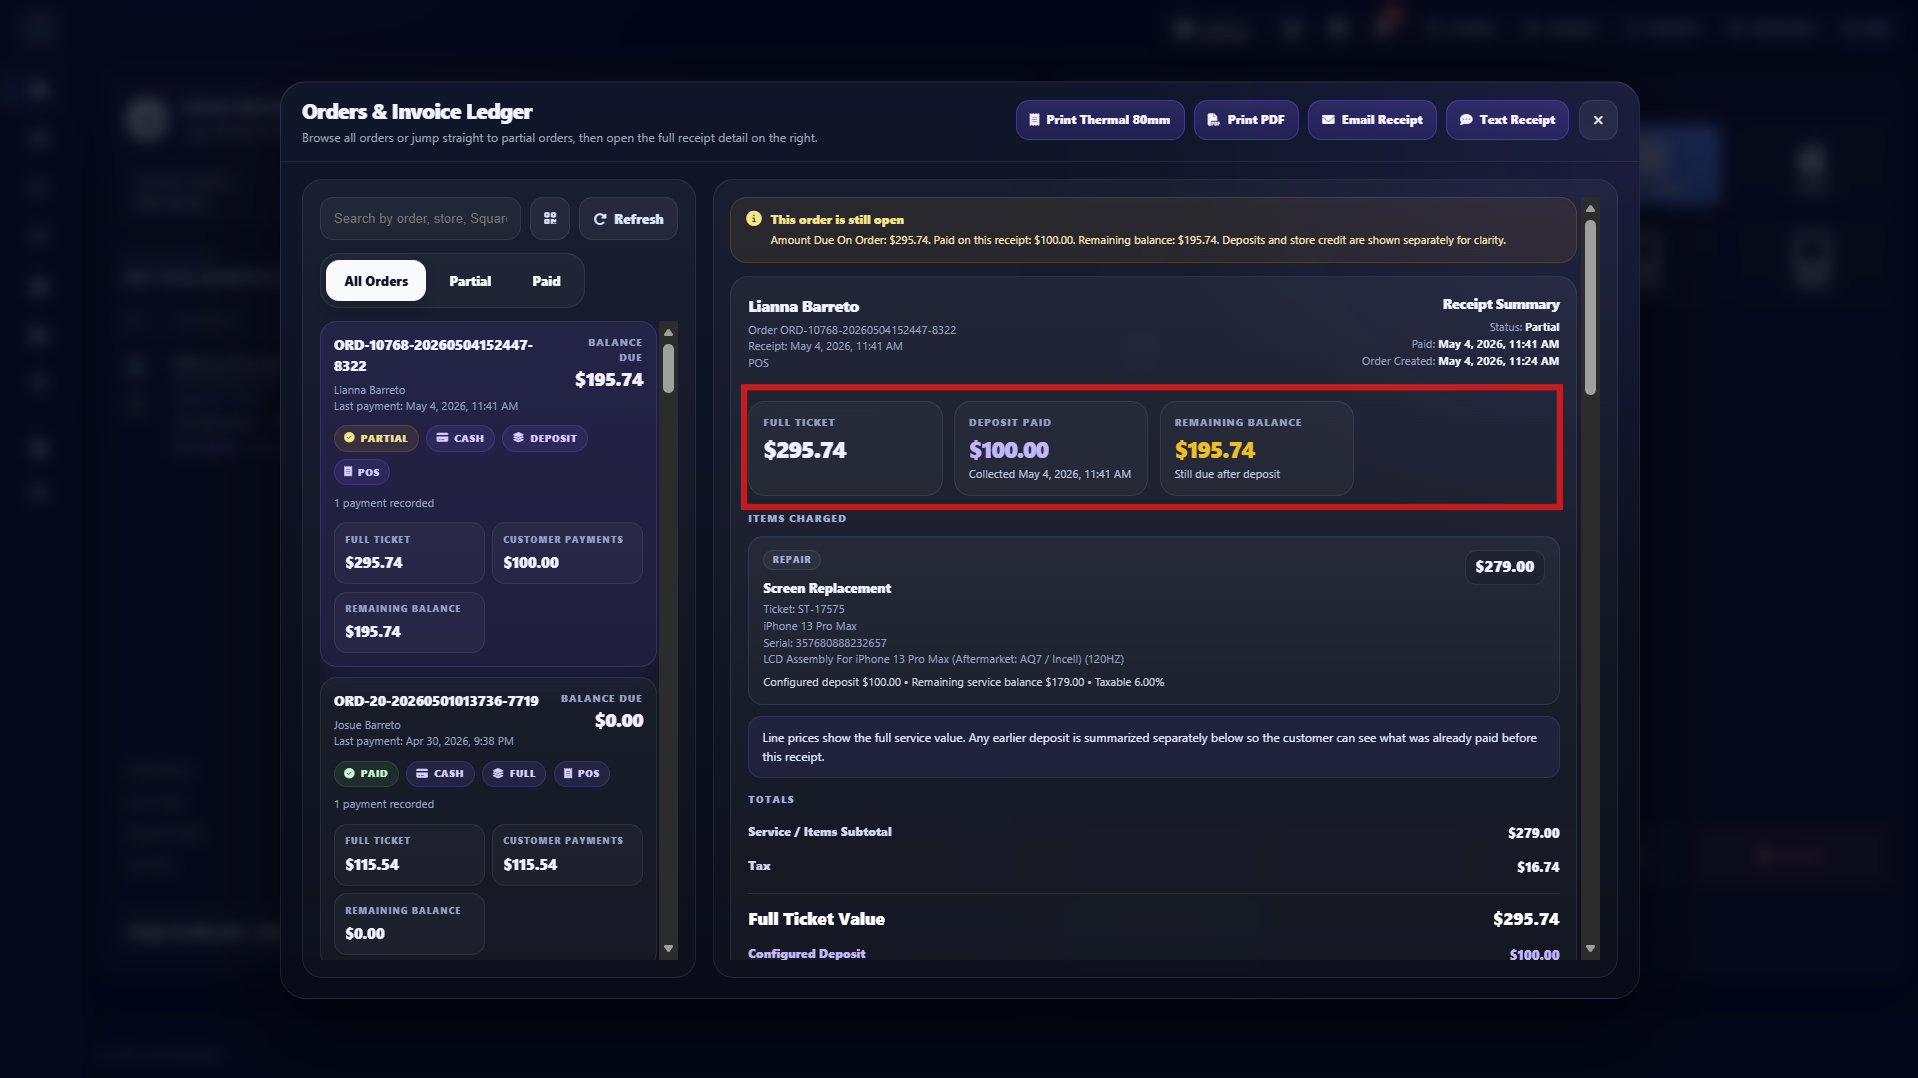
- After confirming checkout, the receipt panel opens with deposit, remaining balance, tax, and final totals.
- From this panel, you can print or send proof of payment by SMS, 80mm, PDF, or Email.
Step 18
Order ready, clear POS panel for next customer
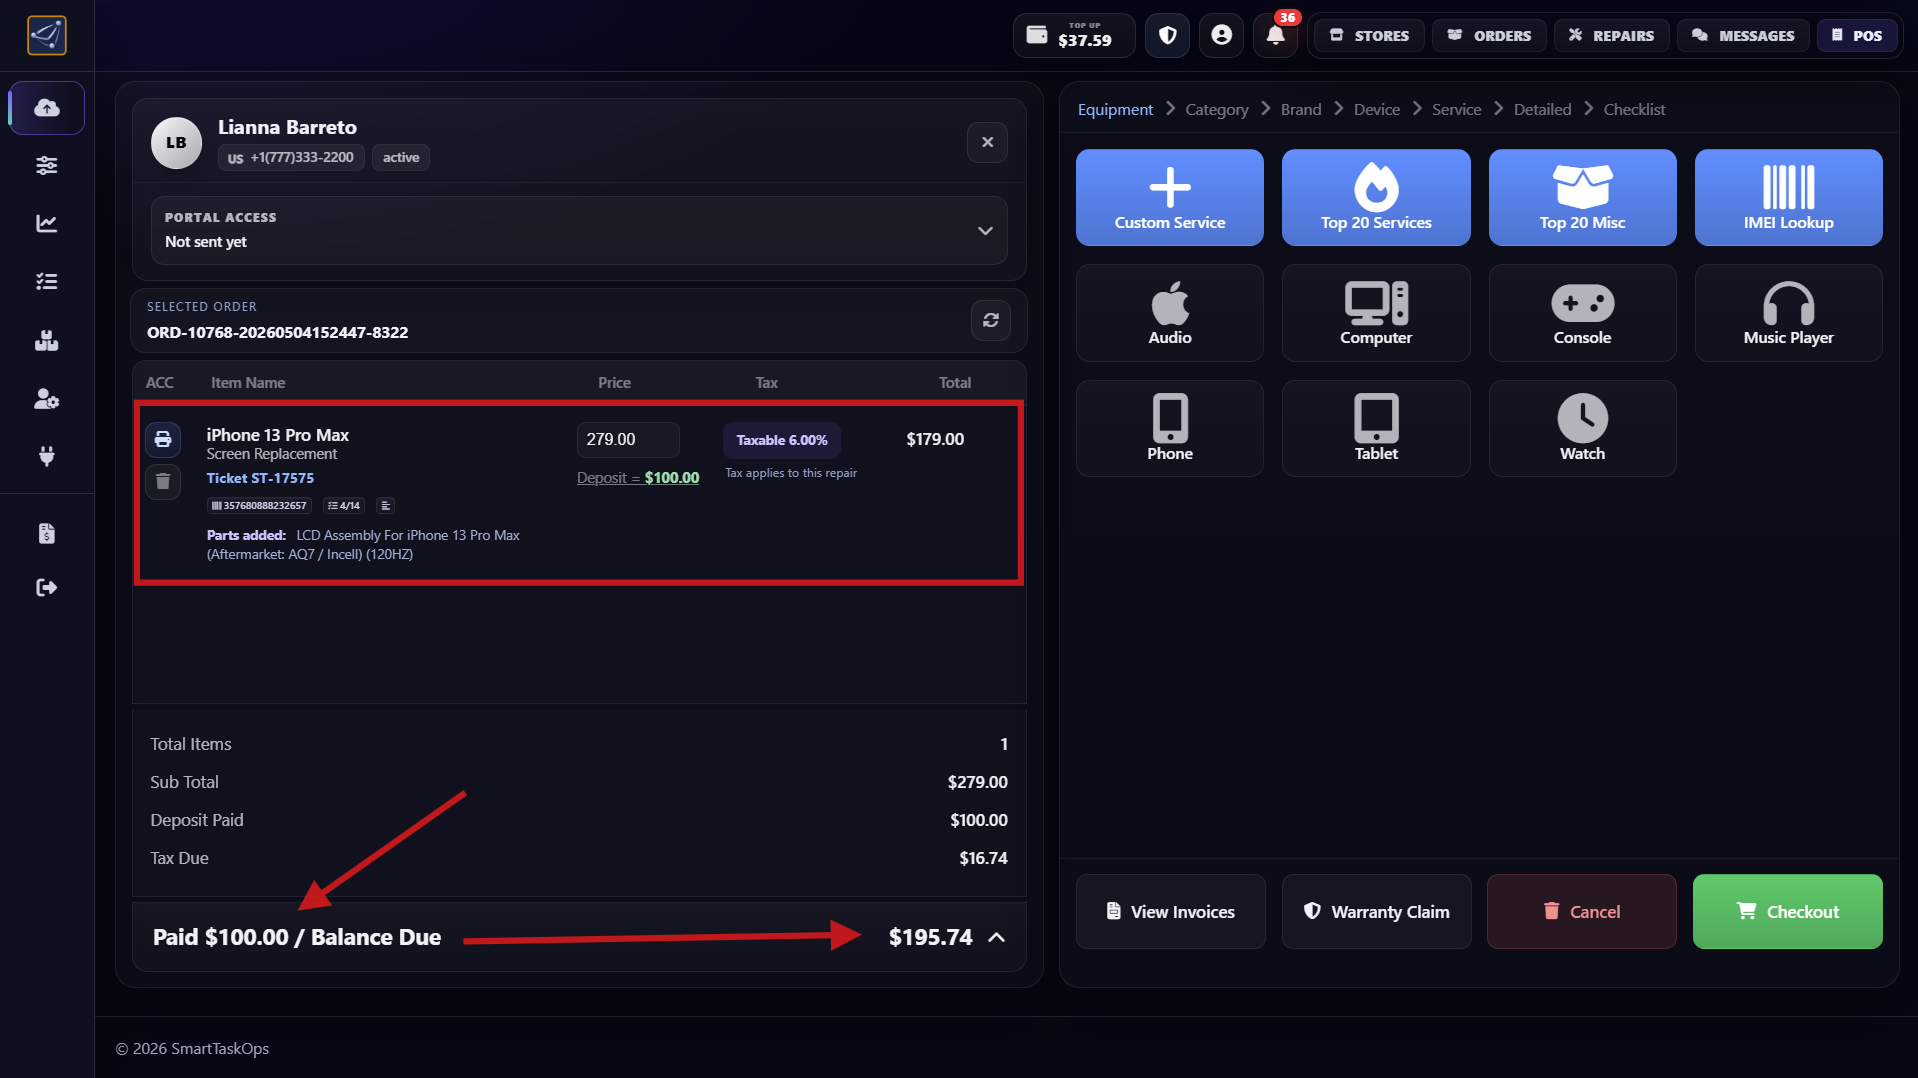
- After payment, you see paid balance, pending balance, ticket number, and order number.
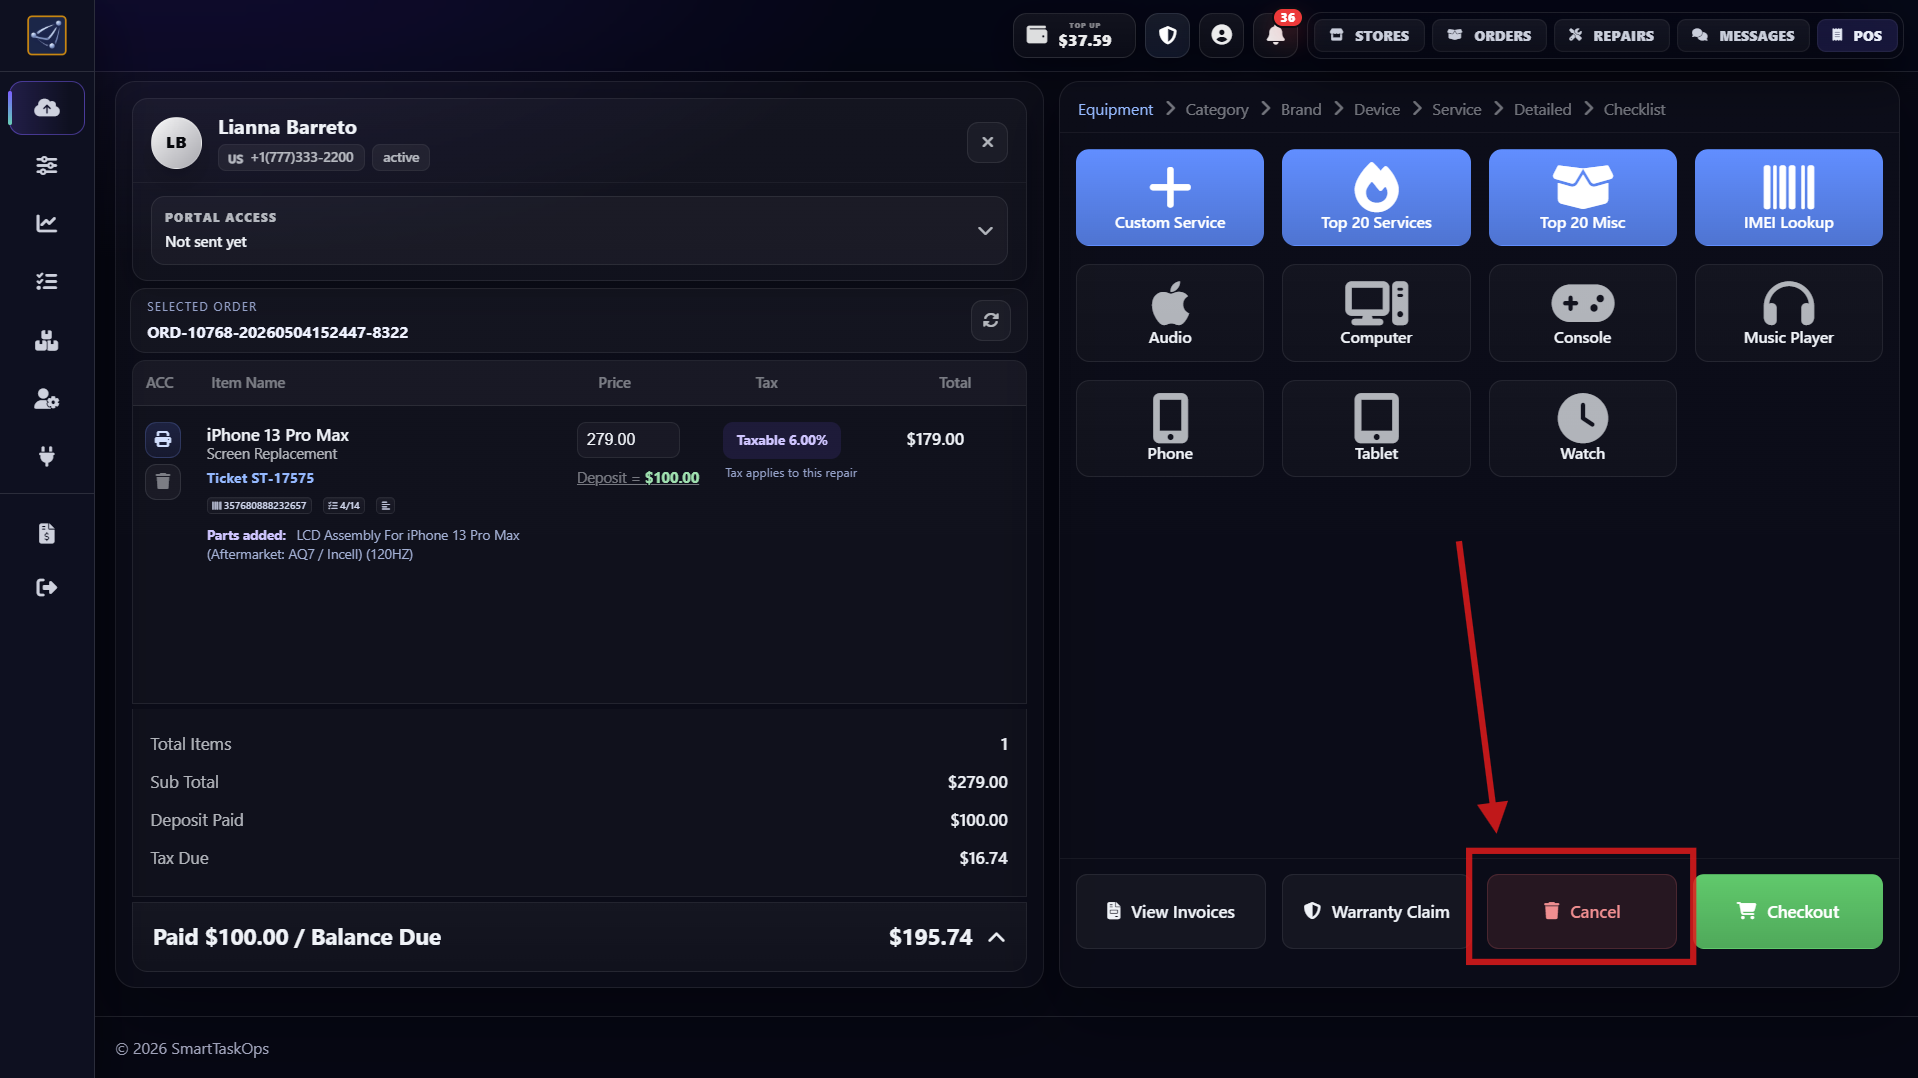
- Press Cancel to clear the POS panel only. It does not cancel the order.
Step 19
Watch the complete order workflow video
- This full Bunny.net video shows the entire order process from selecting the customer to completing checkout.
- Use it as a complete training walkthrough to review every order step in one continuous flow.
How to Activate Aurion AI Agent
Aurion is the preconfigured SmartTaskOps phone assistant for every store. Use this guide to activate it, route calls, and choose what Aurion can handle for customers.
Step 1
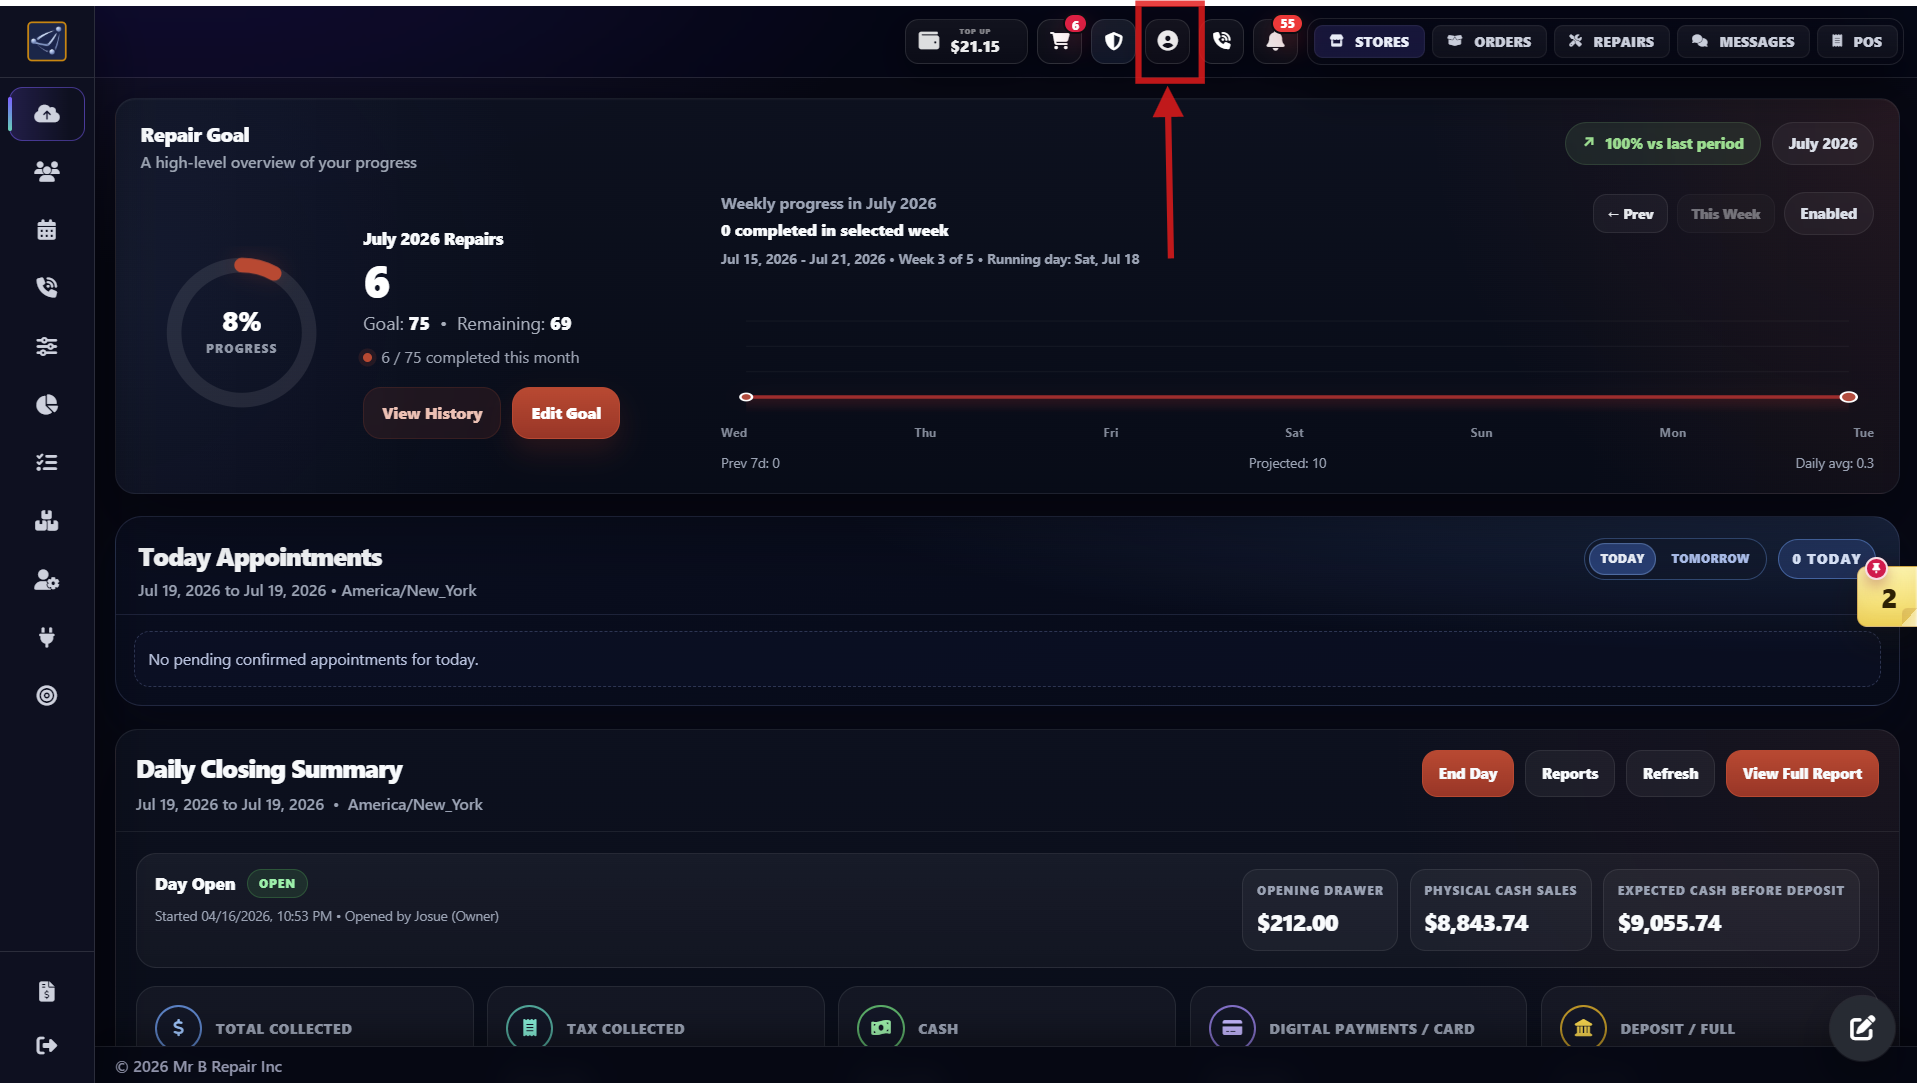
Open AI Phone Assistant settings
- Sign in with the owner account, then open the profile/settings panel and go to the Store settings.
- Find AI Phone Assistant. Aurion is already configured for the stores, so you only need to activate it and choose the features.
- Press the Profile icon or account settings area to open the configuration panel where Aurion AI Phone Assistant is managed.
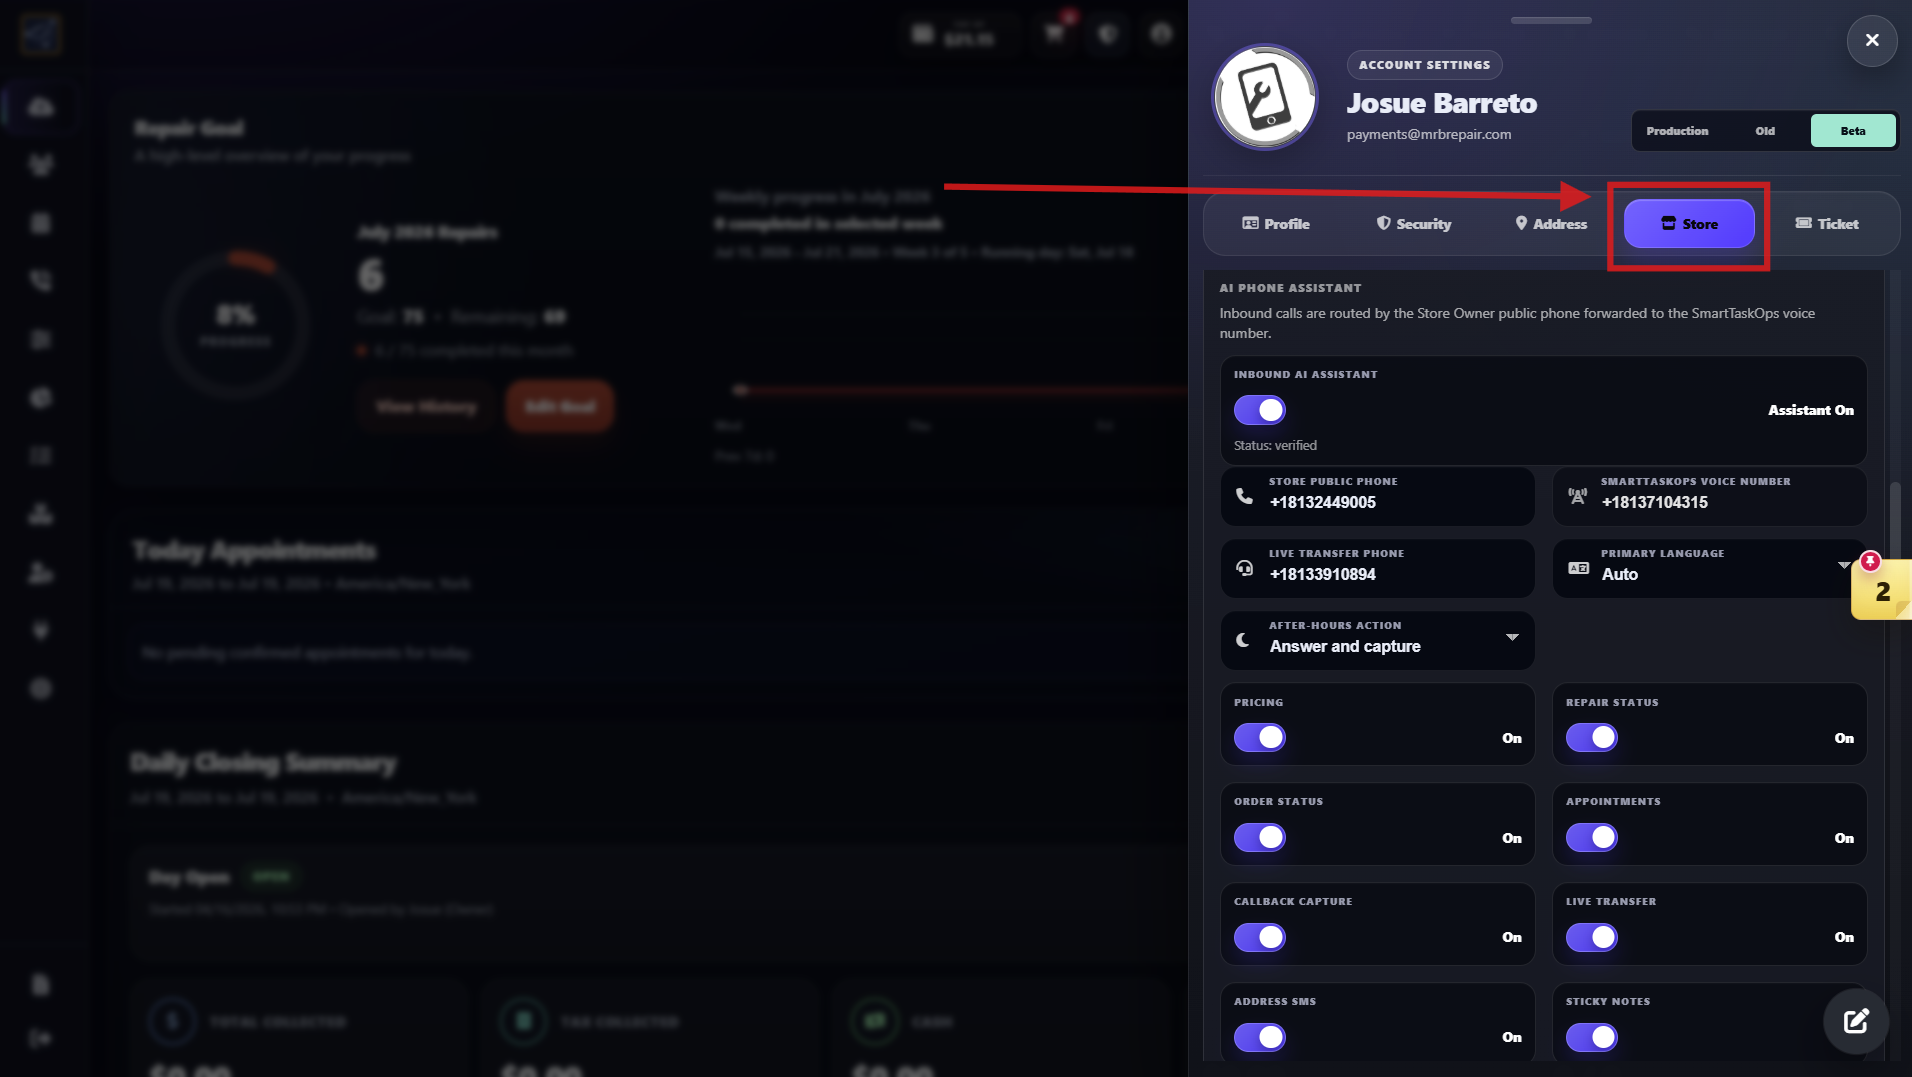
- After the profile panel opens, press the Store tab to reach the Aurion AI Phone Assistant settings.
Step 2
Forward and verify the store phone
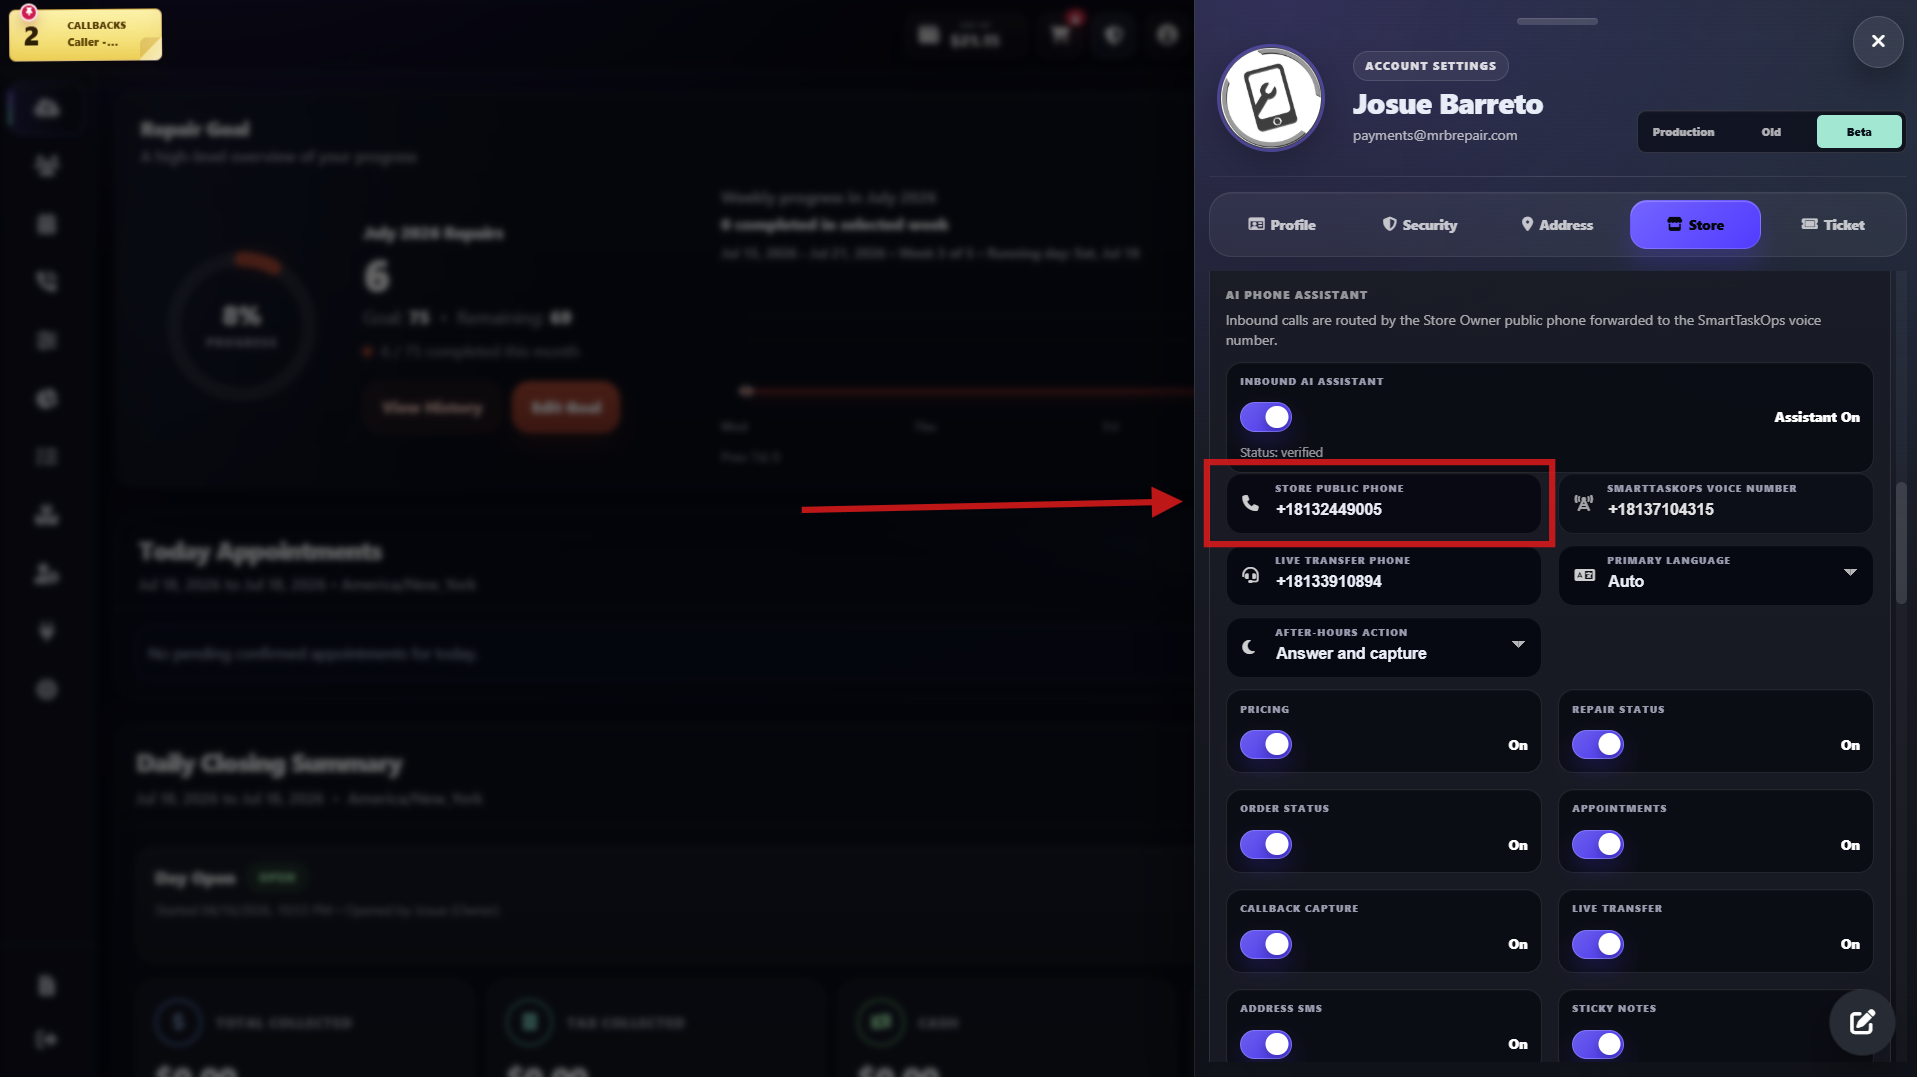
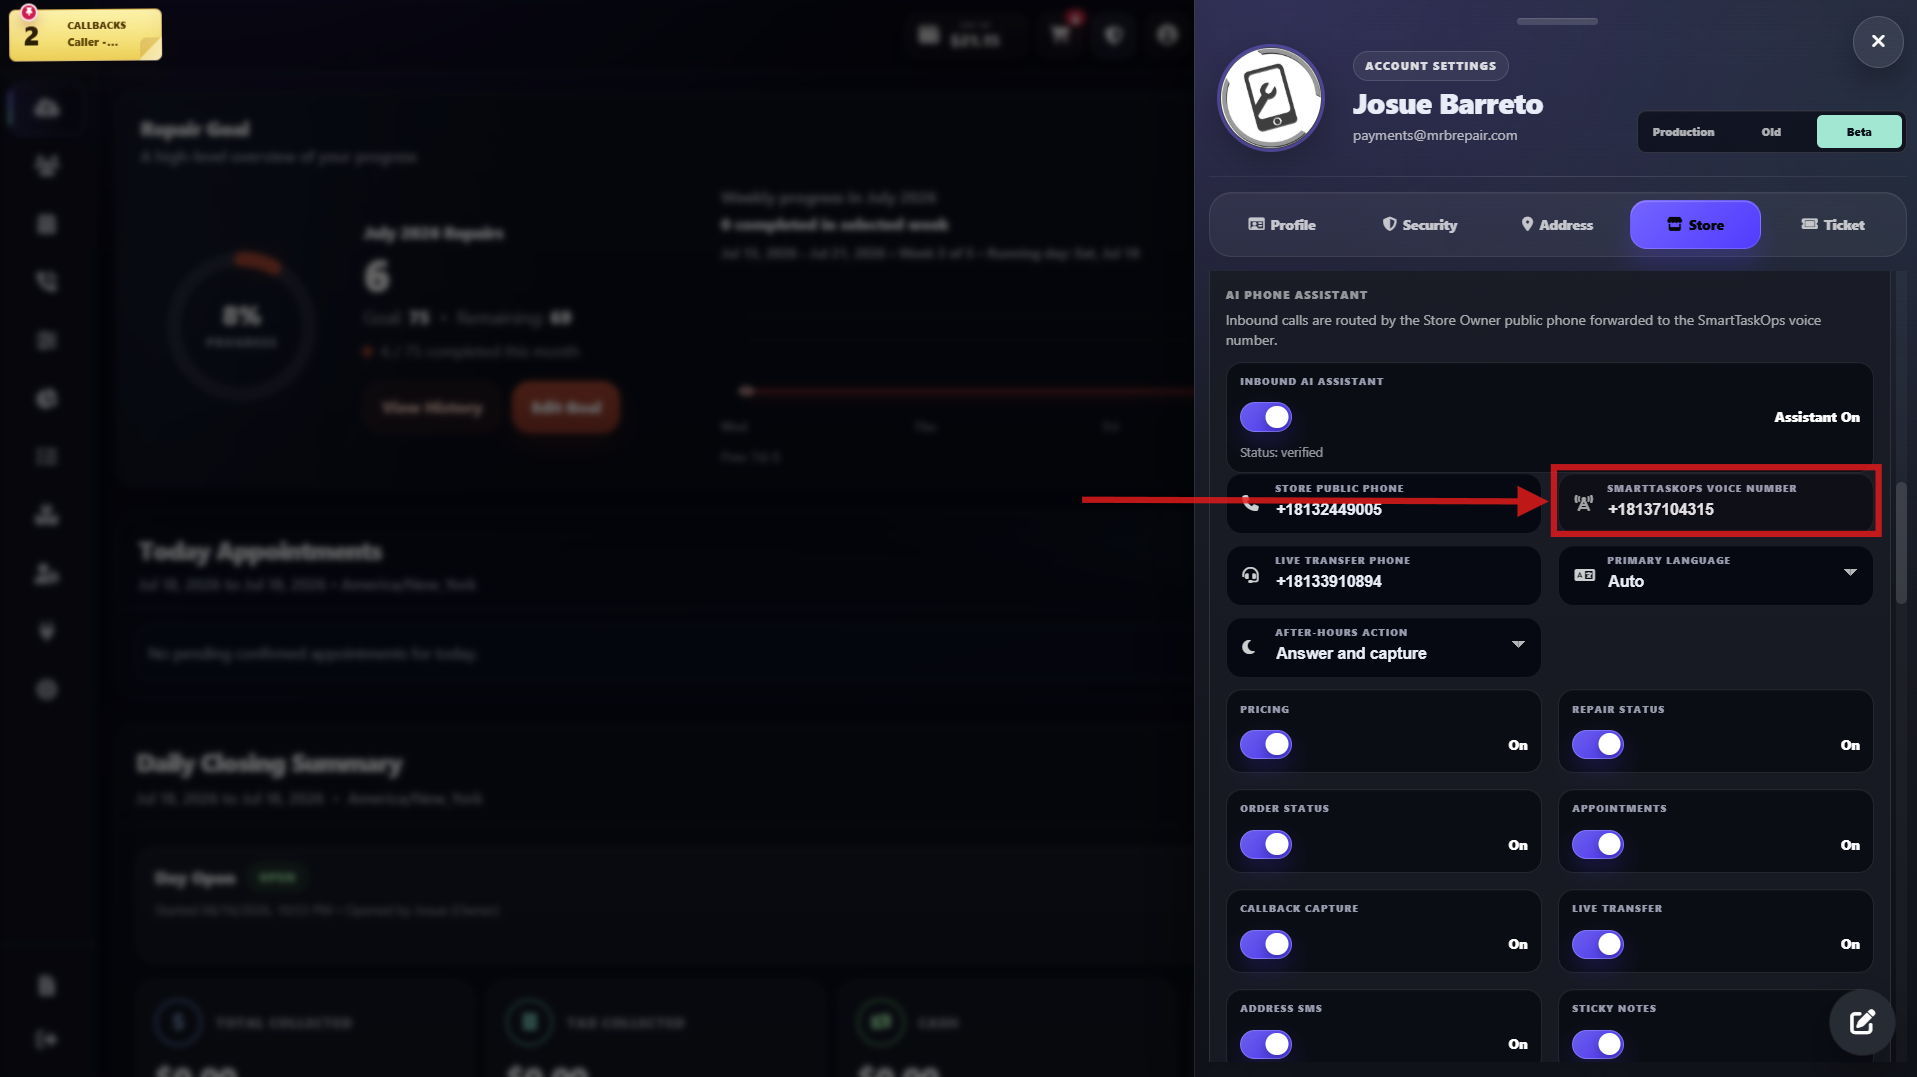
- Enter the Store public phone and forward that number to the SmartTaskOps voice number shown in the panel.
- Use Check forwarding until the status is verified. This confirms inbound customer calls can reach Aurion.
- This number is critical: Aurion uses the Store public phone to find the store's unique account and recognize where inbound calls are coming from.
- The SmartTaskOps voice number is the Aurion virtual assistant number. From the phone service that owns your store number, set call forwarding to this SmartTaskOps number.
Step 3
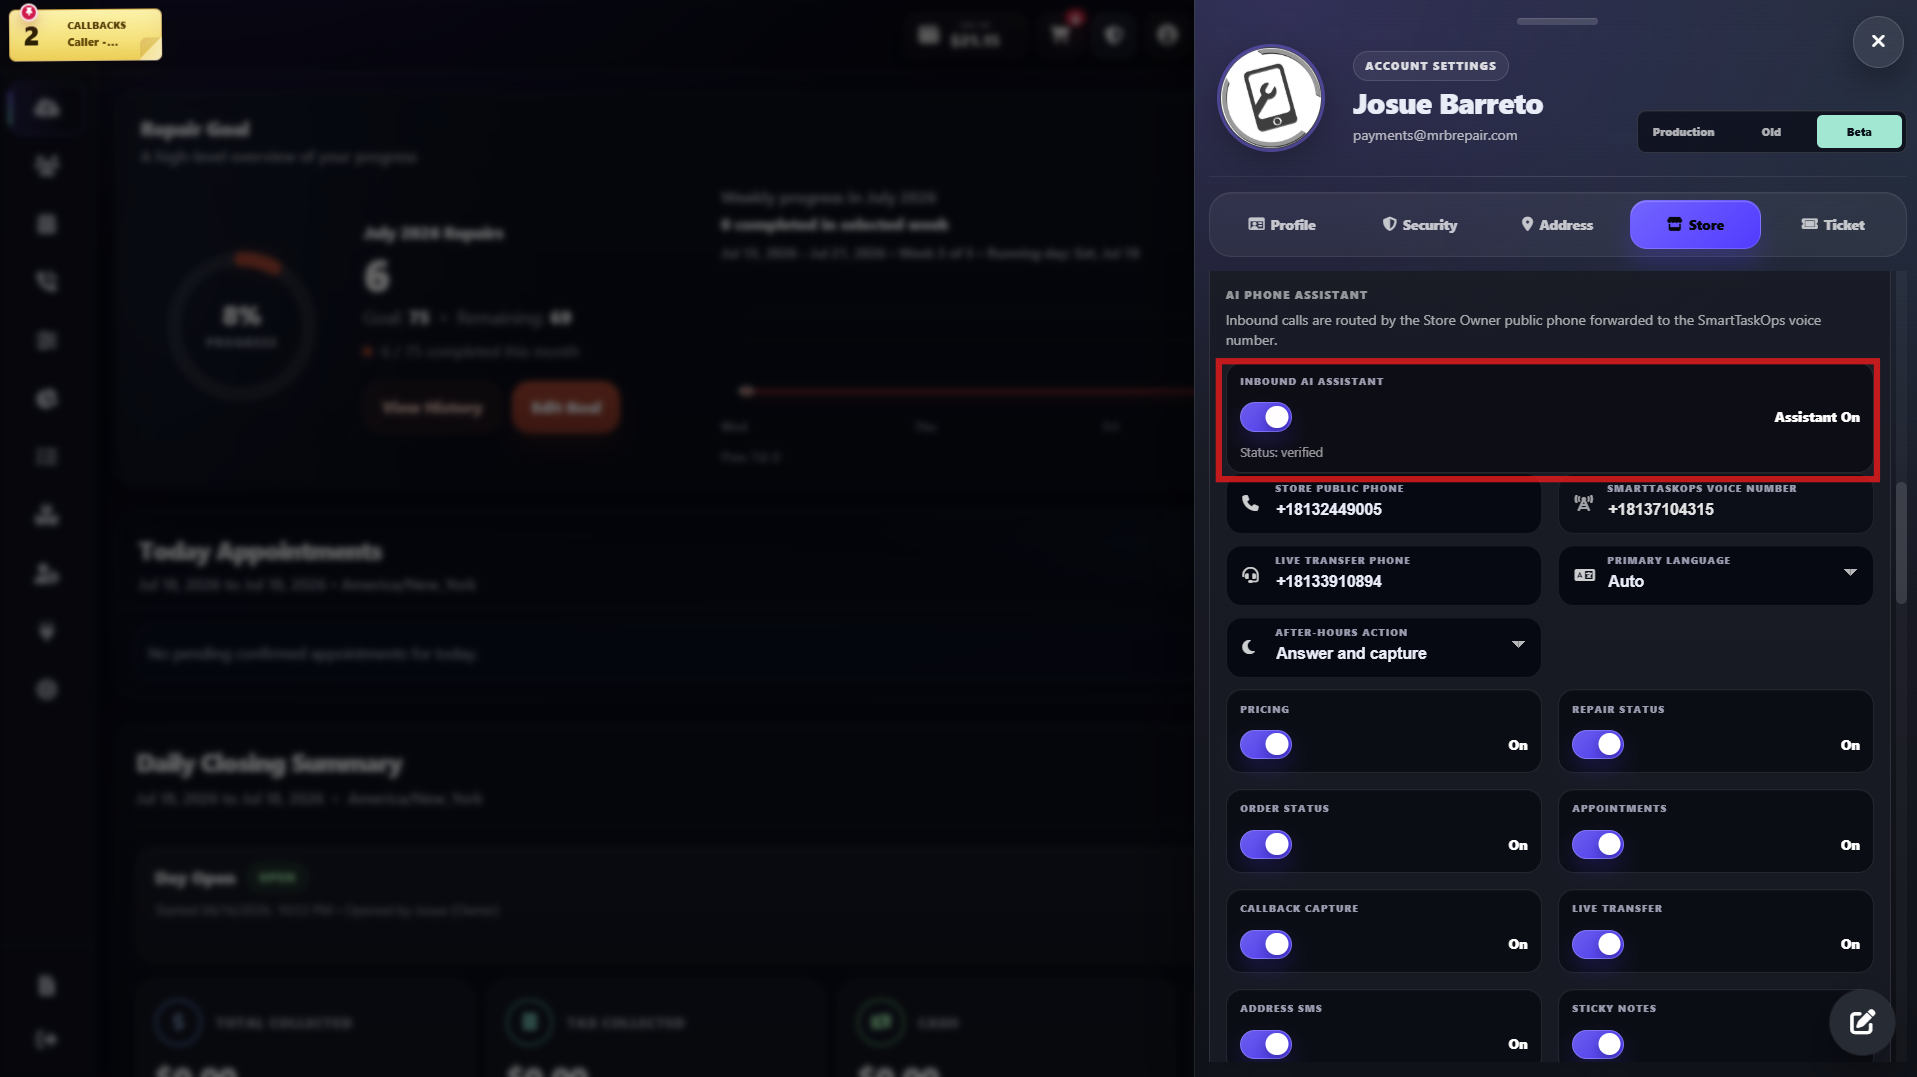
Turn on Inbound AI Assistant
- Switch Inbound AI Assistant on. The toggle should show Assistant On.
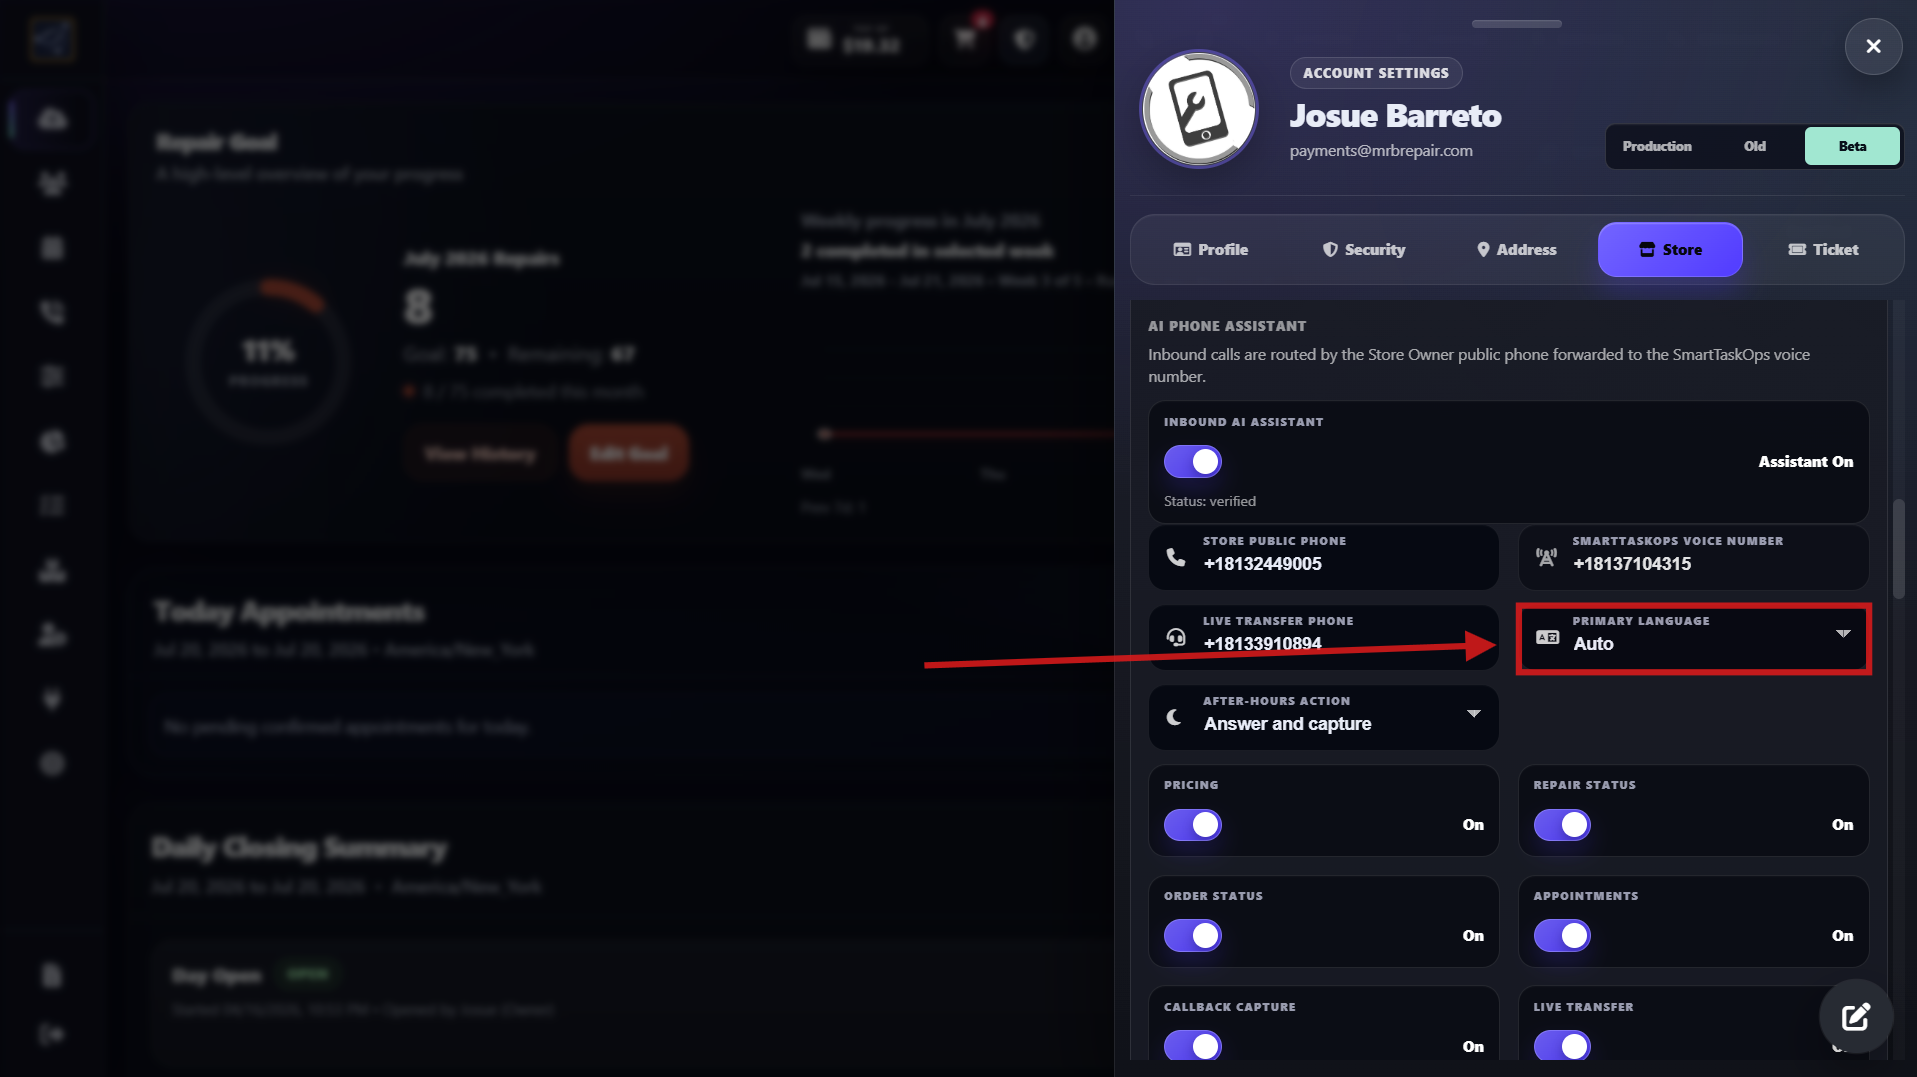
- Set Primary language to Auto for bilingual mode. Aurion detects whether the caller speaks English or Spanish and switches automatically during the conversation.
- To keep calls in one language, select English or Spanish. Aurion will use only the option selected by the store.
- Choose the After-hours action, such as Answer and capture, for calls received outside business hours.
Step 4
Enable customer answer tools
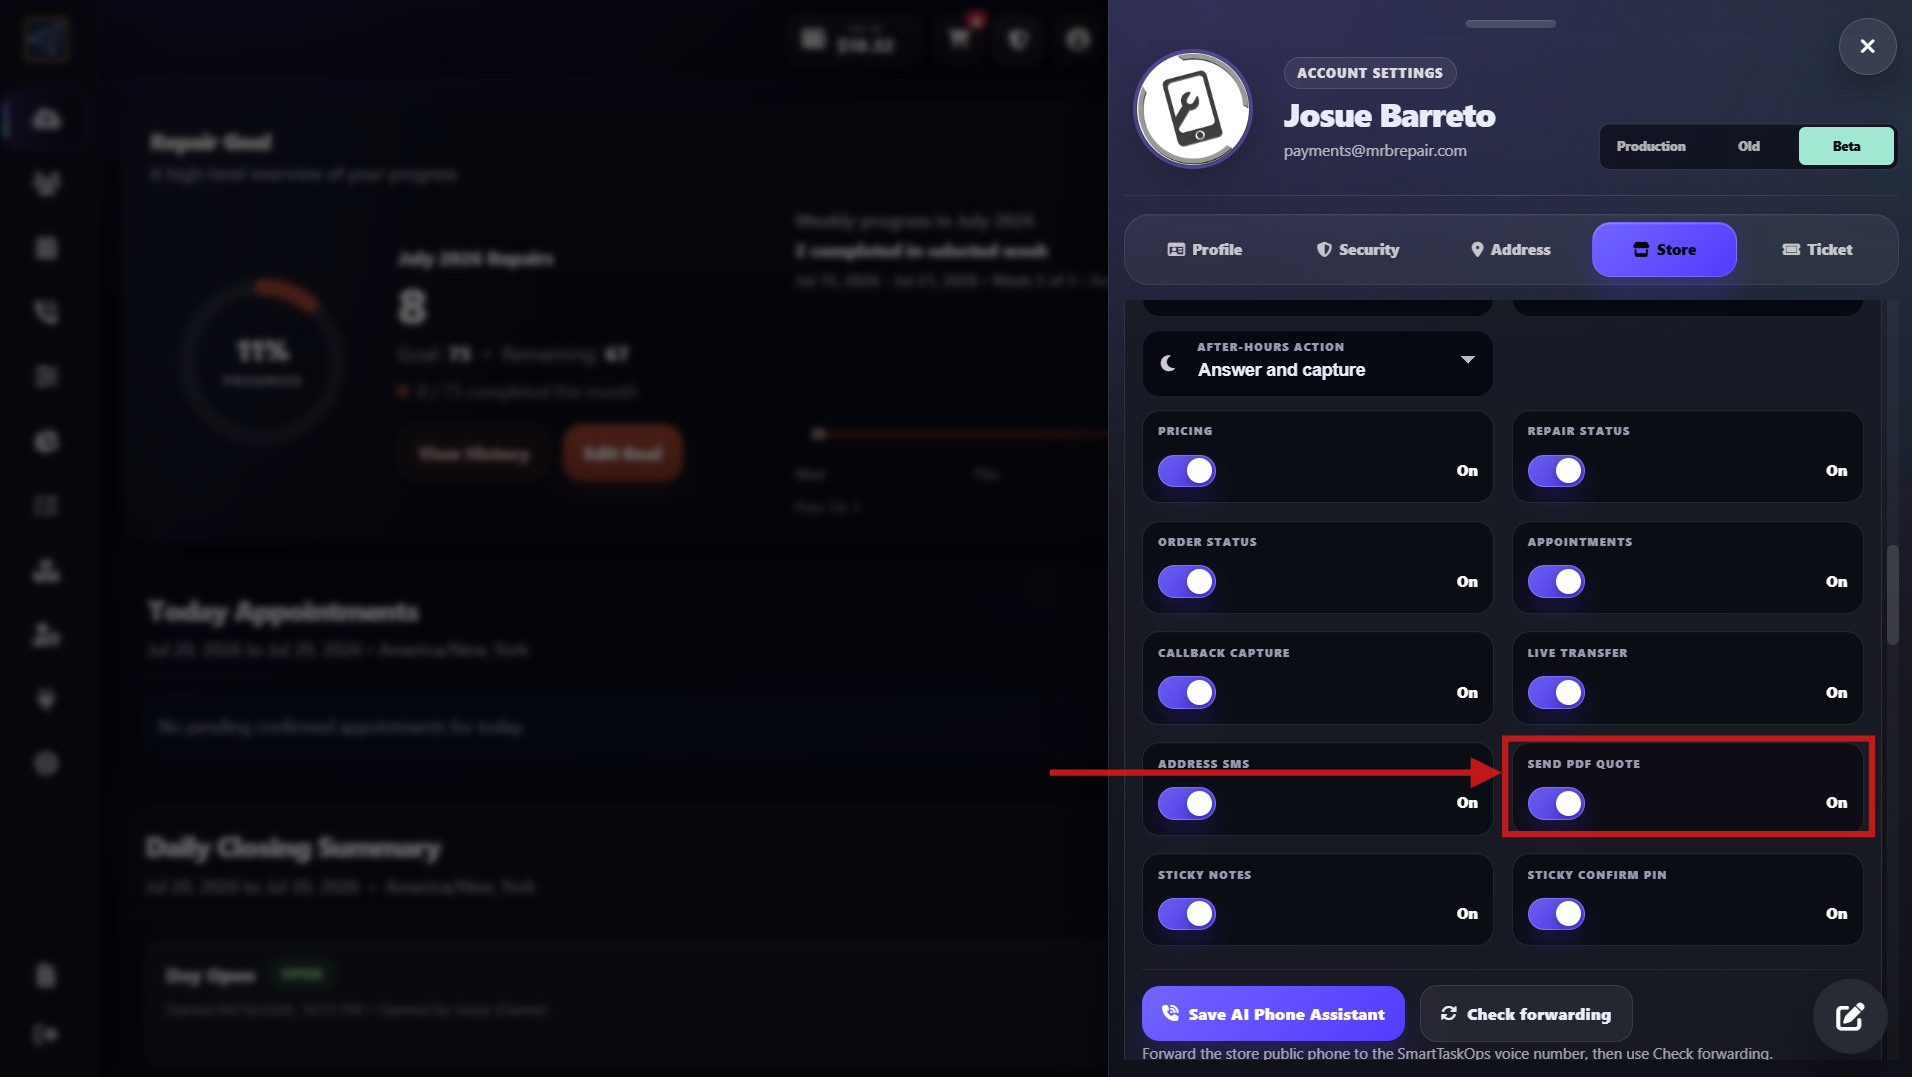
- Turn on Pricing, Repair status, Order status, Appointments, and Address SMS.
- With these on, Aurion can give repair prices, check ticket/order status, help with appointments, and text the store address.
- Turn on Send PDF Quote. After Aurion gives a repair or service price during the call, it can create a draft order for that customer.
- The draft includes the quoted price and the sales tax configured for the store. Aurion generates a PDF quote and sends it to the customer by SMS so staff can review the draft before completing the sale.
Step 5
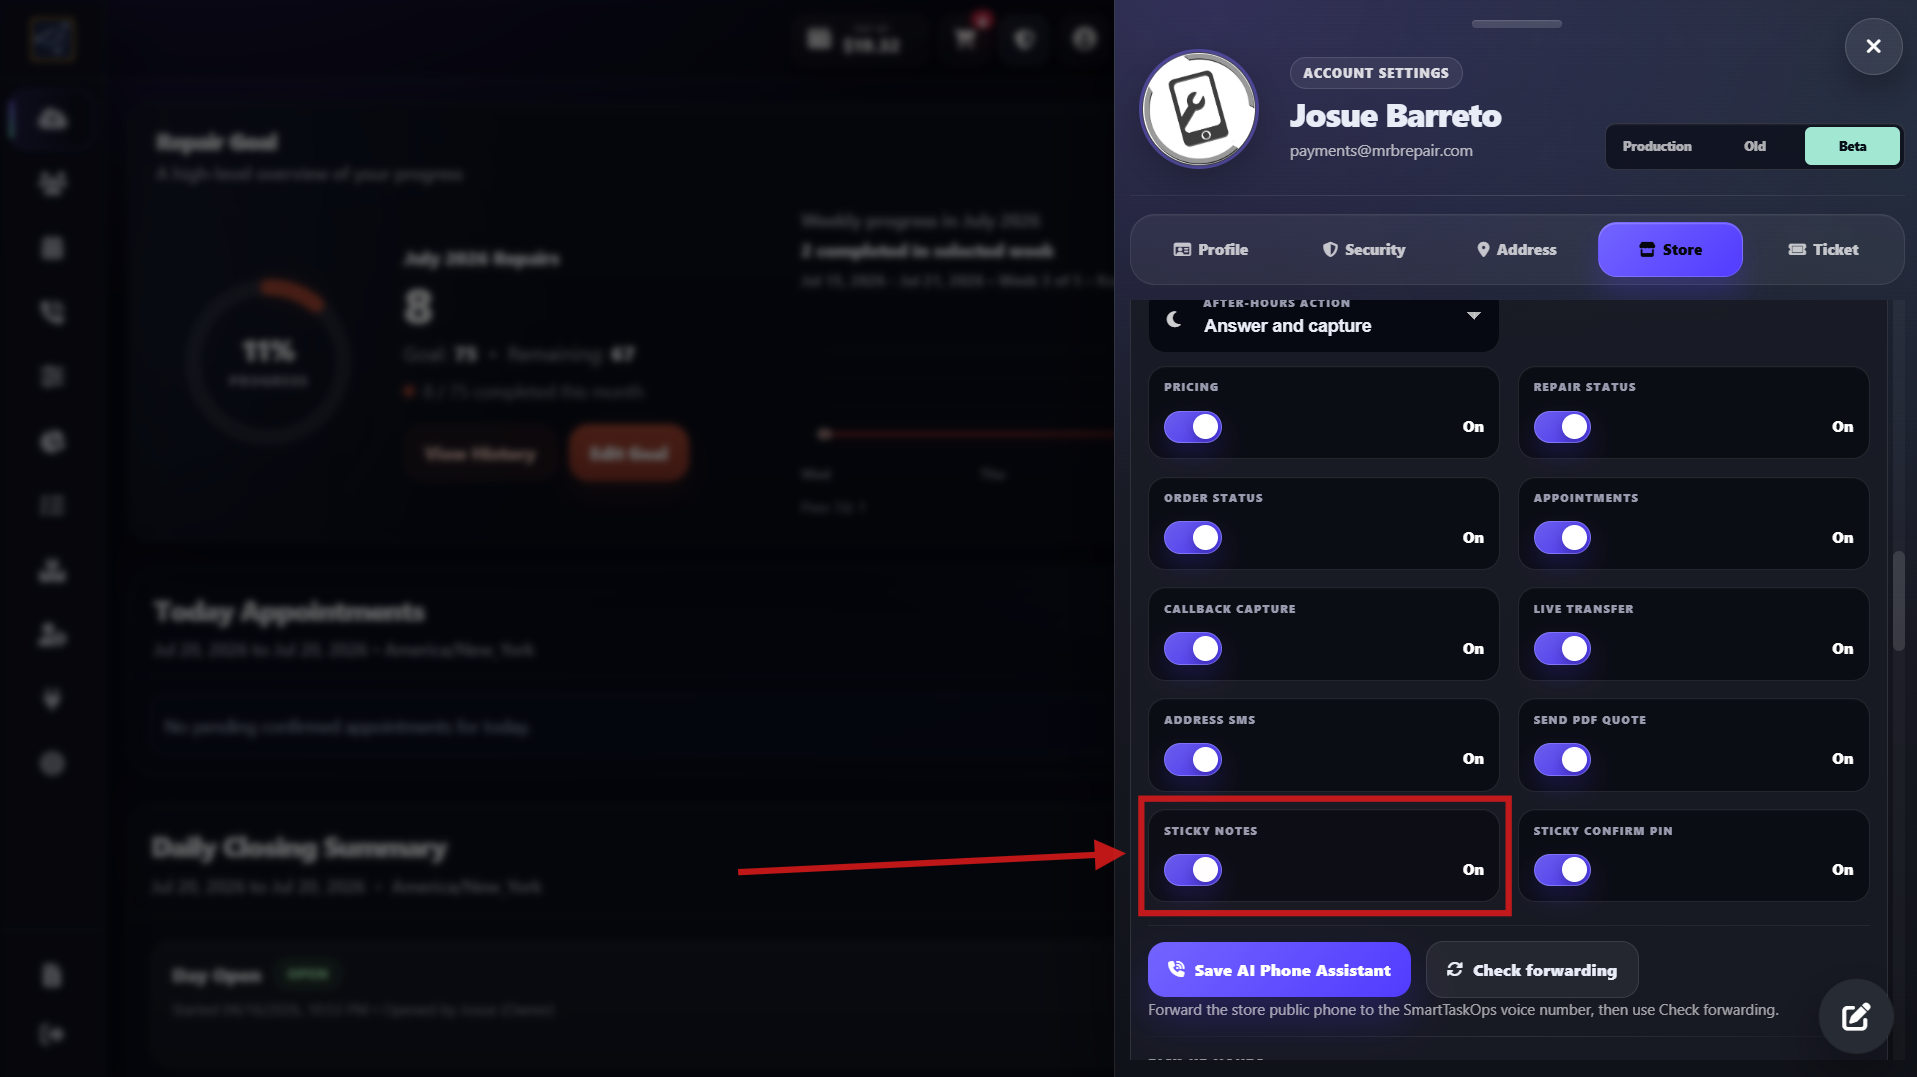
Enable transfer, callbacks, and notes
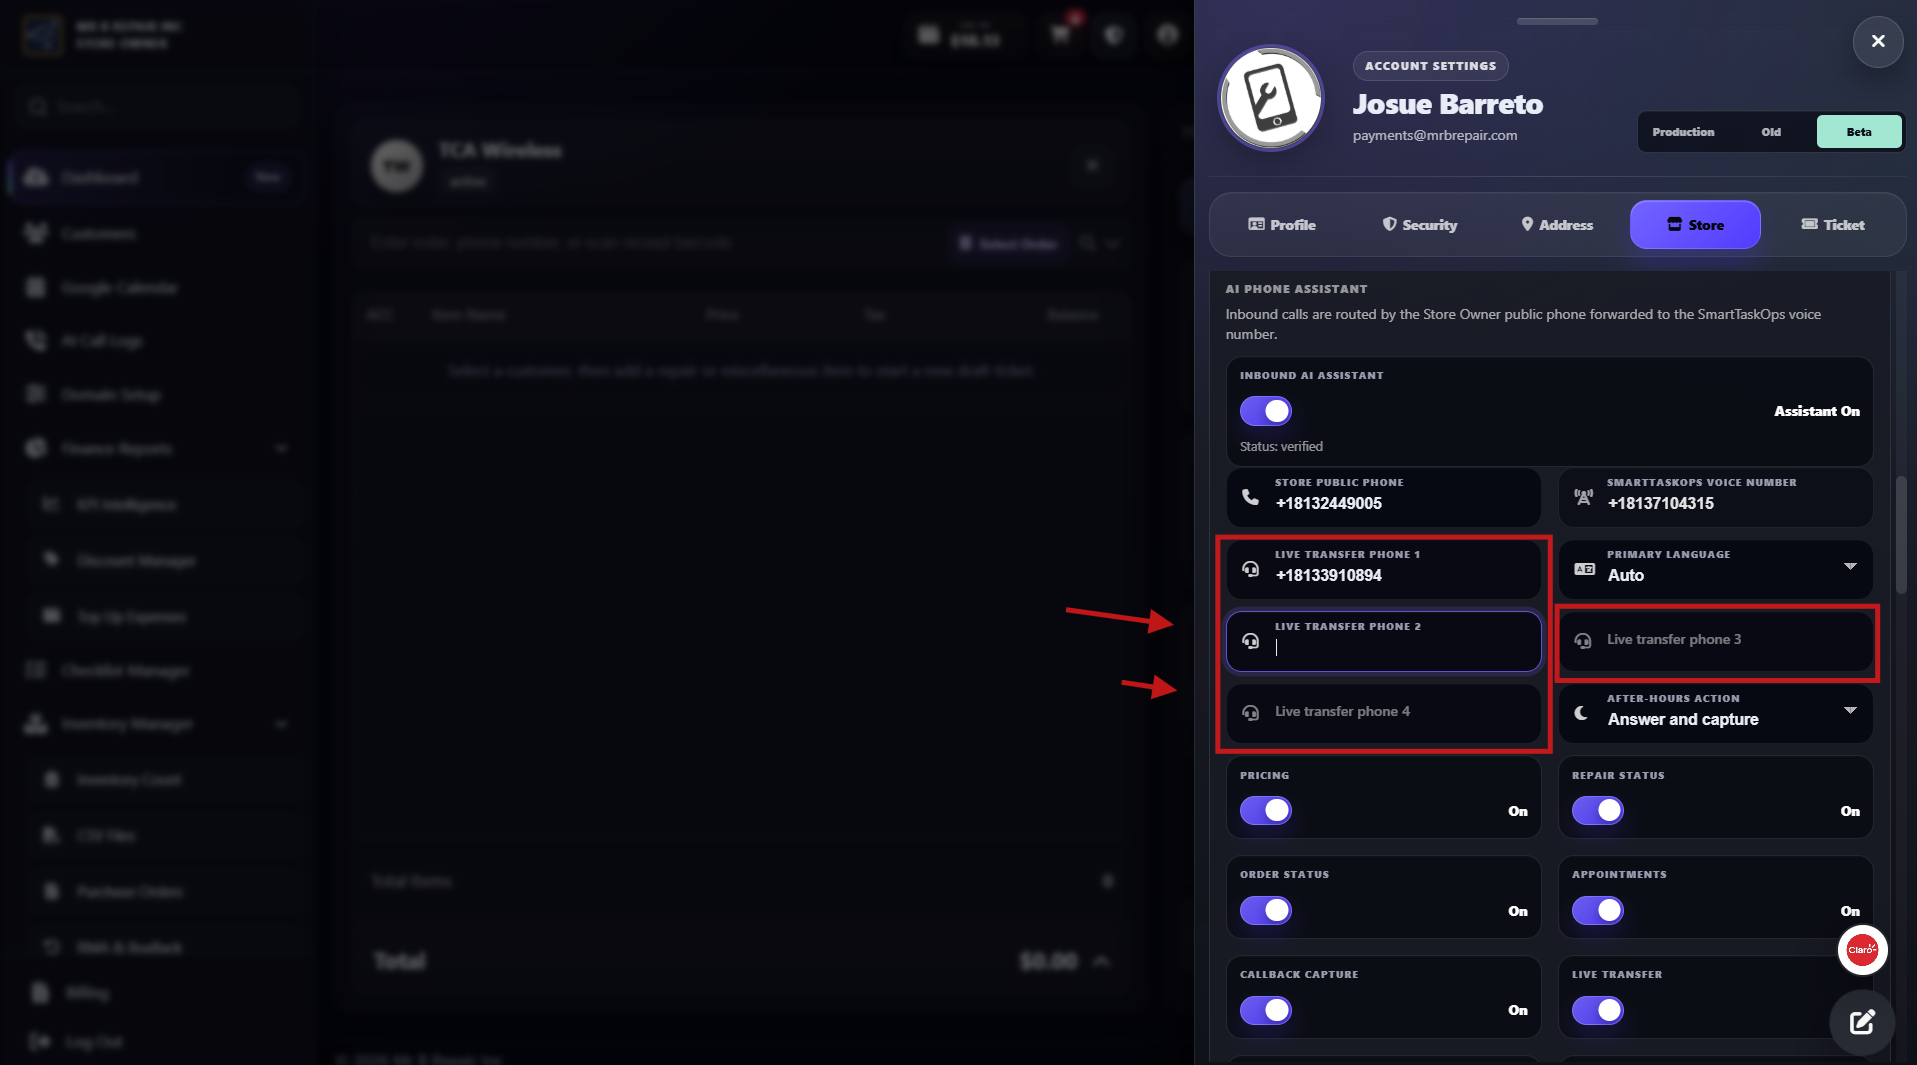
- Turn on Callback capture, Live transfer, Sticky notes, and Sticky confirm PIN.
- Add up to four different direct Live transfer phone numbers for the people or teams who can answer customer transfers.
- When a caller asks to speak with the store, Aurion tries the numbers one by one in the configured order until someone answers. Use only direct representative or team numbers. Never use the store public phone forwarded to SmartTaskOps, because it can create a call loop.
- If none of the four numbers answers, Aurion captures the caller information and attaches a sticky note that stays pending until the callback is resolved. With Sticky confirm PIN on, the employee enters a PIN when completing the callback so the record identifies exactly who handled it. SmartTaskOps keeps the call details and recordings, including the transferred conversation between the store and customer, as part of the complete call history.
Step 6
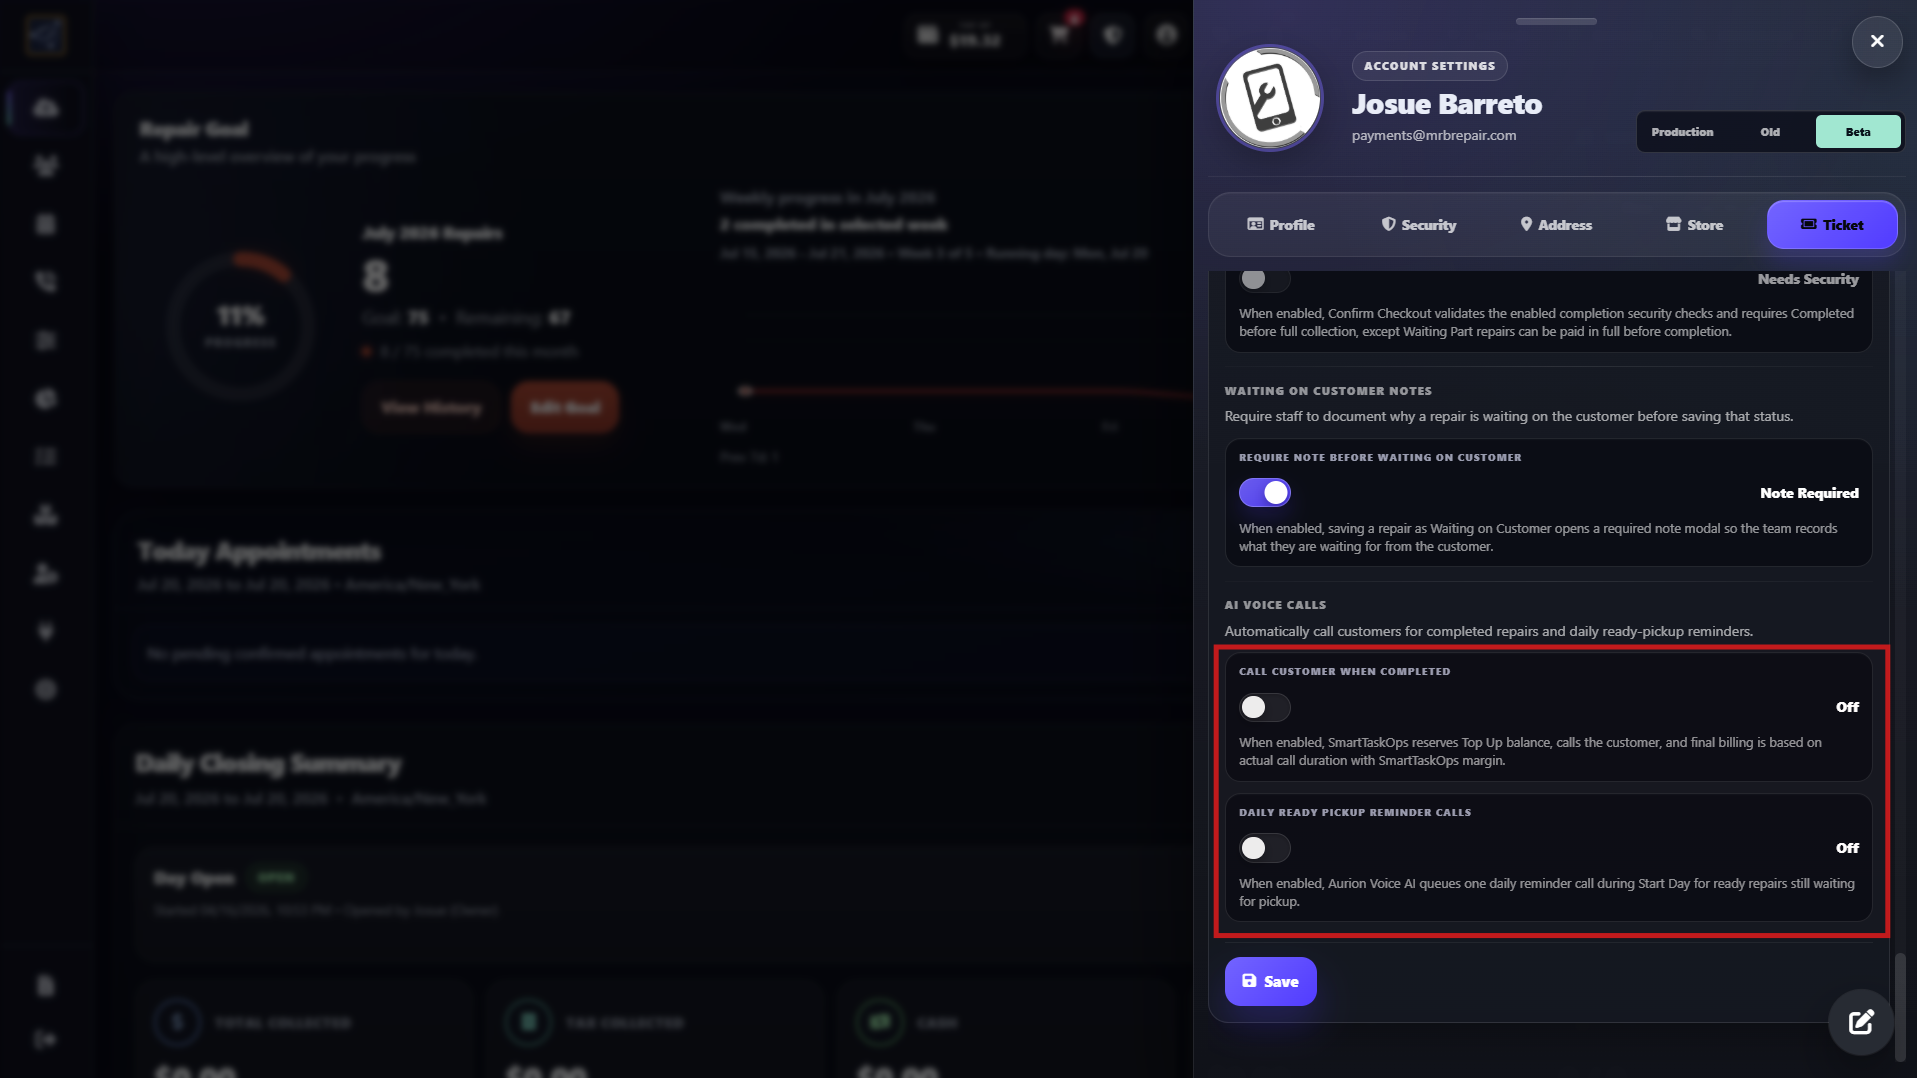
Turn on repair-ready calls
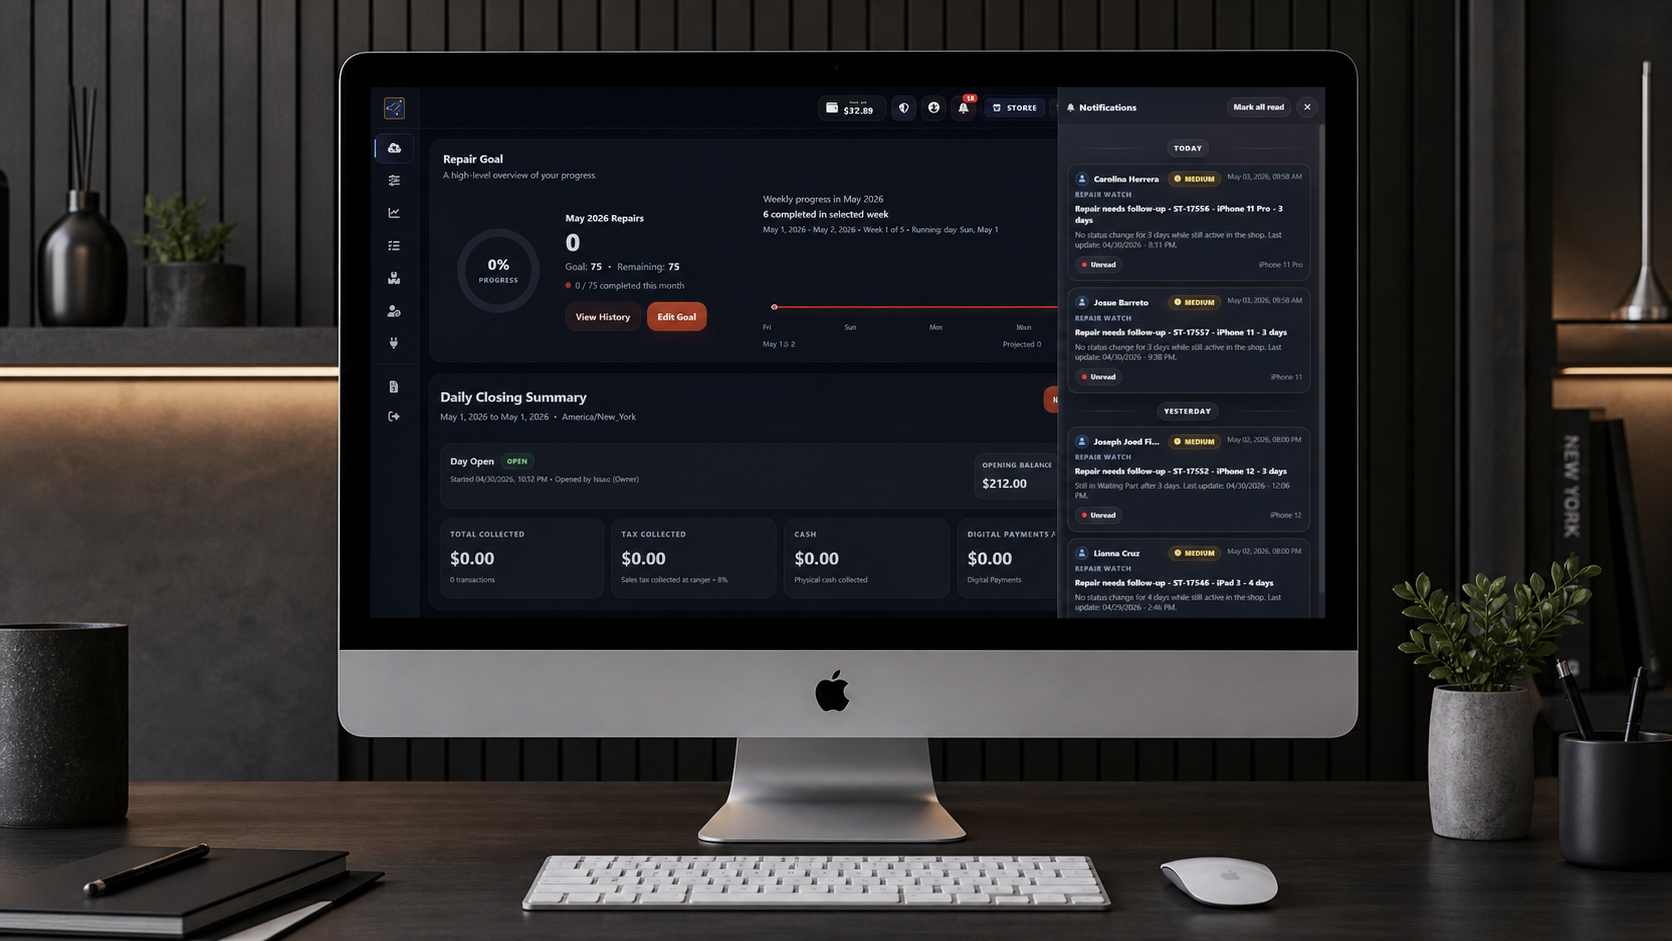
- In Ticket settings, turn on Call Customer When Completed and Daily Ready Pickup Reminder Calls, then save. Aurion can call when a repair is completed and remind customers whose ready devices are still waiting for pickup.
- The daily reminder is not triggered by the clock alone. Staff must complete the morning Cash In / Start Day from Daily Closing Summary. If nobody opens the day, no reminder calls are queued, preventing customers from arriving while the store is unattended.
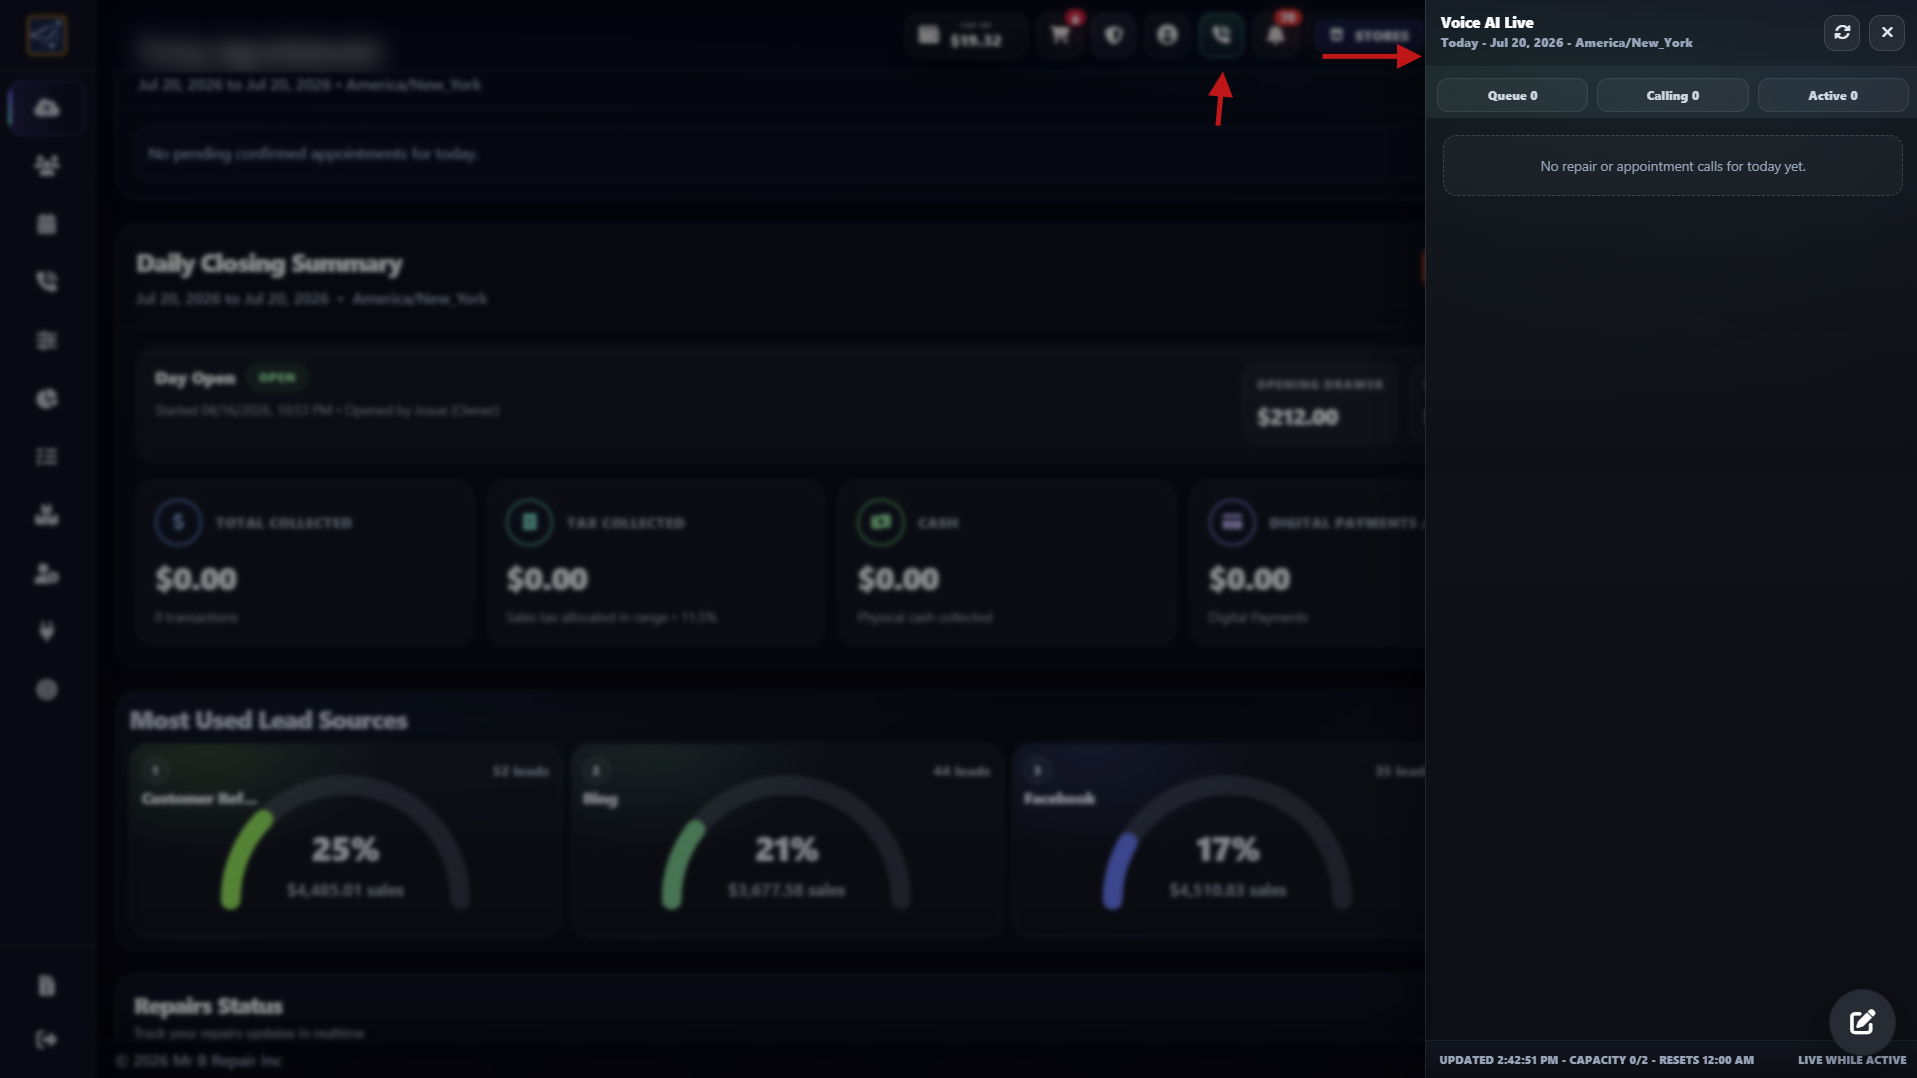
- That morning action loads eligible ready repairs into Voice AI Live. Aurion dispatches the calls from the queue, and staff can follow Queue, Calling, Active, and each result in real time. If a customer does not answer, Aurion can leave a voicemail.
- One action can contact 20 ready-repair customers while an employee continues helping the front desk, reducing time spent making calls and keeping devices waiting for pickup to a minimum. SmartTaskOps also sends webhook events for external workflows such as HighLevel.
Step 7
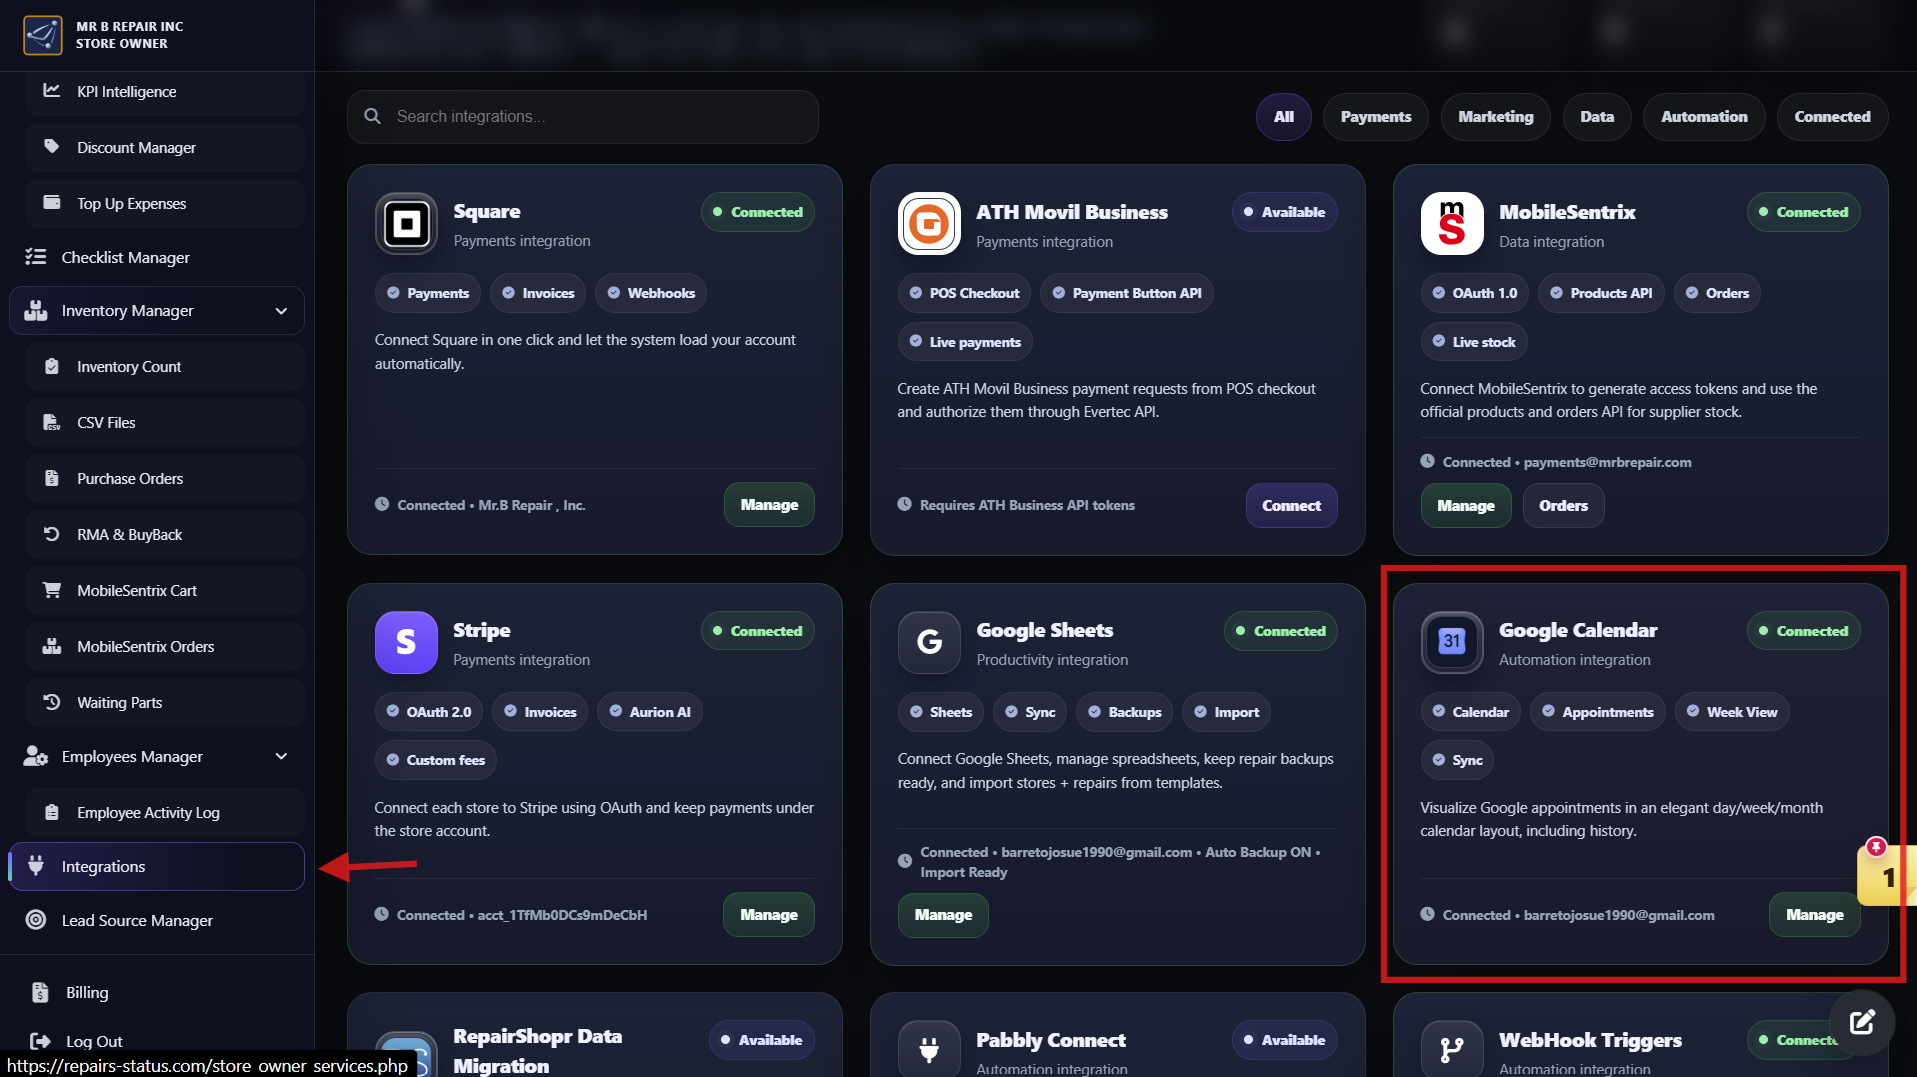
Turn on appointment reminder calls
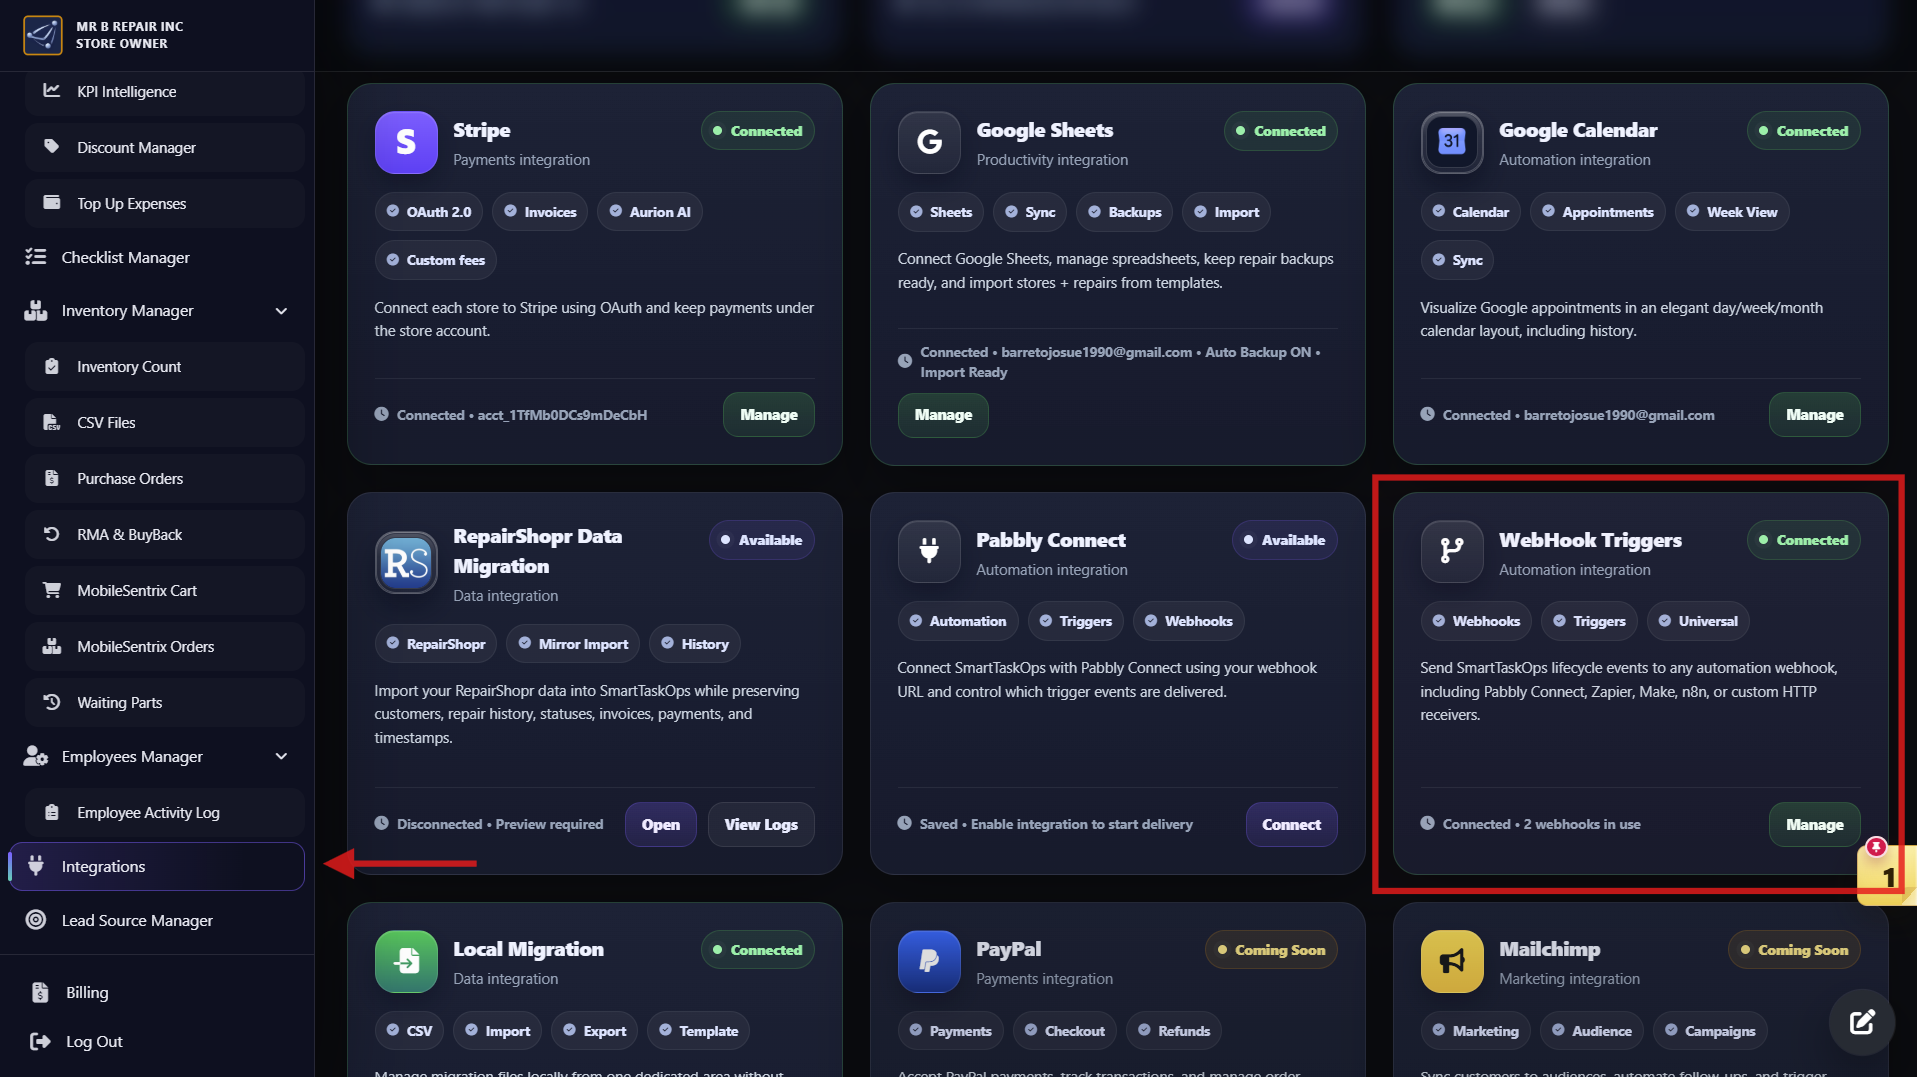
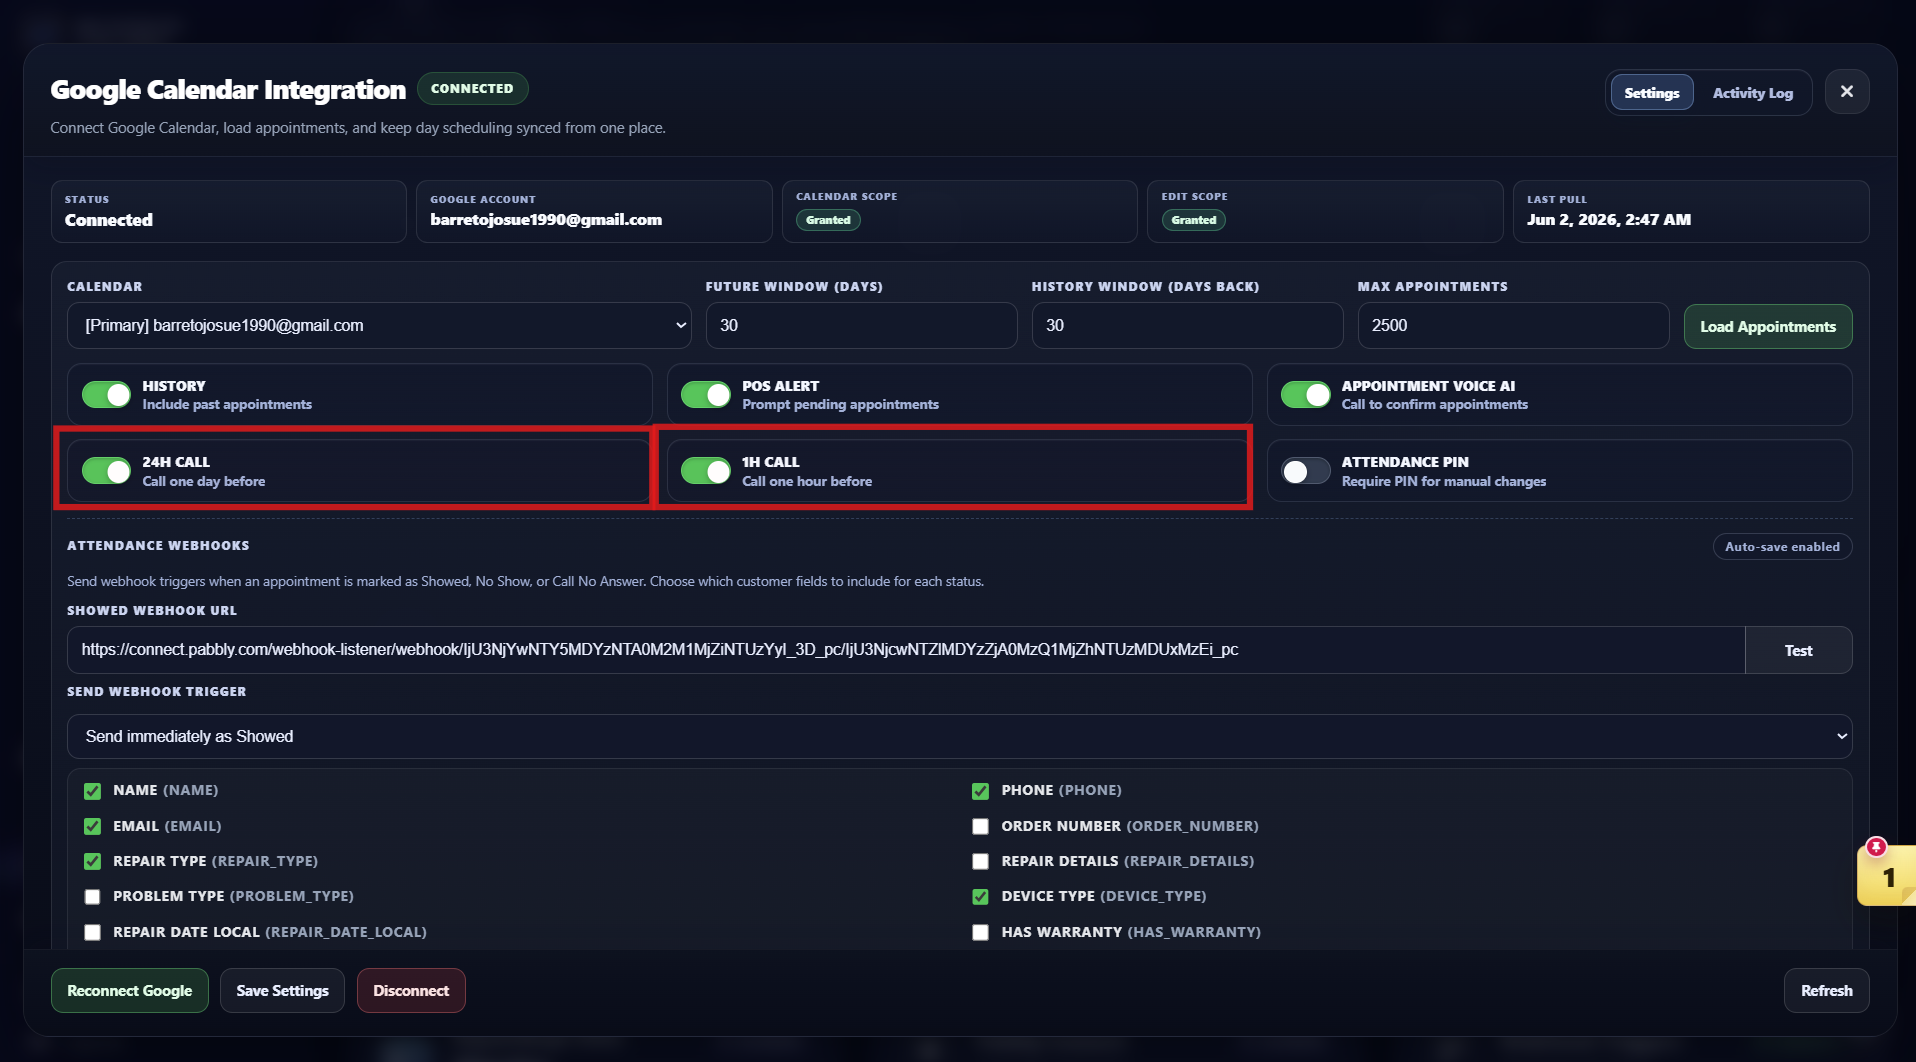
- Open the left sidebar, select Integrations, find Google Calendar, and connect it or confirm it shows Connected.
- Press Manage, select the calendar that contains the store appointments, press Load Appointments, and confirm the appointments are synchronized.
- Turn on 24H CALL so Aurion calls the customer 24 hours (one day) before the appointment.
- Turn on 1H CALL so Aurion calls again one hour before the appointment, then press Save Settings.
- Keep both toggles on. Aurion uses the customer phone saved with the appointment; if the customer does not answer, it can leave a voicemail according to the store settings.
Step 8
Save and test Aurion
- Press Save AI Phone Assistant, wait for the success message, and confirm the assistant still shows On.
- Place a test call to the store public phone, ask for pricing, address, repair status, or an appointment, then review the result in AI Call Logs.
Step 9
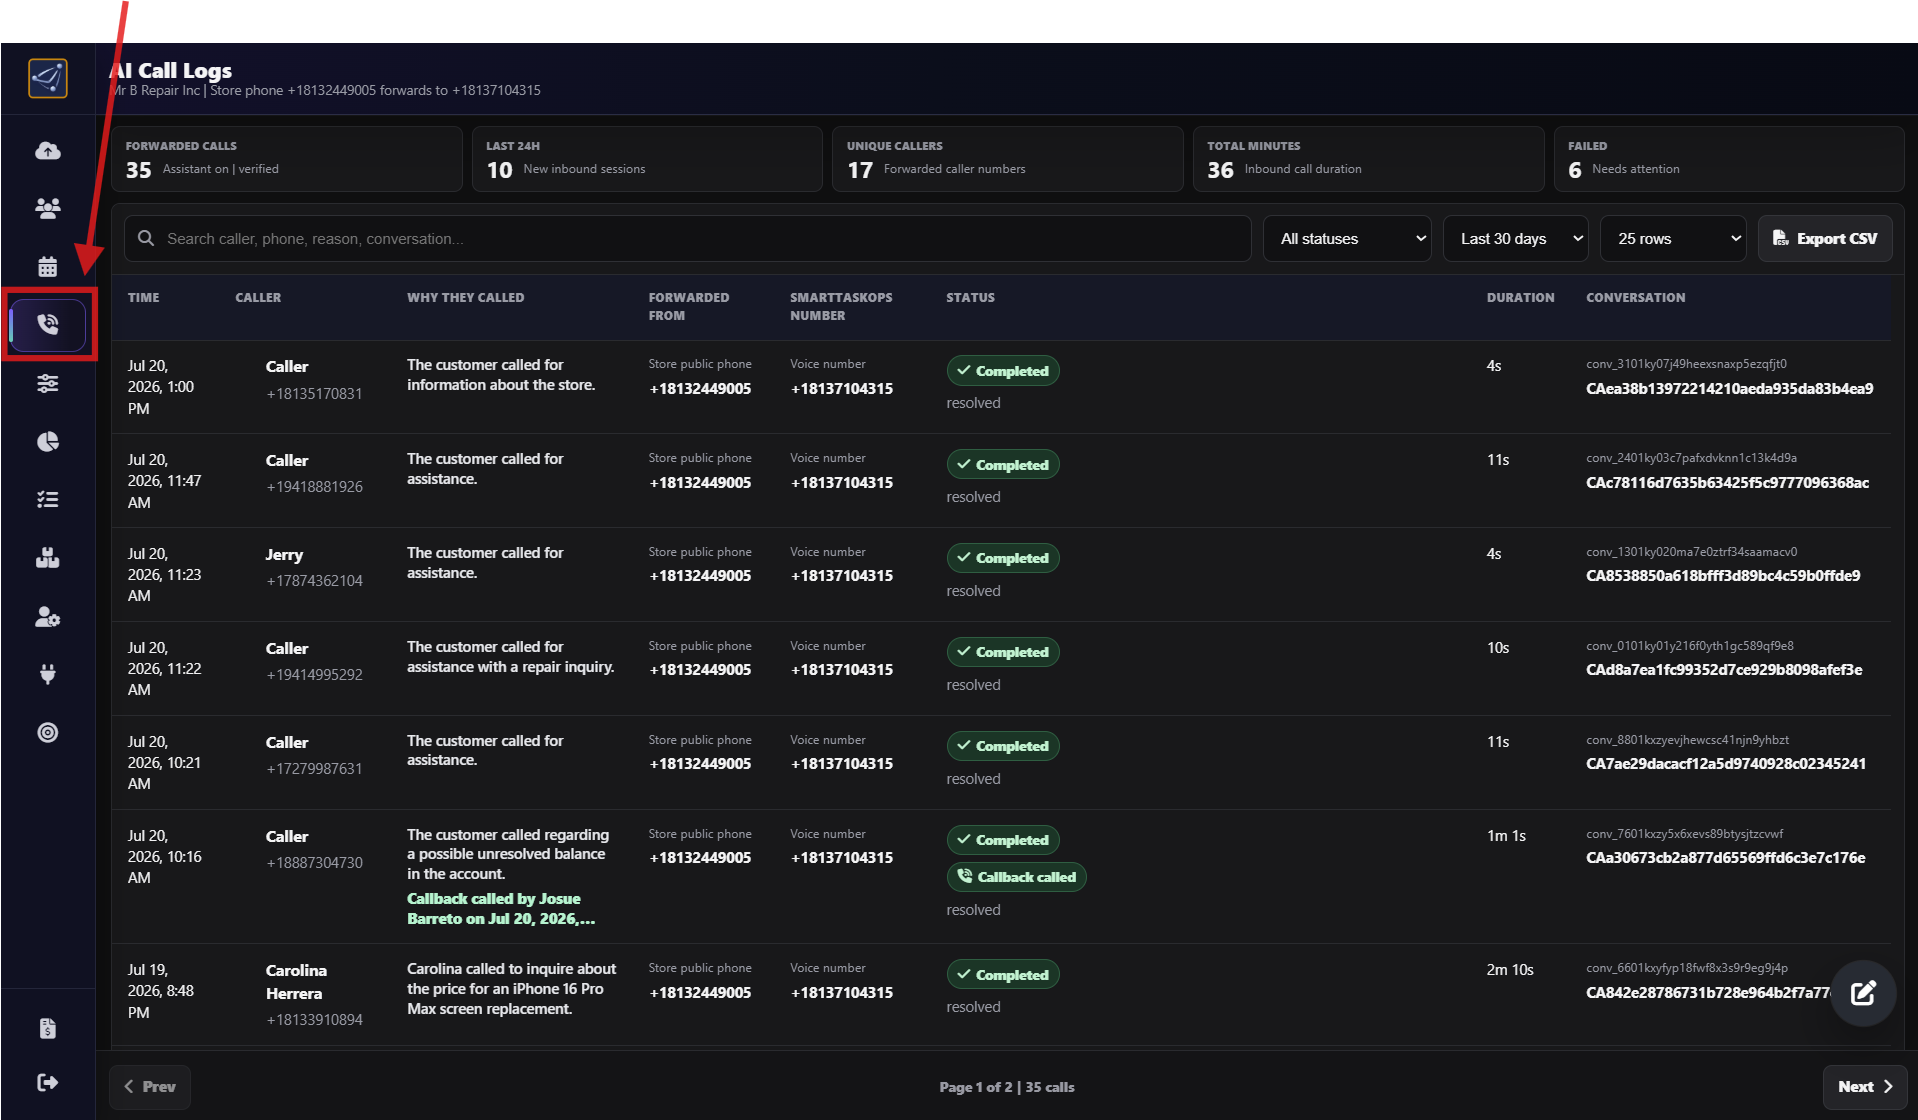
Review AI Call Logs
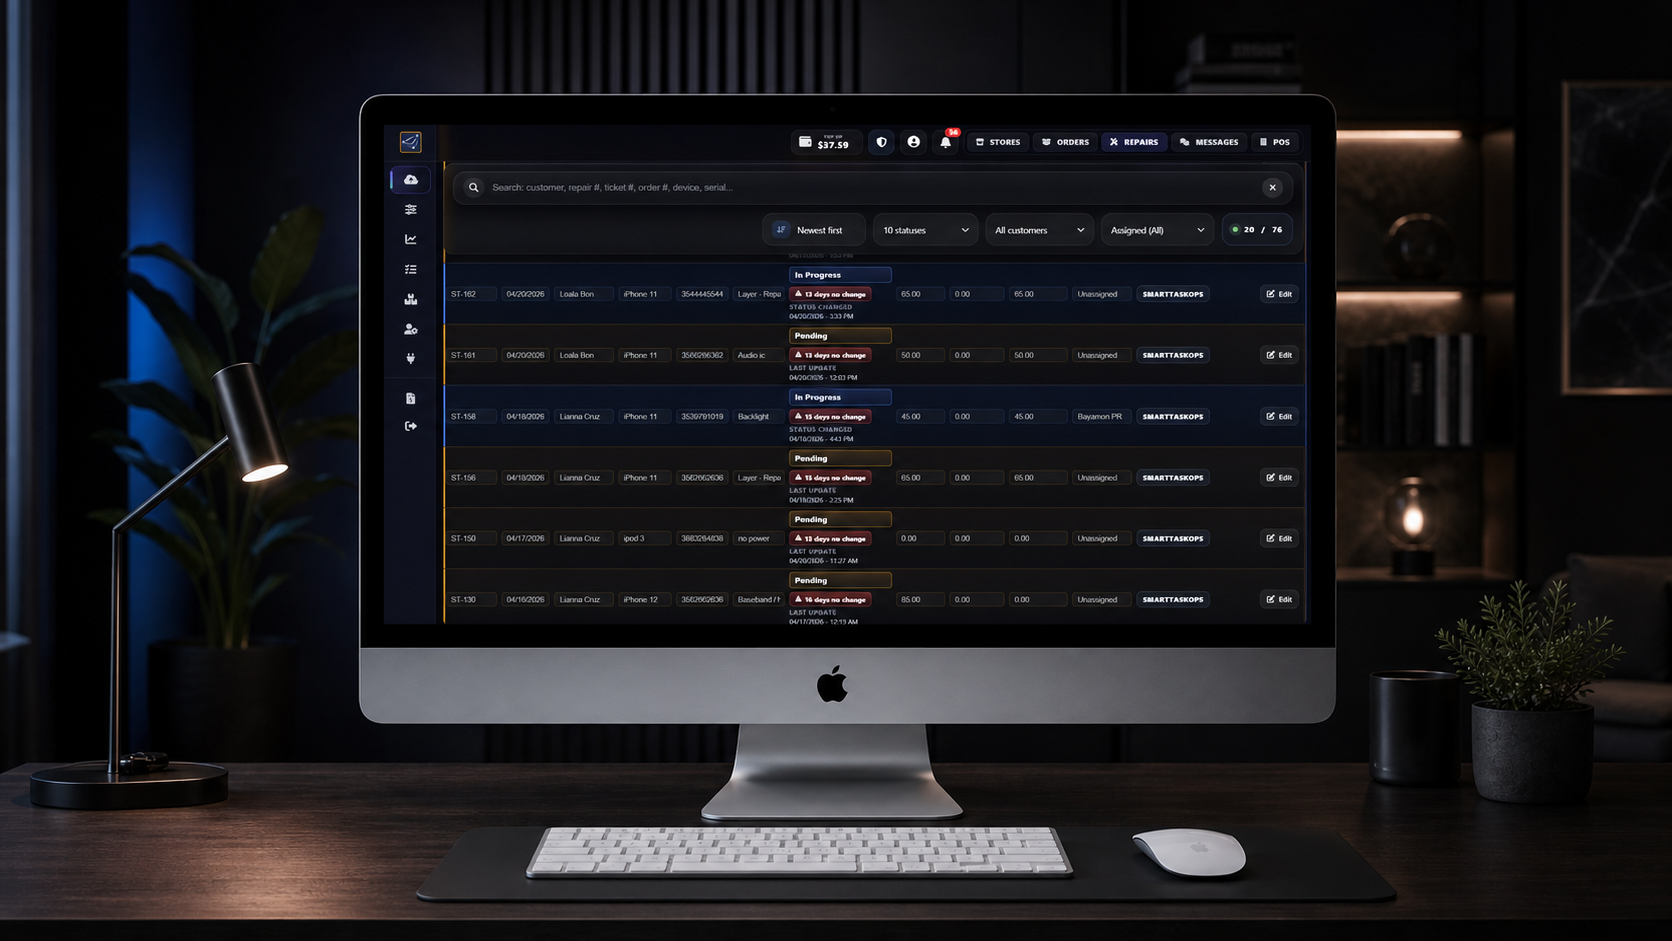
- Open AI Call Logs from the phone icon and select a call. The list shows the date, caller, reason, forwarded and SmartTaskOps numbers, status, duration, and callback result.
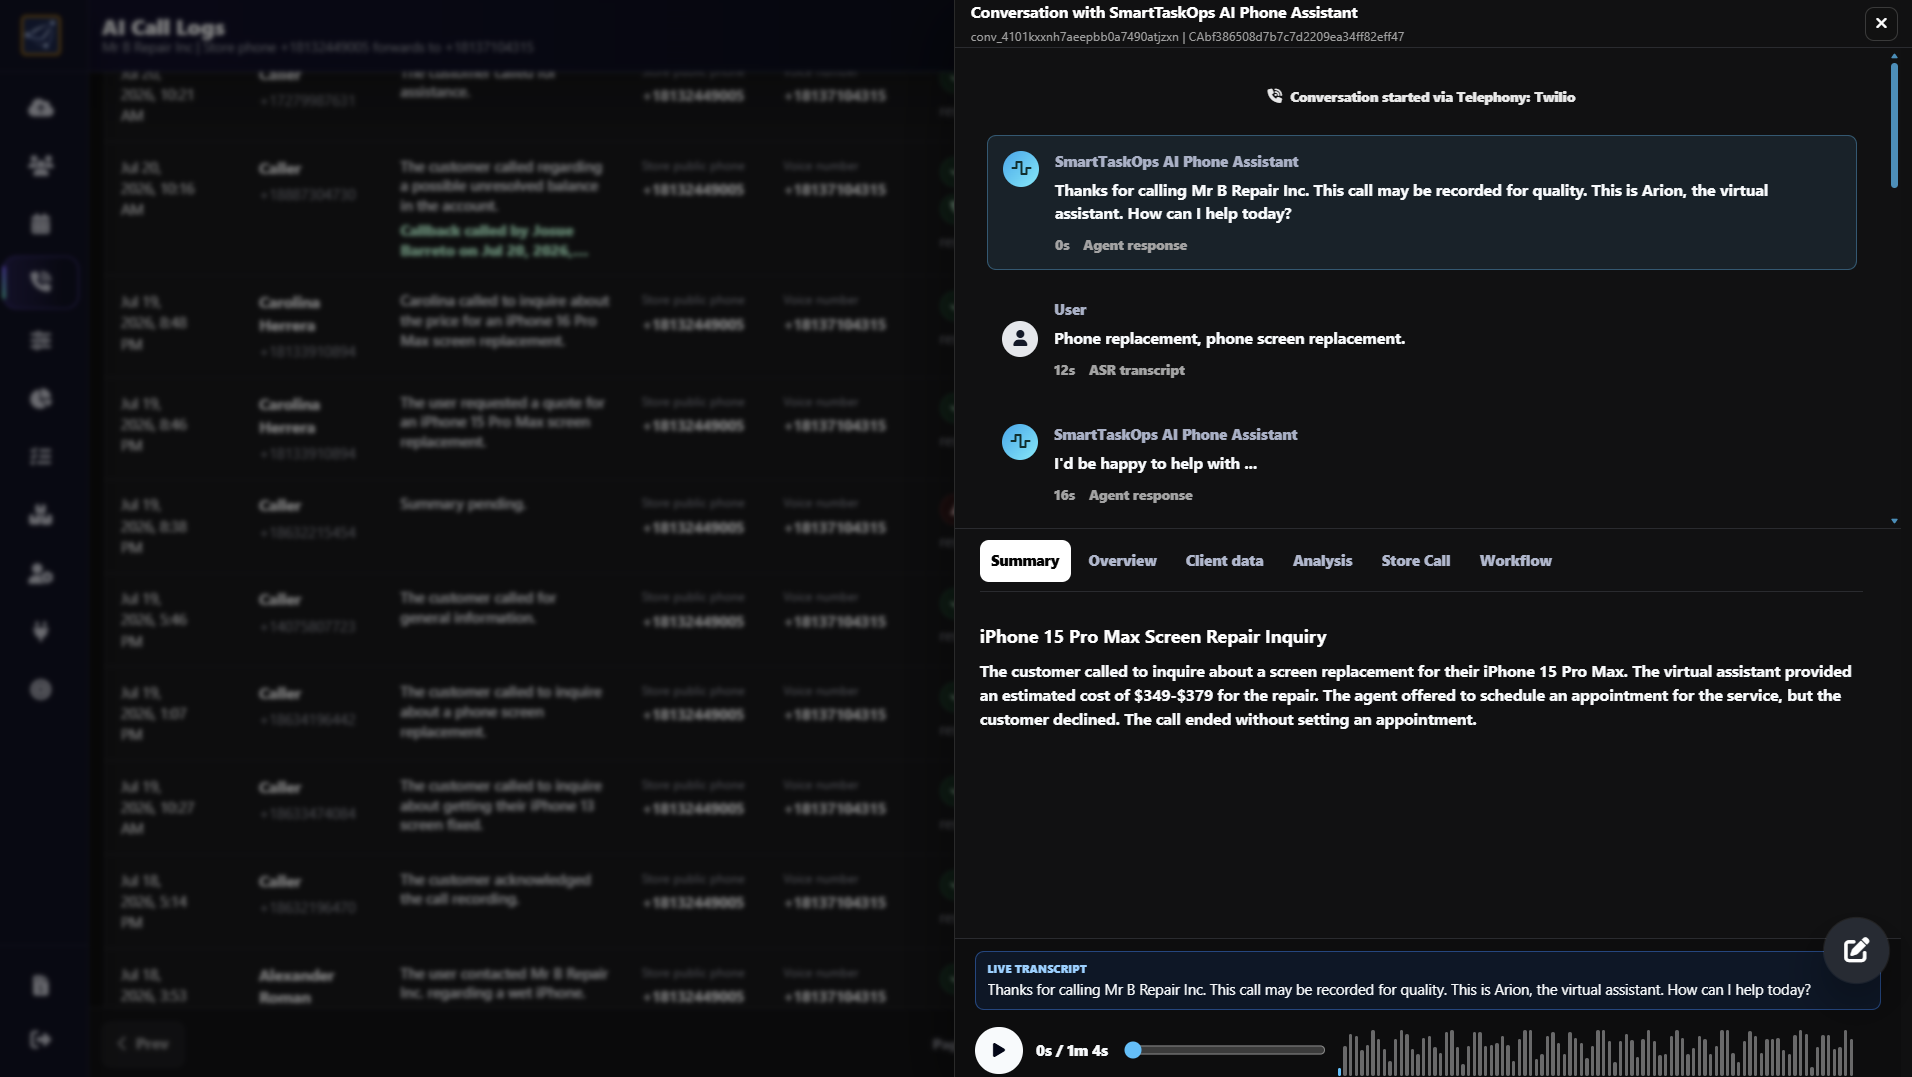
- Open the conversation to review the complete transcript from Aurion, the customer, and the store representative when a call is transferred.
- Use Summary, Overview, Client data, Analysis, Store Call, and Workflow to review the AI summary, customer details, actions, and store conversation.
- Use the player at the bottom to listen to the complete recording, verify exactly what was said, and keep a reliable record of the customer call.
Step 10
Watch Aurion price a repair
- This real call shows a customer asking Aurion for the price of an iPhone 15 Pro Max screen replacement.
- Aurion understands the repair request, finds the price configured by the store, and gives the quote during the conversation.
Step 11
Connect Aurion webhooks
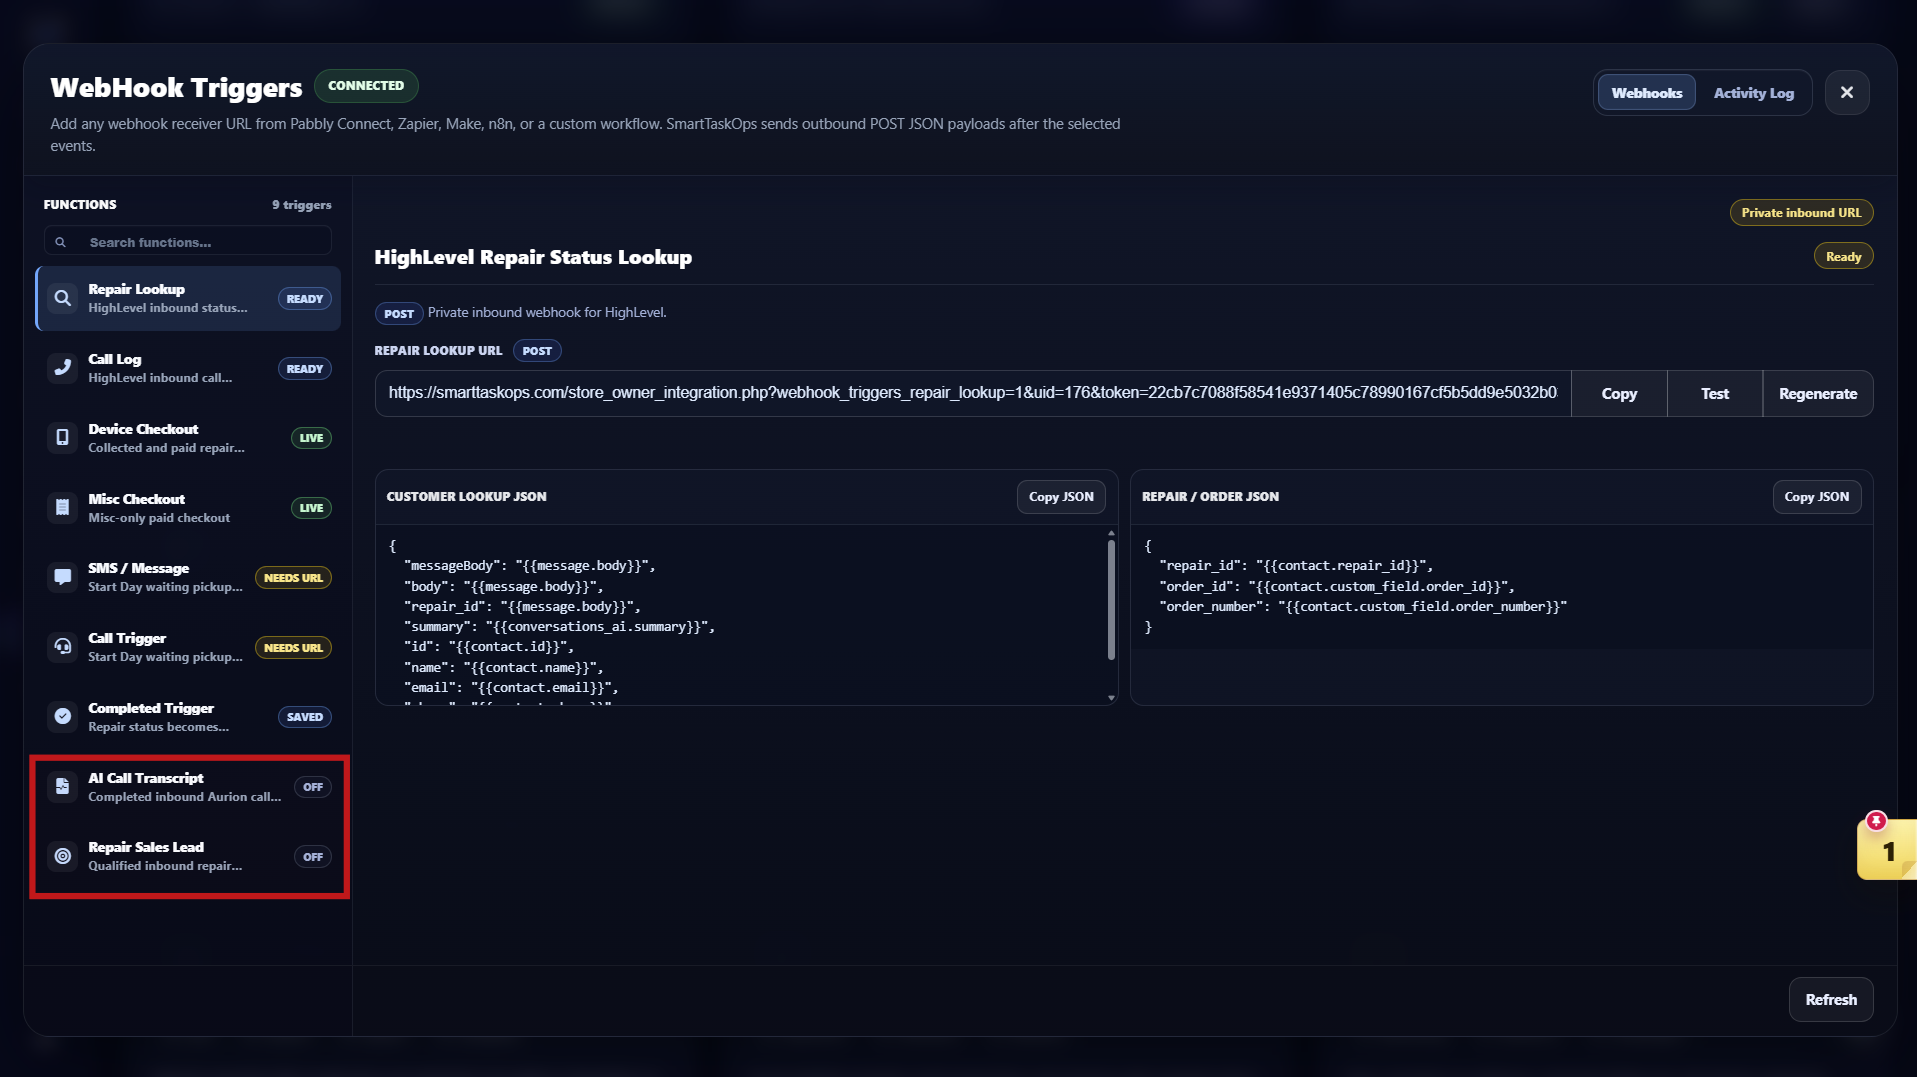
- Open the left sidebar, select Integrations, find Webhook Triggers, then press Manage.
- AI Call Transcript: sends the call transcript and customer information to your connected workflow.
- Repair Sales Lead: fires when a customer asks Aurion for a repair price and sends the customer information, transcript, device, problem, and quoted price.
- Use this data for immediate sales follow-up and help convert the quote into a booked repair.
- Open each trigger, paste the receiver URL from HighLevel, Pabbly Connect, Zapier, Make, n8n, or another compatible platform, then enable and save it.